Setting up your artificial Christmas tree can feel tricky if you’re not sure where to start. But imagine having a perfect, full tree ready in no time, without the stress or mess.
You’re just a few simple steps away from creating that festive centerpiece for your home. In this guide, you’ll discover easy, clear instructions to put your tree together quickly and confidently. Keep reading, and by the end, you’ll have a beautiful tree that brings holiday magic to your space.
Credit: www.trinitychristmas.in
Choosing The Right Tree
Choosing the right artificial Christmas tree sets the tone for your holiday decor. A perfect tree fits your space, style, and budget. It also makes assembly easier and more enjoyable. Understanding the options helps you pick a tree that feels just right.
Types Of Artificial Trees
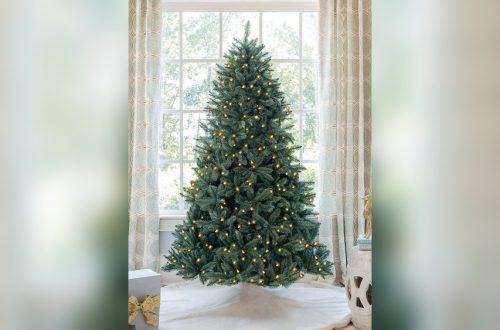
There are many types of artificial Christmas trees. Traditional green trees mimic real pine or fir trees. Some trees have white or frosted tips for a snowy look. Others feature colored lights built into the branches. Choose a style that matches your holiday vision.
Size And Shape Options
Artificial trees come in many sizes and shapes. Tall trees suit large rooms or high ceilings. Smaller trees fit tight spaces or tables. Shapes vary from full and bushy to slim and narrow. Pick a size and shape that fits your room perfectly.
Material Differences
Materials affect the tree’s look and feel. PVC trees have soft, flat needles and are affordable. PE trees use molded tips for a more realistic appearance. Some trees combine both materials for a fuller look. Consider materials to find a tree that looks natural and lasts long.
Preparing Your Space
Preparing your space is the first step to a smooth artificial Christmas tree setup. A well-organized area helps avoid frustration and makes the process faster. It also keeps your tree safe and stable during assembly. Take time to prepare before unpacking the tree.
Selecting A Location
Choose a spot with enough room for the tree’s height and width. Avoid areas near heaters or vents to keep the tree fresh longer. Pick a place visible to your guests and family. The tree should not block doors or pathways.
Clearing The Area
Remove furniture and objects around the chosen spot. Clear space prevents accidents and gives you room to work. Sweep or vacuum the floor to avoid dirt on the tree. A clean surface helps the tree stand firmly.
Gathering Tools And Accessories
Collect all needed tools before starting. You may need scissors, gloves, or a ladder. Have the tree stand, lights, and decorations nearby. Keeping everything close saves time and effort.
Unpacking The Tree
Unpacking your artificial Christmas tree is the first step to a festive home. Taking your time now makes assembly easier. It also helps keep the tree in great shape for years. Start by finding a clean, open space to work on. This gives room to spread out all parts safely.
Checking Parts And Sections
Open the box carefully to avoid damage. Take out all pieces and lay them down. Check that every section is present. Usually, the tree has several parts: base, trunk, and branches. Look for any broken or bent pieces. Make sure the instructions are in the box. This helps you follow steps smoothly later.
Handling Branches Carefully
Handle each branch with care to avoid bending wires. Gently pull branches apart if they are packed tight. Avoid pulling too hard to stop damage. Fluff the tips lightly to make the tree look full. Do this before attaching branches to the trunk. Keep branches soft and natural-looking for a better tree.

Credit: www.webechristmas.com
Assembling The Base
Assembling the base is the first step to setting up your artificial Christmas tree. A strong base keeps the tree upright and safe. Proper assembly stops the tree from tipping over. This part needs focus and care for a solid foundation.
Securing The Stand
Start by unpacking the stand parts carefully. Place the stand on a flat surface. Insert the tree trunk into the center hole of the stand. Tighten all screws or bolts firmly to hold the trunk in place. Check that the trunk feels secure and does not wobble. A tight fit prevents any movement later.
Ensuring Stability
Look at the base after securing the stand. Make sure all legs or supports are fully spread out. This spreads the tree’s weight evenly. Press down gently on the base to test stability. Adjust the legs or screws if the tree feels loose. Stability helps keep your tree safe during the holiday season.
Connecting Tree Sections
Connecting the sections of your artificial Christmas tree is a key step to getting it ready. Each part fits together to form a full, beautiful tree. Taking time to connect the pieces correctly helps the tree stand firm and look great. Follow clear steps to join the parts safely and easily.
Aligning And Locking Parts
Start with the tree base and work upward. Each section has a metal or plastic pole. Line up these poles carefully. The poles should slide into each other without force. Push down gently until you hear a click or feel it lock. The lock keeps sections steady and prevents wobbling. Make sure each part is fully locked before adding the next.
Adjusting Height And Shape
After locking the sections, check the tree height. Some trees allow you to add or remove sections. Adjust height based on your room and preference. Next, shape the branches. Pull out branches evenly on all sides. Fluff the tips to make the tree look full. Adjust branches until the tree looks natural and balanced.
Fluffing The Branches
Fluffing the branches is the key step to make your artificial Christmas tree look lively and full. It changes a flat tree into a lush, natural-looking centerpiece. This process takes time but gives great results.
Each branch needs care. Fluffing helps separate the needles, giving the tree depth and volume. The goal is to avoid flat spots and bunches.
Separating Branch Tips
Start at the tips of each branch. Gently pull apart the needle clusters. Do this slowly to avoid breaking any parts. Spread the tips in different directions. This adds space and makes the branch look wider. Check the whole tree for tight spots. Fluff every tip for a balanced look.
Creating A Full Look
Work from the top down. Shape the branches so they do not point straight down. Bend them slightly upward and outward. This simulates natural tree growth. Fill in gaps by adjusting inner branches. Step back and look at the tree often. Fluff more if the tree looks thin in places. This step gives the tree a rich, full shape.
Adding Lights
Adding lights to your artificial Christmas tree brings it to life. Lights create a warm, festive glow that makes your tree special. Choosing the right lights and placing them well can make a big difference. This section explains how to add lights easily and beautifully.
Pre-lit Vs. Separate Lights
Pre-lit trees come with lights already attached. They save time and effort. You only need to plug them in. Separate lights let you choose color and style. You can wrap the tree as you like. Separate lights may take longer but offer more control over the look.
Wrapping Tips For Even Lighting
Start wrapping lights at the base of the trunk. Move upward in a spiral, spacing lights evenly. Push lights gently into the branches for depth. Use more lights on the outer branches for brightness. Check from different angles to avoid dark spots. This method creates balanced, beautiful lighting.
Final Touches
The final touches make your artificial Christmas tree look complete and beautiful. These steps help your tree appear full and festive. Small details create a big difference in the tree’s overall look.
Trimming Uneven Areas
Check your tree for branches that stick out too much or look sparse. Use scissors or garden shears to trim these uneven parts. Cut carefully to keep the tree shape natural and balanced. Step back often to see the tree from different angles. Fixing uneven spots makes the tree look neat and full.
Adding Decorations
Start by placing lights evenly around the tree, from bottom to top. Then hang larger ornaments first to fill empty spaces. Add smaller decorations to cover gaps and add detail. Use garlands or ribbons to wrap around the tree for extra color. Spread decorations evenly to keep the tree balanced and pretty. The right placement brings your tree to life.
Storage Tips After The Holidays
Storing your artificial Christmas tree properly keeps it safe and fresh for next year. Good storage helps avoid damage and saves space. Follow simple steps to pack your tree carefully. This makes setting it up next holiday easier and faster.
Disassembling The Tree
Start by removing all decorations and lights. Take off the branches one section at a time. Fold or roll each branch gently to keep its shape. Keep the sections in order to make reassembly simple. Handle the tree parts with care to prevent scratches or breaks.
Packing For Next Year
Use the original box if you still have it. Otherwise, choose a sturdy storage box or bag. Place soft cloth or paper between branches to avoid tangling. Store the tree in a cool, dry place to stop mold and dust. Label the box clearly for quick identification next season.

Credit: www.youtube.com
Frequently Asked Questions
How Do I Assemble An Artificial Christmas Tree?
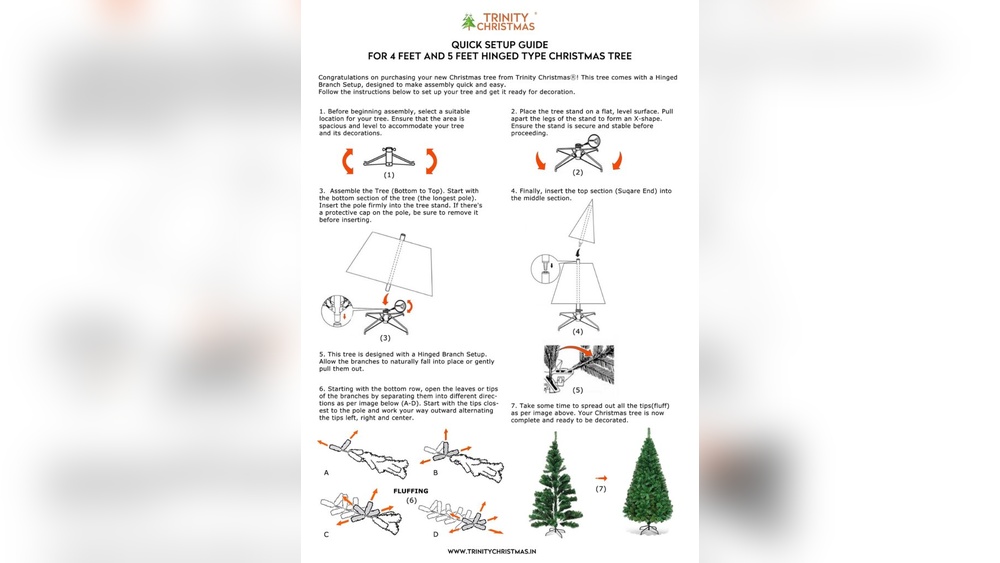
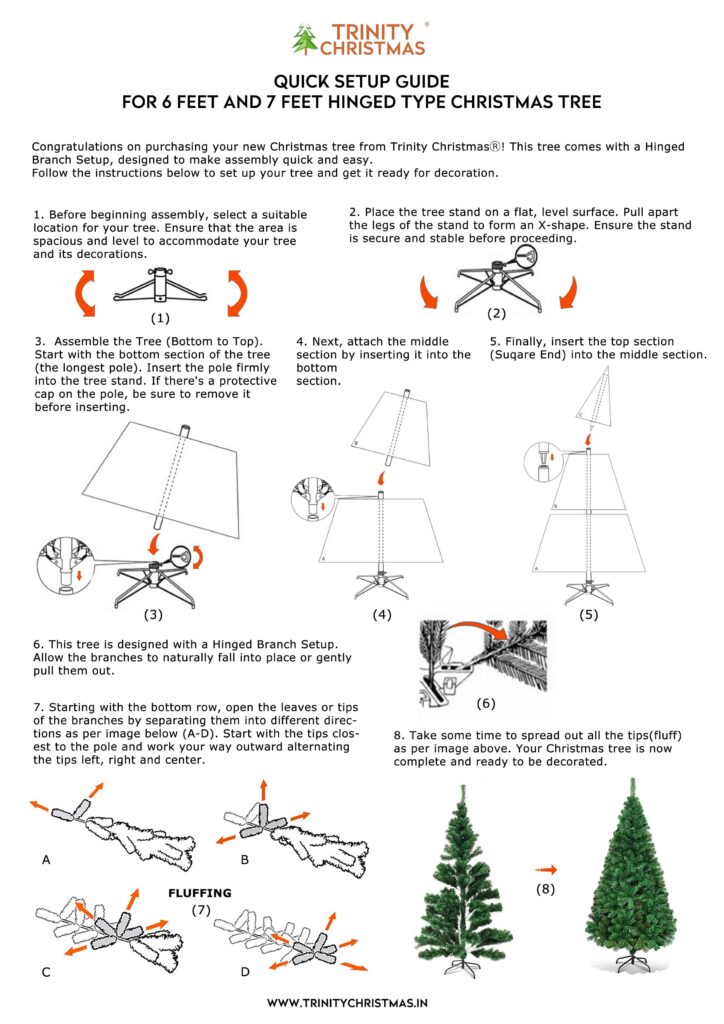
Start by unpacking all parts carefully. Connect the trunk sections first. Attach branches starting from the bottom. Fluff each branch for fullness. Secure the tree firmly in the stand. Finally, check stability before decorating.
What Tools Are Needed To Put Up The Tree?
Most artificial Christmas trees require no tools. Usually, parts fit together by hand. A ladder may help with tall trees. Use gloves to protect hands from sharp tips. Keep the assembly instructions nearby for guidance.
How Can I Make The Tree Look Fuller?
Fluff each branch thoroughly to spread needles evenly. Bend branch tips to fill gaps. Arrange branches symmetrically for balance. Add garlands or lights to enhance fullness. Use tree skirts to cover sparse areas at the base.
How Do I Safely Secure The Tree In Place?
Use the provided tree stand and tighten screws securely. Place the tree on a flat, stable surface. Avoid placing near heat sources to prevent damage. Check stability after assembly to prevent tipping. Weigh the base if needed for extra support.
Conclusion
Putting an artificial Christmas tree together can be simple and fun. Start by unpacking all parts carefully. Connect the sections firmly for a sturdy base. Fluff the branches to make the tree look full. Take your time to shape each branch well.
A well-set tree brings warmth to your home. Enjoy decorating it with lights and ornaments. Celebrate the season with a tree you built yourself. Remember, practice makes the process easier each year.