Is your artificial Christmas tree’s cord looking worn out or stopped working altogether? Don’t worry—you don’t need to buy a new tree or call an expensive electrician.
You can replace the cord yourself, and it’s easier than you might think. In this guide, you’ll discover simple, step-by-step instructions that will save you time and money. Keep reading to bring your tree back to life and enjoy a bright, safe holiday season!
Tools And Materials Needed
Replacing the cord on an artificial Christmas tree needs some basic tools and materials. Having the right items makes the task easier and safer. Prepare everything before starting the work.
Gather tools that help cut, strip, and connect wires. Choose materials that fit your tree’s electrical needs. Use quality parts for a lasting repair.
Wire Cutters And Strippers
Wire cutters help remove the old cord cleanly. Wire strippers expose the wires inside without damage. These tools allow precise and safe handling of wires.
Replacement Power Cord
Pick a cord matching the original in length and thickness. Ensure it is rated for indoor use and Christmas lights. A proper replacement prevents electrical hazards.
Electrical Tape Or Heat Shrink Tubing
Insulate wire connections with electrical tape or heat shrink tubing. These materials keep wires secure and prevent short circuits. They protect the repair from moisture and wear.
Screwdriver Set
Use screwdrivers to open any compartments or secure wire terminals. A small flathead or Phillips screwdriver usually works best. Choose the right size for your tree’s fittings.
Multimeter
A multimeter tests the cord for continuity and safety. It confirms if the wires connect correctly. This tool helps avoid electrical problems later.
Safety Precautions
Replacing the cord on an artificial Christmas tree requires careful attention to safety. This task involves electrical components that can be dangerous if mishandled. Taking proper safety steps protects you and your home from harm. Follow these simple rules to work safely and confidently.
Turn Off And Unplug The Tree
Always unplug the tree before starting any work. This stops electricity from flowing to the cord. Never handle wires while the tree is plugged in. This reduces the risk of electric shock or fire.
Work In A Dry Area
Make sure your workspace is dry and clean. Water and electricity do not mix well. Keep the tree and cord away from wet surfaces. Use a dry cloth to clean the area before you start.
Use Proper Tools And Equipment
Use insulated tools designed for electrical work. Avoid using damaged or old tools. Proper tools help you avoid accidents and damage to the cord. Check tools for any signs of wear before use.
Wear Protective Gear
Wear rubber gloves to protect your hands. Safety glasses can protect your eyes from sparks or debris. Dress in clothing that covers your skin. This lowers the chance of injury during the repair.
Check The Cord For Damage
Inspect the new cord for cuts or frays before installation. Using a damaged cord is dangerous. Replace the cord if you find any defects. A safe cord is vital for proper tree function.
Test The Tree After Replacement
After replacing the cord, plug in the tree carefully. Watch for any sparks, smells, or unusual heat. If you notice any issues, unplug immediately. Fix problems before using the tree normally.
Removing The Old Cord
Start by unplugging the tree and finding the old cord. Gently pull the cord out from the base or trunk. Take care not to damage the tree while removing it.
Unplugging And Inspecting The Tree
Start by unplugging the artificial Christmas tree from the power outlet. Safety first. No electricity should run through the cord during the process. Once unplugged, check the entire cord for any visible damage. Look for frays, cuts, or exposed wires. Also, inspect the tree’s light sockets for signs of wear or corrosion. This helps confirm the cord really needs replacement.
Detaching The Old Cord
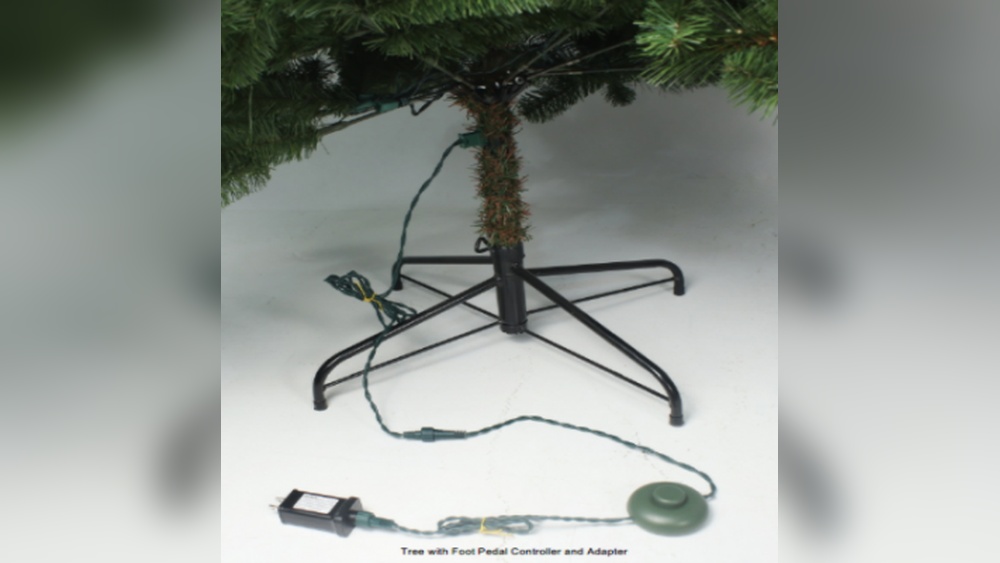
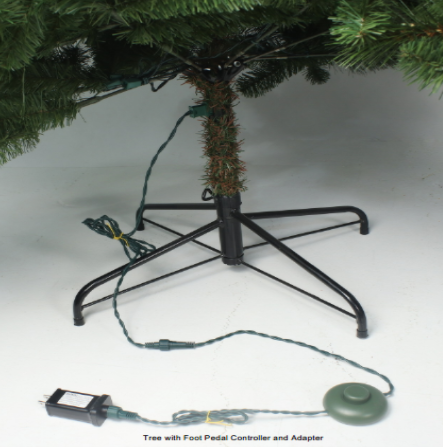
Locate where the cord connects to the tree frame or base. Gently pull the cord from the attachment points. Some cords might have clips or small screws holding them in place. Use a screwdriver if needed to remove these fasteners. Carefully unwind the cord from the branches or poles. Avoid tugging hard to prevent breaking the tree’s structure. Set the old cord aside once fully detached.
Credit: www.ebay.com
Preparing The New Cord
Preparing the new cord is a key step in replacing the cord on your artificial Christmas tree. This process ensures the new cord fits properly and works safely. Careful preparation helps avoid electrical problems. Take time to choose the right cord and prepare it correctly before installation.
Selecting The Right Replacement Cord
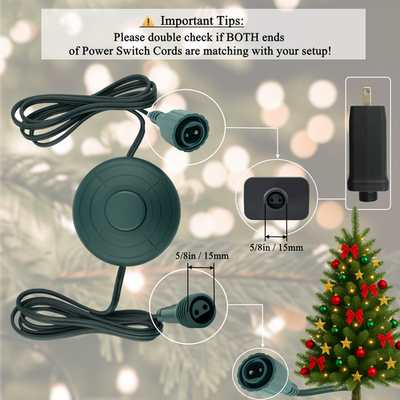
Choose a cord that matches the original in thickness and length. Check the cord’s voltage and wattage ratings to suit your tree’s lights. Use a cord designed for indoor use and holiday decorations. Avoid cheap cords without safety certifications. A proper cord reduces the risk of fire or electrical shock.
Cutting And Stripping The Wires
Cut the new cord to the needed length with wire cutters. Leave extra length for easy handling during installation. Strip about half an inch of insulation from each wire end. Use a wire stripper for clean and safe stripping. Expose wires carefully without damaging the metal inside. Twisting the wire strands after stripping keeps them neat.
Installing The New Cord
Installing the new cord on your artificial Christmas tree is a key step. It ensures the lights work safely and look neat. Take your time to follow each step carefully. This will help avoid any electrical problems and keep your tree bright.
Connecting The Wires
First, match the wires from the new cord to the tree’s wires. Look for colors or labels to guide you. Twist the matching wires together tightly. Use wire connectors or electrical tape to cover the connections. This keeps the wires secure and prevents shorts.
Securing The Cord In Place
Next, attach the cord along the tree’s pole or branches. Use zip ties or clips to hold it firmly. Avoid letting the cord hang loosely. A well-secured cord prevents damage and keeps the tree tidy. Check that the cord does not block any branches or lights.
Credit: www.cpsc.gov
Testing The Tree Lights
Testing the lights on your artificial Christmas tree is a key step before replacing the cord. It helps find any problems early. This makes the replacement process easier and safer.
Testing also shows if all bulbs work well. It can save time and avoid frustration later. Let’s explore how to test the tree lights properly.
Preparing For The Light Test
Unplug the tree from the power source. Place it near an outlet with enough space to move. Check the bulbs for visible damage or missing pieces. Have a small bulb tester or a spare bulb ready.
Plugging In And Observing
Plug the tree lights into the outlet. Watch the entire string carefully. Look for bulbs that do not light up or flicker. Note any sections that stay dark or show inconsistent light.
Using A Bulb Tester
Use a bulb tester to check each bulb if some do not light. Remove the bulb and test it with the device. Replace any bulbs that fail the test. This ensures the whole string works well.
Checking For Loose Connections
Gently press each bulb into its socket. Loose bulbs can cause breaks in the circuit. Wiggle the bulbs to see if lights flicker. Fix any loose bulbs before replacing the cord.
Recording Issues Found
Write down any bulbs or sections that have problems. This helps when you replace the cord. Knowing the problem spots makes repairs faster and more accurate.
Troubleshooting Common Issues
Troubleshooting common issues is key when replacing the cord on your artificial Christmas tree. Problems like flickering lights or no power can stop your tree from shining. Finding the root cause saves time and effort.
Start by checking simple fixes before moving to complicated repairs. Many problems come from loose parts or damaged bulbs. Identifying these early helps keep your tree safe and bright.
Checking Loose Connections
Loose connections often cause the lights to go out. Check the plug and socket where the cord connects. Make sure the cord is firmly plugged in. Wiggle the wires gently to spot any breaks or weak spots.
Look for corrosion or dirt on the connectors. Clean them with a dry cloth if needed. Tighten any loose screws or clips holding the cord. A solid connection ensures power flows correctly through the tree lights.
Replacing Bulbs Or Fuses
Burned-out bulbs or blown fuses stop the lights from working. Inspect each bulb for dark spots or broken filaments. Replace any faulty bulbs with the same size and type.
Check the fuse inside the plug or cord. Use a small screwdriver to open the fuse holder. Swap a blown fuse with a new one matching the original rating. Correct bulbs and fuses keep your tree glowing evenly.

Credit: www.ebay.com
Maintaining Your Artificial Tree Cord
Maintaining your artificial tree cord is important to keep your tree safe and working well. A damaged cord can cause electrical problems or even fire. Simple care steps can extend the life of the cord and keep your Christmas tree bright.
Check the cord regularly for any signs of wear or damage. Look for cracks, frays, or exposed wires. If you spot any issues, replace the cord right away. Never use a cord that looks unsafe.
Store the tree and cord properly after the holiday season. Wrap the cord loosely to avoid bending or twisting. Keep the cord in a cool, dry place. Moisture and heat can damage the wires inside.
Inspecting The Cord Before Use
Always inspect the cord before plugging in the tree. Look closely at the entire length. Check the plug and socket for damage. A quick check can prevent accidents and save energy.
Cleaning The Cord Safely
Dust and dirt can build up on the cord. Use a dry cloth to clean it gently. Avoid water or cleaning sprays near the cord. Keep moisture away to prevent electrical problems.
Storing The Cord Correctly
Store the cord separately or wrapped around the tree stand. Avoid tight coils that can cause kinks. Use a cord organizer or twist tie for neat storage. Proper storage keeps the cord in good shape.
Replacing A Damaged Cord
Replace the cord immediately if it shows any damage. Use a cord that matches the tree’s voltage and length. Follow the manufacturer’s instructions for replacement. Safety first to avoid shocks or fires.
Frequently Asked Questions
How Do I Safely Remove The Old Cord From My Christmas Tree?
Unplug the tree first. Gently untwist and pull the old cord from the branches. Avoid forcing to prevent damage.
What Tools Are Needed To Replace An Artificial Tree Cord?
You’ll need wire cutters, pliers, electrical tape, and a replacement cord with matching voltage.
How To Connect The New Cord To The Tree’s Wiring?
Match the wire colors, twist them securely, and cover with electrical tape to ensure safe connections.
Can I Replace The Cord Without Professional Help?
Yes, with basic electrical knowledge and careful handling, you can replace it safely at home.
Conclusion
Replacing the cord on your artificial Christmas tree keeps it safe and bright. Take your time and follow each step carefully. Always check the cord for damage before use. A well-maintained tree brings joy all season long. Small fixes make a big difference in holiday cheer.
Keep your tree shining for many years ahead. Simple repairs save money and avoid hassle later. Enjoy decorating without worry or stress this year.