Are you thinking about adding a pendant light to your space but unsure where to start? Hanging a pendant light can seem tricky, but with the right steps, you can easily brighten up your room like a pro.
Imagine transforming your space with just one simple change—your new pendant light can do that. In this guide, you’ll discover clear, easy instructions that take the guesswork out of the process. Keep reading, and by the end, you’ll have the confidence to install your pendant light quickly and safely.

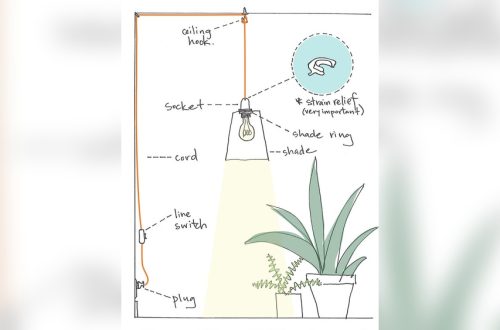
Credit: www.instructables.com
Choosing The Right Pendant Light
Choosing the right pendant light is key to brightening your space well. It affects the room’s look and the light’s function. The right choice makes a big difference in style and brightness.
Types Of Pendant Lights
Pendant lights come in many styles. Single pendant lights hang from one point and work well over tables. Multi-light pendants have several bulbs for more light. Drum pendants have a wide shade that spreads soft light. Glass pendants show the bulb and create a modern feel. Choose a type that fits your room’s need and mood.
Size And Scale Considerations
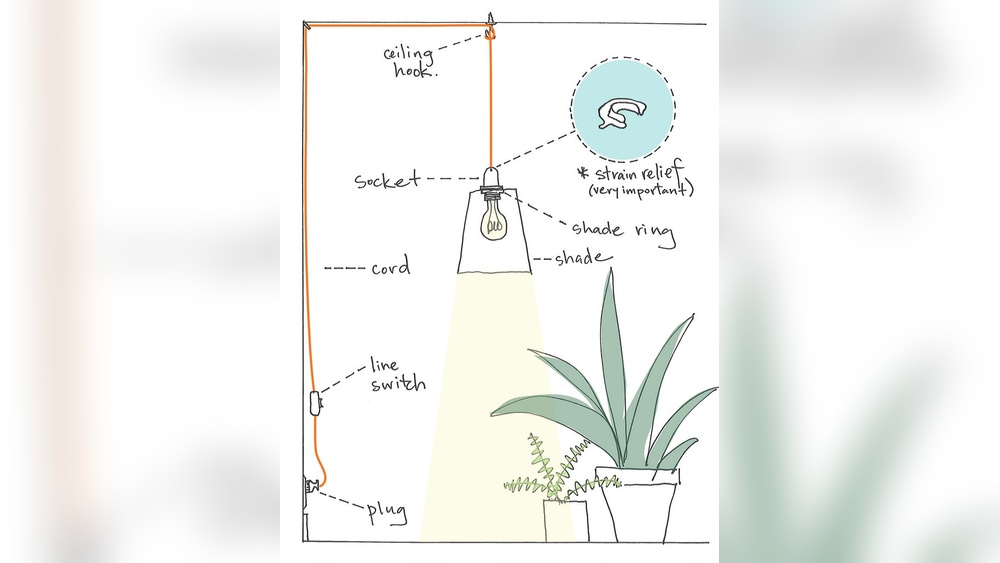
Size matters for pendant lights. A light too big or small looks odd. Measure your space before buying. For dining tables, a pendant should be about one-third the table’s width. In kitchens, hang lights 30 to 36 inches above the counter. Keep the pendant size balanced with the room and furniture.
Matching Your Decor Style
Your pendant light should match your room’s style. For modern rooms, choose sleek metal or glass designs. Rustic spaces look great with wood or metal fixtures. Traditional rooms fit well with classic shapes and warm tones. Match colors and materials to your decor for a unified look.
Tools And Materials Needed
Hanging a pendant light needs the right tools and materials. Using proper equipment makes the job easier and safer. Prepare everything before starting to avoid delays or mistakes.
Essential Tools
You need a drill for holes and screws. A screwdriver helps tighten screws securely. Wire strippers cut and strip electrical wires. A voltage tester checks power to avoid shocks. A ladder reaches the ceiling comfortably.
Safety Gear
Wear safety glasses to protect your eyes. Use gloves to keep hands safe from sharp edges. A dust mask stops you from breathing in dust. Always switch off power at the circuit breaker before working.
Additional Supplies
Get wire connectors to join electrical wires safely. Use electrical tape for extra insulation. Anchors and screws hold the light fixture firmly. Have a pencil handy to mark drill points.
Preparing The Installation Area
Preparing the installation area is the first step to hang a pendant light safely and correctly. It ensures the workspace is ready and safe for the new fixture. This process involves turning off power, removing old fixtures, and checking electrical boxes. These steps protect you and help the new light fit well.
Turning Off Power
Always turn off the power before starting any electrical work. Find the correct circuit breaker and switch it off. Test the light switch to confirm there is no electricity. This step prevents electric shocks and keeps you safe.
Removing Old Fixtures
Remove any old light fixtures carefully. Use a screwdriver to take out screws holding the fixture. Gently pull the fixture away from the ceiling. Disconnect wires by loosening wire nuts. Keep the wires exposed for the new light installation.
Checking Electrical Boxes
Check the electrical box before installing the pendant light. It must be strong enough to hold the fixture’s weight. Look for any damage or loose parts. Replace the box if it is cracked or weak. A sturdy box ensures the pendant light stays secure.
Step-by-step Hanging Process
Hanging a pendant light can change the look of any room. Follow these steps to install your new light safely and correctly. This guide breaks down the process into clear actions. Each step builds on the last. Stay patient and careful.
Assembling The Pendant Light
Start by unpacking all parts of your pendant light. Check the instructions for specific pieces. Connect the parts as shown. Tighten screws but avoid over-tightening. Attach the bulb holder and shade securely. Make sure everything fits well before moving on.
Mounting The Bracket
Find the ceiling box where the light will hang. Turn off power at the main switch. Attach the mounting bracket to the box using screws. The bracket must be tight and level. This will hold the light firmly. Double-check the fit before wiring.
Connecting The Wiring
Match the wires from the pendant to the ceiling wires. Usually, black connects to black, white to white, and green or copper to ground. Use wire connectors to join wires. Twist wires together tightly before securing. Cover the connections with electrical tape for safety.
Securing The Fixture
Lift the pendant light and attach it to the mounting bracket. Use screws or clips provided with the fixture. Check that the light hangs straight and does not wobble. Tighten all screws firmly but gently. Restore power and test the light. Adjust if needed for perfect placement.
Adjusting Height And Position
Adjusting the height and position of a pendant light is key to getting the perfect look. It affects both the light’s style and how well it lights the space. Taking time to set the right drop length and placement makes the fixture fit your room and needs.
Measuring Drop Length
Start by measuring the drop length from the ceiling to the bottom of the light. Use a tape measure for accuracy. The ideal height depends on the room and the light’s purpose. For dining tables, keep the light about 30 to 36 inches above the surface. In open spaces, hang it higher to avoid blocking views.
Leveling The Pendant
Check that the pendant hangs straight. Use a small level tool or a smartphone app. Adjust the cord or chain to fix any tilt. A level pendant looks neat and prevents uneven light spread. This step helps the fixture feel balanced and professional.
Fine-tuning Placement
Move the light slightly to find the best spot. Try shifting it left or right and see how it changes the room’s feel. Consider how the light hits tables, counters, or seating areas. Fine-tuning placement ensures the pendant fits the space perfectly and creates the right mood.
Testing And Final Touches
After hanging your pendant light, it’s important to test everything and add the final touches. This step ensures your light works well and looks perfect. Take your time to check all parts carefully. Small details make a big difference in the final look.
Restoring Power And Testing
Turn the power back on at the breaker box carefully. Switch on the pendant light to see if it lights up. Watch for any flickering or unusual sounds. If the light does not work, double-check your wiring connections. Safety is key, so do not touch wires with wet hands.
Adding Bulbs And Shades
Choose bulbs that match your pendant light style and room needs. Screw the bulbs in gently but firmly. Attach any shades or covers that came with your light. Make sure they fit well and are secure. This step adds style and controls the light glow.
Cleaning And Styling
Wipe the pendant light with a soft cloth to remove dust or fingerprints. Clean the bulbs carefully to keep the light bright. Adjust the height or angle of the pendant if needed. Arrange furniture or decor to highlight the new light fixture. A clean and styled light brightens your whole space.
Common Mistakes To Avoid
Hanging a pendant light seems simple but can have hidden challenges. Many people make avoidable mistakes. These errors can cause safety issues or damage your light fixture. Knowing what to avoid helps you install your pendant light correctly and safely.
Overlooking Weight Limits
Each pendant light has a weight limit. This limit shows how heavy the fixture can be. Ignoring weight limits may cause the light to fall. It can damage your ceiling or hurt someone. Always check the weight before hanging your pendant light. Use strong support if your light is heavy.
Ignoring Electrical Codes
Electrical codes protect your home and family. They set rules for safe wiring and installation. Ignoring these rules can cause fire risks or electric shocks. Follow local electrical codes exactly. If unsure, ask a professional electrician for help.
Improper Wiring Connections
Proper wiring is crucial for your pendant light. Loose or wrong connections can cause flickering or short circuits. Always connect wires tightly and correctly. Use wire nuts and electrical tape to secure connections. Double-check your work before turning the power back on.
Credit: www.locallifesc.com
Tips For Stunning Results
Hanging a pendant light is only the first step. Creating a beautiful space needs extra care. These tips help you get stunning results with your pendant lighting. Simple ideas make a big difference in how your room feels and looks.
Focus on how your pendant light works with other lights. Control the light’s brightness. Use the light to draw attention to important spots. These small steps improve your room’s style and comfort.
Layering With Other Lighting
Use different types of lighting to create layers. Combine pendant lights with floor lamps or wall sconces. This mix adds depth and warmth. It stops the room from feeling flat or harsh. Layered lighting helps you set the right mood for any time.
Using Dimmers
Install dimmers to control your pendant light’s brightness. Dimming lets you change the light level fast and easy. Bright light works well for tasks. Soft light creates a calm, cozy place. Dimmers save energy and extend the bulb’s life.
Highlighting Key Areas
Use pendant lights to focus on key spots in the room. Hang them over dining tables, kitchen islands, or reading nooks. This draws eyes to important spaces. It also makes these areas more useful. Highlighting adds style and function at once.
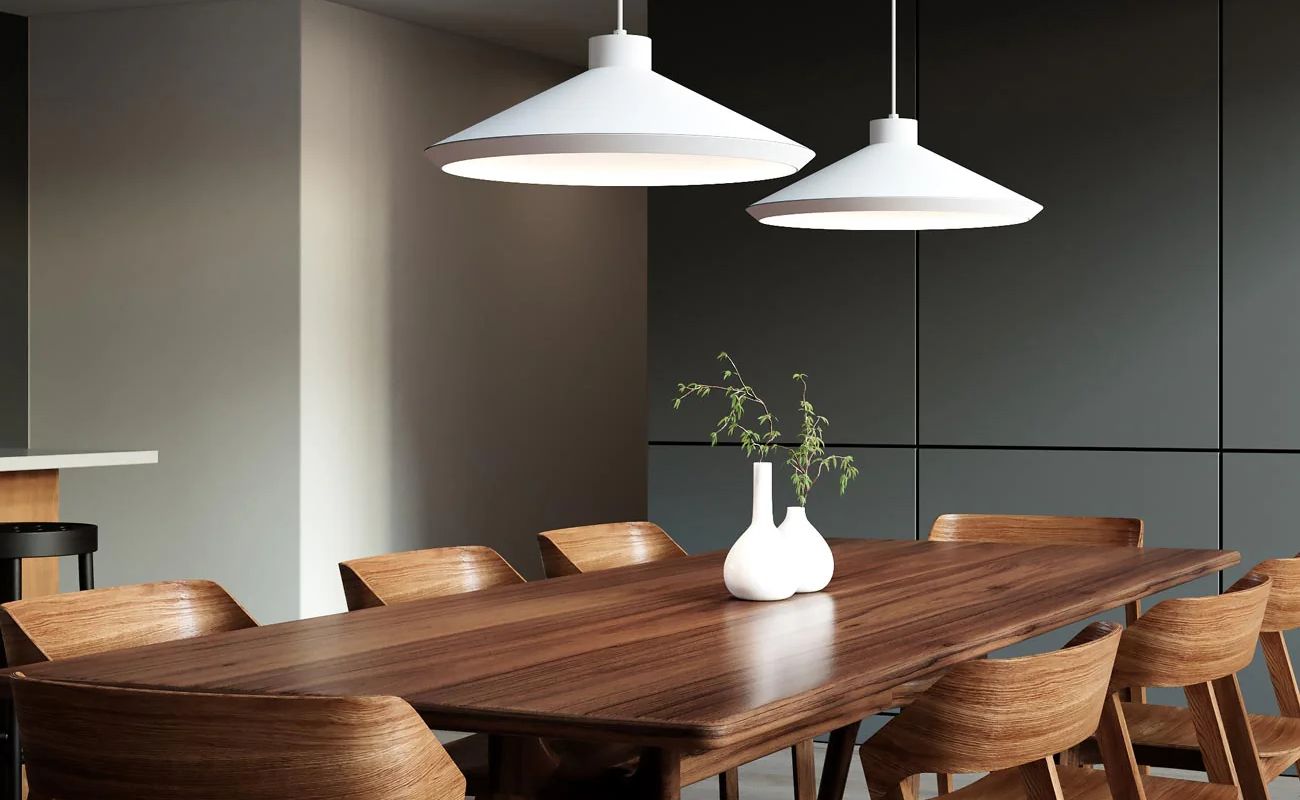
Credit: citylightssf.com
Frequently Asked Questions
How High Should I Hang A Pendant Light?
Hang pendant lights 28 to 34 inches above tabletops or countertops. This height provides optimal lighting and prevents glare. Adjust based on ceiling height and room size. Ensure the light is not obstructive and complements the room’s design.
What Tools Do I Need To Hang A Pendant Light?
You need a drill, screwdriver, wire stripper, voltage tester, ladder, and electrical tape. Also, use a stud finder and level for precise installation. These tools ensure a safe and accurate pendant light setup.
Can I Install A Pendant Light Without An Electrician?
Yes, if you have basic electrical knowledge and follow safety precautions. Turn off power, use a voltage tester, and follow manufacturer instructions carefully. For complex wiring, hiring a professional electrician is safer and recommended.
How Do I Adjust The Pendant Light Height?
Most pendant lights have adjustable cords or rods. Loosen the canopy, set the desired length, then tighten securely. Always measure before cutting any cord to avoid mistakes and ensure proper lighting height.
Conclusion
Hanging a pendant light can change any room’s look and feel. Start by choosing the right spot and height for your light. Always turn off the power before you begin the work. Use the right tools and follow the steps carefully.
Take your time to secure the light well and check the wiring. A well-hung pendant light adds style and good lighting. You can do this yourself with a little patience and care. Brighten your space safely and enjoy your new light fixture.