Setting up your artificial Christmas tree can feel tricky, but it doesn’t have to be. Imagine having a beautiful, full tree ready in no time, without the stress or mess.
In this guide, you’ll discover simple, step-by-step instructions that make assembling your tree easy and even fun. Whether it’s your first time or you want to get better at it, you’ll learn tips that save you time and effort. Keep reading, and soon your home will be filled with holiday magic.
Choosing The Right Tree
Choosing the right artificial Christmas tree makes decorating easier and more fun. The perfect tree fits your space and style. It also lasts for many holidays. Consider the types, size, shape, and material before buying.
Types Of Artificial Trees
There are many types of artificial trees. Some look very real with detailed branches. Others have a modern or slim design. Classic green trees are popular. White or colored trees create a unique look. Pick a style that matches your home decor.
Size And Shape Options
Measure your space before buying a tree. Choose a height that fits your ceiling. Narrow trees work well in small rooms. Full trees suit large spaces. The shape can be traditional or slim. Think about how much room you need for decorations.
Material Considerations
Most trees use PVC or PE needles. PVC is soft and affordable. PE looks more natural but costs more. Some trees mix both materials. Check if the tree is fire-resistant. Quality materials mean the tree lasts longer and looks better.
Credit: www.youtube.com
Unpacking And Preparing
Unpacking and preparing your artificial Christmas tree sets the tone for a smooth assembly. Taking time here avoids mistakes later. It helps to work carefully and stay organized. Follow these steps to get ready quickly.
Checking The Box Contents
Open the box and look inside carefully. Count all parts and check for damage. Trees usually come in sections and include a stand. Make sure the branches and tips are intact. Missing pieces can delay your setup.
Organizing Parts
Lay out all parts on a flat surface. Group tree sections by size or shape. Keep small pieces like screws and clips together. This saves time and stops parts from getting lost. Clear organization helps the process flow.
Preparing The Setup Area
Choose a spacious, clean spot for your tree. Use a soft blanket or mat to protect floor and branches. Check there is enough room for the tree’s full height. Good lighting helps you see details during assembly. Clear the area of obstacles.
Assembling The Base
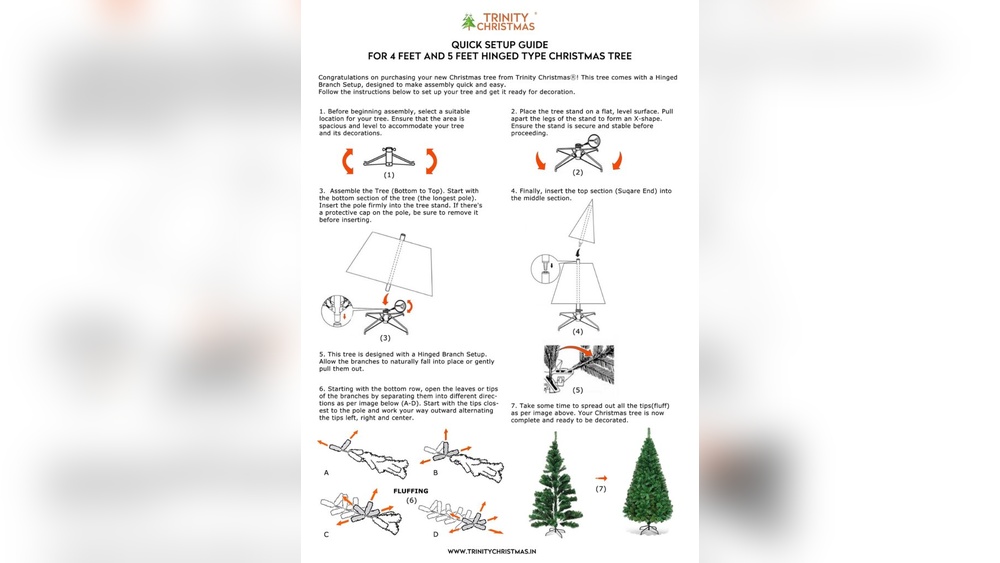
Start by placing the base on a flat surface to ensure stability. Secure the tree trunk into the base tightly to keep it upright. Check that the base feels steady before adding the tree sections.
Securing The Stand
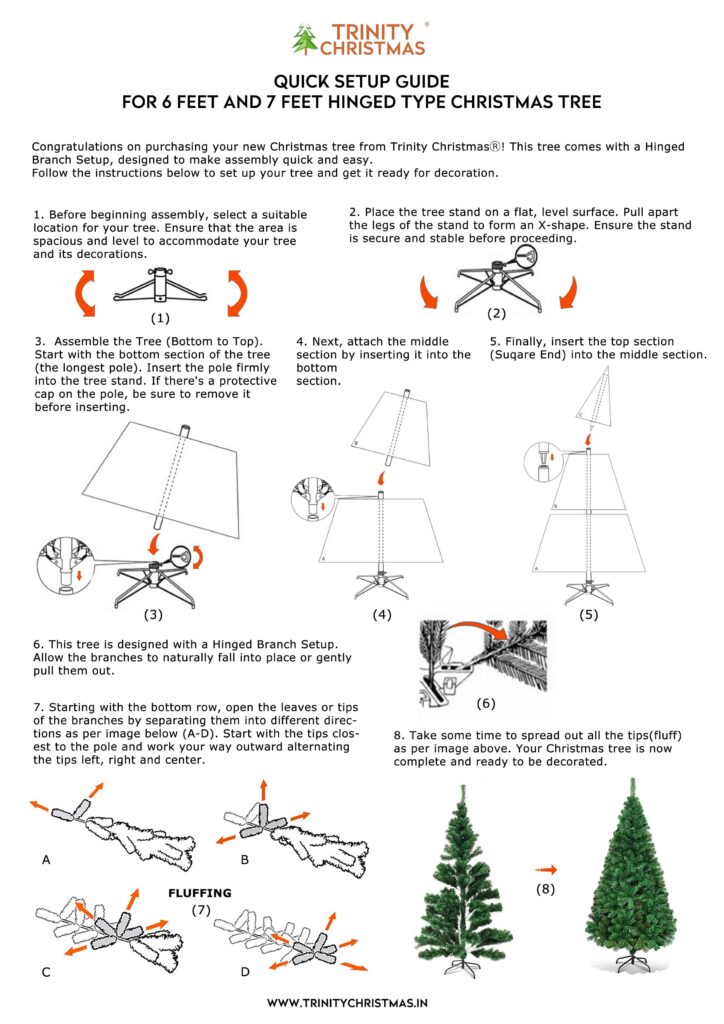
Start by opening the tree stand and placing it on a flat surface. Make sure the stand is stable and level. Tighten all screws or bolts to keep it secure. A firm base prevents the tree from tipping over. Check that the stand’s legs are fully spread out for better support.
Attaching The Pole Sections
Most artificial trees come in two or three pole sections. Begin by connecting the bottom pole to the stand. Push it firmly into place until it locks or fits snugly. Next, attach the middle pole section by sliding it onto the bottom part. Repeat the process with the top pole. Ensure each section fits tightly to avoid wobbling. This creates a strong, stable frame for your tree.
Attaching Branches
Attaching branches to your artificial Christmas tree is a key step in creating a full and festive look. This process requires some patience and care. Properly attaching each branch helps the tree look natural and well-shaped. Follow these steps to make your tree stand out.
Sorting Branches By Size
Start by sorting all branches into groups based on size. Usually, large branches go at the bottom of the tree. Medium branches fit in the middle section. Small branches belong near the top. Sorting helps you place branches quickly and correctly. It also keeps the tree balanced and stable.
Connecting Branches To The Pole
Attach each branch to the pole by slotting or clipping it into place. Most trees have numbered or marked sections for easy connection. Begin at the bottom and work upwards. Press firmly to secure each branch. Make sure branches are evenly spaced around the pole. This ensures a natural, full look.
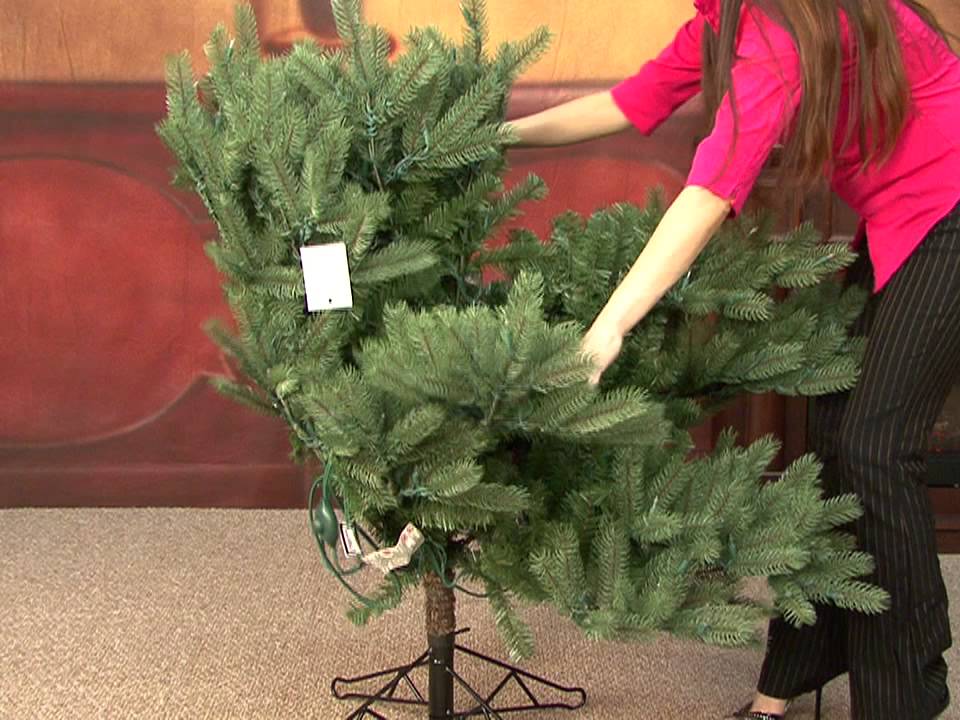
Fluffing And Shaping The Branches
Once all branches are attached, start fluffing each one. Spread out the needles and twigs gently with your hands. This adds volume and hides any gaps. Shape branches by bending tips slightly upward or outward. Fluffing creates a realistic, lush appearance. Take your time for best results.
Adding Lights
Adding lights to your artificial Christmas tree brings it to life. Lights create a warm, festive glow that fills the room. This step makes your tree look magical and inviting. Taking time to place lights carefully improves the tree’s overall beauty.
Built-in Vs. Separate Lights
Some trees come with built-in lights. These lights are easy to set up. No need to untangle or wrap strings. Separate lights offer more control over placement. You can choose color, style, and brightness. Separate lights may take more time but allow customization.
Wrapping Lights Evenly
Start at the bottom of the tree. Wrap lights around each branch evenly. Move up slowly to avoid gaps. Push some lights deep into branches for depth. Avoid bunching lights together in one spot. Even wrapping makes the tree shine all over.
Testing The Lights
Plug in lights before you finish. Check for any bulbs that do not work. Replace or fix broken bulbs immediately. Testing early saves time and frustration. A fully lit tree looks bright and cheerful.

Credit: www.webechristmas.com
Final Touches
The final touches bring your artificial Christmas tree to life. These small steps make the tree look full and festive. They help create a warm holiday atmosphere.
Adjusting Branch Positions
Start by spreading out each branch evenly. Pull branches gently to fill gaps. Shape the branches to look natural. Fluff the needles for a fuller look. Check the tree from all sides for balance.
Adding Decorations
Hang lights first to avoid hiding bulbs later. Place ornaments evenly around the tree. Use different sizes to add interest. Add a tree topper that fits your style. Avoid crowding one area with too many decorations.
Ensuring Stability
Make sure the tree stand is secure. Tighten all screws and locks firmly. Place the tree on a flat surface. Avoid spots near doors or heavy traffic. Stability keeps your tree safe and upright all season.
Maintenance Tips
Maintaining your artificial Christmas tree keeps it looking fresh and new each year. Proper care helps the tree last longer and stay beautiful through many holiday seasons. Small steps make a big difference in preserving your tree’s quality and appearance.
Cleaning The Tree
Dust gathers on branches and needles during storage and use. Use a soft cloth or feather duster to remove dust gently. Avoid harsh chemicals that can damage the tree’s material. A vacuum with a brush attachment works well for deep cleaning. Clean your tree before decorating to keep ornaments bright and shiny.
Storing For Next Year
Disassemble the tree carefully, following the instructions. Store all parts in the original box or a sturdy container. Wrap branches in tissue paper or plastic to prevent dust and damage. Keep the box in a dry, cool place to avoid moisture buildup. Proper storage helps the tree keep its shape and color for the next holiday season.
Credit: www.trinitychristmas.in
Frequently Asked Questions
How Do I Start Assembling An Artificial Christmas Tree?
Begin by unpacking all parts carefully. Identify the base, trunk sections, and branches. Assemble the base first for stability.
What Is The Best Way To Attach Tree Branches?
Insert branches into the designated holes on the trunk. Spread them evenly to create a full, natural look.
How Can I Ensure My Artificial Tree Looks Realistic?
Fluff and shape each branch after assembly. Adjust branch angles and fill gaps for a natural appearance.
How Do I Safely Secure The Tree To The Stand?
Tighten screws or clamps on the stand firmly. Ensure the tree is stable and won’t tip over.
Conclusion
Assembling an artificial Christmas tree can be simple and fun. Follow each step carefully and take your time. Make sure all parts fit snugly for a stable tree. Fluff the branches to give a full, natural look. Add your favorite decorations to bring the tree to life.
Enjoy the festive spirit with a beautifully set up tree. This easy process saves time and stress every year. Celebrate the holidays with a tree that feels just right.