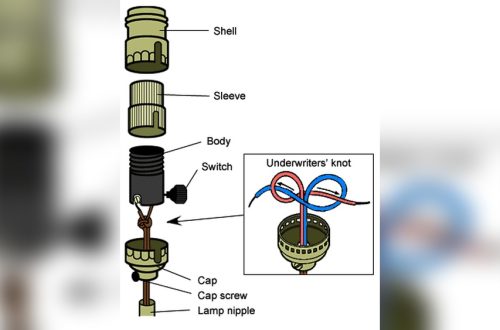
Are you ready to transform your apartment with a stylish pendant light but unsure where to start? Installing a pendant light can instantly brighten your space and add a touch of personality without the need for major renovations.
In this guide, you’ll discover simple, step-by-step instructions that make the process easy—even if you’ve never handled electrical work before. By the end, you’ll have the confidence to install your new light fixture safely and beautifully, turning your apartment into a cozy, inviting home.
Keep reading to light up your space like a pro!
Choose The Right Pendant Light
Choosing the right pendant light sets the tone for your apartment’s style and function. It brightens your space and adds charm. Picking the perfect one needs thought about size, style, and apartment rules. This helps create a cozy, well-lit room you enjoy.
Consider Size And Style
Pick a pendant light that fits your room size. Large lights suit big rooms or dining areas. Small lights work well for kitchens or corners.
Match the style to your apartment’s look. Modern lights fit sleek spaces. Vintage or rustic lights add warmth. Think about colors and shapes that blend well.
Check Apartment Lighting Restrictions
Some apartments have rules about lighting. Check with your landlord or building guide. They may limit the light’s size or type.
Confirm if you can install hardwired or only plug-in lights. Know if certain bulbs are not allowed. Following rules saves trouble later.
Gather Necessary Tools And Materials
Before installing a pendant light in your apartment, gather all the tools and materials. This step saves time and helps the process go smoothly. Having everything ready means fewer interruptions and safer work.
List Of Tools Needed
Collect these tools for your pendant light installation:
- Screwdriver (flathead and Phillips)
- Wire stripper
- Voltage tester
- Drill with bits
- Measuring tape
- Wire nuts
- Electrical tape
- Ladder or step stool
Safety Gear And Precautions
Safety is crucial. Wear protective gloves to avoid cuts or shocks.
Use safety glasses to protect your eyes from dust or debris.
Turn off the power at the breaker box before starting any work.
Test wires with a voltage tester to confirm no electricity flows.
Work in a well-lit area to see clearly and avoid mistakes.
Turn Off Power Safely
Turning off the power is the first and most important step before installing a pendant light. It keeps you safe from electric shocks while working. Always make sure the electricity is completely off. Never skip this step.
Locate The Circuit Breaker
Find your apartment’s circuit breaker box. It is usually in a closet, basement, or utility room. Open the panel to see switches labeled for different rooms. Look for the switch that controls the light fixture you want to replace. Flip that switch to the “off” position. This stops electricity from flowing to the light.
Verify Power Is Off
After turning off the breaker, check if the power is really off. Use a non-contact voltage tester or a simple light bulb tester on the wires. If the tester shows no power, it is safe to proceed. If you still see light or the tester shows power, double-check the breaker switch. Never trust the switch alone without testing.
Remove Existing Fixture
Removing the old light fixture is the first step in installing a new pendant light. Safety is key here. Turn off the power at the breaker box before you start. This prevents any electric shock. Take your time to remove the old fixture carefully. This helps protect the wiring and ceiling.
Gather a screwdriver and a voltage tester before you begin. These tools make the task easier and safer. Follow each step slowly to avoid mistakes. This part sets the stage for a smooth installation of your pendant light.
Unscrew Old Light
Use a screwdriver to remove the screws holding the old fixture. Keep a hand on the fixture to catch it as it loosens. Some fixtures might have a cover or shade. Remove these parts first if needed. Place all screws and parts in a small container to avoid losing them.
Disconnect Wiring
Check the wires with a voltage tester to ensure no power is running. Then, gently twist off the wire nuts connecting the fixture wires to the house wires. Separate the wires carefully. Remember which wires connect where. This helps during the new fixture installation. Wrap the exposed wire ends with electrical tape for safety.
Prepare Electrical Box
Preparing the electrical box is a key step before installing a pendant light. It ensures safety and a secure fit. Proper preparation helps avoid electrical problems and supports the fixture well.
Inspect Wiring
Start by turning off the power at the circuit breaker. Use a voltage tester to confirm no electricity flows. Check the wires inside the box for damage or wear. Look for frayed insulation or loose connections. Replace any damaged wires before proceeding. Ensure the box is securely attached to the ceiling joist. A loose box can cause the light to hang improperly or fall.
Install Mounting Bracket
Attach the mounting bracket that comes with the pendant light. Align it with the screw holes on the electrical box. Use a screwdriver to tighten the screws firmly. The bracket must be level and stable. This bracket will hold the pendant light’s weight. Double-check that it does not move or wiggle. Proper installation here ensures the fixture hangs straight and safe.
Connect Pendant Light Wiring
Connecting the pendant light wiring is a key step in installing your new light fixture. This process ensures the light will work safely and properly. Take your time to connect the wires carefully. Proper wiring prevents electrical issues and keeps your apartment safe.
Match Wire Colors
Start by identifying the wire colors. Usually, black or red wires are hot. White wires are neutral. Green or bare wires are ground. Match the pendant light wires to the corresponding house wires. Connect black to black, white to white, and green to green or bare copper. This step is important for safe electrical flow.
Secure Wire Connections
Twist the matching wires together tightly. Use wire nuts to cover each connection. Push the wires and nuts inside the electrical box. Tug gently on each wire to make sure it is secure. Loose wires can cause sparks or flickering. Proper connections keep your pendant light stable and safe.
Attach Pendant Light Fixture
Attaching the pendant light fixture is a key step in your installation. This process secures the light to the ceiling and makes sure it stays in place. Take your time and follow each step carefully for a safe and sturdy setup.
Mount Fixture To Bracket
First, align the fixture base with the ceiling bracket. Use the screws provided to fix the fixture to the bracket. Tighten each screw evenly to keep the fixture steady. Check that the fixture does not wobble before moving on.
Adjust Height And Position
Next, set the pendant light to your desired height. Most fixtures have adjustable cords or rods. Shorten or lengthen the cord carefully to fit your space. Make sure the light hangs straight and is centered. A well-positioned light improves both look and function.
Restore Power And Test Light
After installing your pendant light, restoring power is the next step. This allows you to check if the light works correctly. Testing the light ensures safety and confirms the installation is successful.
Turn Circuit Breaker On
Find the circuit breaker for your apartment’s lighting. Flip the switch back to the “on” position. This restores electricity to the light fixture. Wait a few seconds for power to flow. Make sure no sparks or unusual sounds occur.
Check Light Functionality
Use the light switch to turn on the pendant light. Observe if the bulb lights up steadily. Check for flickering or dimness that might signal a problem. If the light works well, the installation is complete. If not, turn off the breaker and review your wiring steps.
Troubleshooting Common Issues
Installing a pendant light can brighten your apartment beautifully. Sometimes, small problems appear after installation. Troubleshooting helps fix these common issues quickly. This section covers easy steps to solve common problems with pendant lights.
Light Not Turning On
Check the power source first. Make sure the switch is on. Look at the circuit breaker to see if it tripped. Replace the light bulb with a new one. Confirm the bulb fits the socket correctly. Inspect the wiring connections for loose ends. Tighten any loose wires carefully. If the light still does not work, test with a different bulb or fixture.
Flickering Or Dim Light
Flickering or dim light often means a bad connection. Tighten the bulb in its socket. Replace the bulb with a higher quality one. Check the wiring for any damage or loose connections. Verify the dimmer switch is compatible with the bulb. Sometimes, the bulb and dimmer do not match. If flickering continues, consult an electrician for safety.
Frequently Asked Questions
How Do I Choose The Right Pendant Light Size?
Select a pendant light that suits your room size and ceiling height. Measure the space carefully. A smaller light fits compact areas, while larger ones suit spacious rooms. Ensure the fixture complements your apartment’s style and doesn’t overwhelm the space for balanced decor.
Can I Install A Pendant Light Without Professional Help?
Yes, you can install a pendant light yourself if you have basic electrical skills. Turn off the power first. Follow the manufacturer’s instructions carefully. Use proper tools and safety gear. If unsure, consult an electrician to avoid risks and ensure safety.
What Tools Are Needed To Install A Pendant Light?
Common tools include a screwdriver, wire stripper, voltage tester, drill, and ladder. You may also need wire nuts and electrical tape. Having these ready makes installation smoother and safer. Always follow safety guidelines when using electrical tools to avoid accidents.
How High Should A Pendant Light Hang In An Apartment?
Hang pendant lights about 30 to 36 inches above tables or countertops. For general room lighting, ensure clearance is at least 7 feet from the floor. Proper height balances aesthetics and functionality, providing enough light without obstructing movement or views.
Conclusion
Installing a pendant light in your apartment can brighten any room. Follow the steps carefully for a safe setup. Choose the right fixture that fits your space and style. Turn off the power before starting to avoid accidents. Take your time and double-check each connection.
A well-installed light adds warmth and charm instantly. Enjoy the new look and feel of your home. Simple changes can make a big difference. Ready to light up your apartment?