Are you ready to transform your space with a stunning pendant light but don’t know where to start? Installing a pendant light might seem tricky, but with the right steps, you can do it yourself and add a stylish touch to any room.
Imagine the warm glow and modern vibe your new light will bring—brightening your home and impressing your guests. In this guide, you’ll find simple, clear instructions that make the process easy and safe. Keep reading, and by the end, you’ll have the confidence to hang your pendant light like a pro.
Choosing The Right Pendant Light
Choosing the right pendant light is key to brightening your space well. It affects the room’s look and feel. Picking the correct light means thinking about size, style, and type. This helps the light fit your room perfectly. You want it to add charm and function.
Types Of Pendant Lights
Pendant lights come in many styles. Single pendant lights focus light on one spot. Multi-light pendants use several bulbs for more brightness. Globe pendants have round shades that soften light. Cage pendants show the bulb, giving an industrial feel. Drum pendants have fabric shades for a cozy glow. Choose a type that matches your room’s use and mood.
Size And Scale Considerations
Size matters in pendant lighting. Too big, and it overwhelms the room. Too small, and it looks lost. Measure your space before buying. The pendant should fit the room’s size and ceiling height. For dining tables, hang the pendant about 30-36 inches above. Use multiple smaller pendants for large spaces. Balance the light size with furniture and room size.
Selecting The Perfect Style
The style of your pendant light sets the tone. Modern lights often have clean lines and minimal design. Rustic styles use wood or metal for warmth. Vintage lights bring charm with classic shapes. Match the pendant to your room’s décor and colors. Choose a style that feels right for your home’s personality. The right style makes the pendant part of your room’s story.
Gathering Necessary Tools And Materials
Before installing a pendant light, gather all tools and materials needed. This step saves time and avoids disruptions during installation. Having the right items ready ensures a smooth and safe process.
Essential Tools Checklist
- Screwdriver (flathead and Phillips)
- Wire stripper
- Voltage tester
- Drill with bits
- Measuring tape
- Wire nuts
- Pliers
- Step ladder
Safety Equipment
- Safety goggles to protect eyes
- Insulated gloves for electrical safety
- Dust mask if drilling creates debris
- Non-slip shoes for stable footing
Additional Supplies
- Electrical tape to secure connections
- Light bulbs compatible with the pendant
- Mounting bracket, often included with light
- Wire connectors for safe wiring
- Stud finder to locate ceiling joists
Preparing The Installation Area
Preparing the installation area is the first step to safely hang your pendant light. This stage helps avoid accidents and makes the process smoother. Taking time to prepare will save effort later.
Turning Off Power
Safety starts with turning off the power at the circuit breaker. This stops electricity from flowing to the installation site. Use a voltage tester to confirm power is off. Never skip this step. It protects you from electric shock.
Clearing The Workspace
Remove furniture and objects from below the installation spot. This creates a clear area to work in. Cover the floor with a drop cloth to catch dust or debris. Make sure you have enough light to see clearly. A tidy space prevents accidents and lost tools.
Checking Electrical Box Compatibility
Check that the electrical box can hold your pendant light’s weight. Use a box rated for ceiling fixtures. If the box is old or loose, replace or reinforce it. Secure mounting is key to avoid accidents. Also, ensure the box size fits your light’s mounting bracket.
Step-by-step Installation Process
Installing a pendant light can change the look of any room. The process is simple and clear. Follow these easy steps to set up your pendant light safely and correctly.
Mounting The Bracket
First, turn off the power at the breaker box. This keeps you safe. Next, take the mounting bracket and place it on the ceiling box. Use a screwdriver to secure it with screws. Make sure the bracket is tight and stable. It will hold the weight of the light fixture.
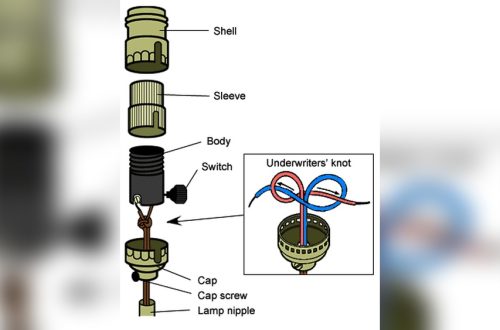
Connecting The Wiring
Carefully pull out the wires from the ceiling. You will see black, white, and green or copper wires. Connect the black wire from the ceiling to the black wire on the pendant. Do the same with the white wires. Connect the green or copper wire to the ground wire or screw. Use wire nuts to secure each connection. Check that all wires are tight and no copper is showing.
Securing The Pendant Light
Once wiring is connected, lift the pendant light to the bracket. Align the fixture’s holes with the bracket screws. Use a screwdriver to fasten the fixture. Ensure it is secure and does not wobble. The pendant should hang straight and firm.
Installing The Bulb And Shade
Now, screw in the light bulb. Use the type recommended for your pendant. After the bulb is in place, attach the shade. The shade may twist or clip on. Make sure it fits snugly and looks even. Turn the power back on and test your new light.
Adjusting Height And Position
Adjusting the height and position of your pendant light is key to both function and style. The right drop length gives the room balance and proper lighting. Positioning it well ensures it lights the area you want without blocking views or movement. Follow simple steps to get the perfect fit for your space.
Measuring The Drop Length
Start by measuring the distance from the ceiling to where you want the light to hang. For dining tables, the bottom of the pendant should be about 30 to 36 inches above the surface. In open spaces, keep it high enough to avoid head bumps but low enough to provide good light. Use a tape measure to get an exact length.
Adjusting Cord Or Chain
Most pendant lights come with an adjustable cord or chain. Shorten or lengthen it to match your measured drop length. If the cord is too long, carefully pull it through the canopy and secure it. For chains, remove extra links with pliers. Make sure the fixture feels stable and safe after adjusting.
Ensuring Level Placement
Check that the pendant light hangs straight and does not tilt. Use a small level tool or step back and look carefully. Adjust the cord or chain until the fixture is perfectly horizontal. A level pendant light looks neat and spreads light evenly across the room.
Testing And Final Touches
After installing a pendant light, testing and final touches are vital. These steps ensure the light works correctly and looks perfect. Taking time here prevents future problems and keeps your space safe. Follow the instructions carefully to finish your project.
Restoring Power And Testing
Turn the power back on at the circuit breaker. Flip the light switch to check if the pendant light turns on. Look for steady light without flickering. Test any dimmer switches or controls connected to the light. Confirm the light hangs straight and at the right height. Adjust the chain or cord if needed. Testing now saves time and effort later.
Troubleshooting Common Issues
If the light does not turn on, check the bulb first. Make sure the bulb is screwed in tightly and is not burned out. Check the wiring connections inside the canopy. Loose wires can stop the light from working. Use a voltage tester to ensure power reaches the fixture. Tighten any loose screws or wire nuts. Replace faulty parts if needed. Be careful and turn off power before fixing wiring.
Cleaning And Maintenance Tips
Dust the pendant light regularly to keep it bright. Use a soft cloth or feather duster for gentle cleaning. Avoid harsh chemicals that can damage the finish. Check the light bulb and replace it when dim or flickering. Inspect wiring and parts yearly to spot wear. Keep the fixture dry and avoid moisture. Proper care helps your pendant light last longer and look great.
Frequently Asked Questions
How Do I Safely Install A Pendant Light?
Turn off the power at the circuit breaker before starting. Use a voltage tester to confirm no electricity flows. Follow the manufacturer’s instructions carefully. Securely mount the bracket and connect wires using wire nuts. Finally, attach the pendant light and restore power.
What Tools Are Needed To Put Up A Pendant Light?
You will need a screwdriver, wire stripper, voltage tester, drill, and pliers. Also, have wire nuts, electrical tape, and a ladder ready. These tools ensure safe and efficient installation of your pendant light fixture.
How High Should I Hang A Pendant Light?
Hang pendant lights 28 to 34 inches above a table or countertop. For general room lighting, 7 feet from the floor is ideal. Adjust height to avoid glare and ensure balanced illumination in the space.
Can I Install A Pendant Light Myself?
Yes, if you have basic electrical knowledge and follow safety steps. Always turn off power and use proper tools. If unsure, consult a licensed electrician to avoid hazards and ensure proper installation.
Conclusion
Putting up a pendant light is easier than it seems. Follow the steps carefully and take your time. Make sure to turn off the power before starting. Use the right tools and check all connections. A well-installed pendant light can brighten any room nicely.
It adds style and improves your space’s look. Enjoy the new light and the cozy feel it brings. Small projects like this boost your home’s charm. Keep safety in mind, and don’t rush the process. You can do this!