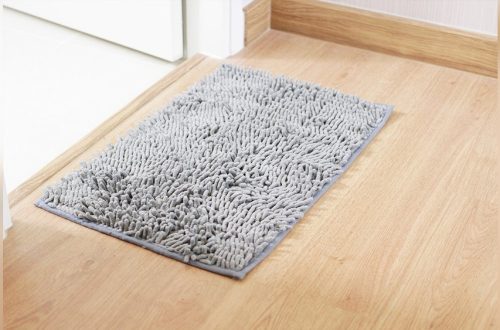
Is your bathroom rug starting to peel or lose its grip? A damaged rubber backing can make your rug slip, bunch up, or look worn out.
But before you toss it aside, there’s good news—you can fix it yourself! Imagine saving money and extending the life of your favorite rug with just a few simple steps. Keep reading, and you’ll learn easy ways to repair your bathroom rug’s rubber backing.
This quick guide will help you restore safety and comfort to your space without any hassle. Ready to bring your rug back to life? Let’s dive in!
Tools And Materials Needed
Repairing a bathroom rug with rubber backing needs the right tools and materials. Having these ready helps the job go smoothly. It saves time and ensures a strong, lasting fix.
Essential Repair Supplies
Start with a clean workspace. Gather scissors for cutting loose threads or damaged parts. Use a soft brush to clean the rug’s surface. Prepare a cloth to wipe the area dry. Have rubber gloves to protect your hands during repair.
Choosing The Right Adhesive
Select an adhesive made for rubber and fabric. A strong, flexible glue works best. It holds the backing firmly without hardening or cracking. Check that the glue dries clear to keep the rug looking neat. Avoid adhesives that have a strong odor or take too long to dry.
Additional Useful Tools
Use a ruler or tape measure for precise cuts. A small roller or flat tool helps press the glue evenly. Keep paper towels nearby to clean spills. A hairdryer can speed up glue drying if needed. These extra tools make the repair easier and neater.
Preparing The Rug
Preparing the bathroom rug is the first step in fixing rubber backing. It helps ensure a strong repair. The rug must be clean and dry. Also, check how bad the damage is. A well-prepared rug lasts longer after repair. Follow these simple steps for best results.
Cleaning The Surface
Remove all dirt and dust from the rug. Use a vacuum or brush for this. Pay close attention to the rubber backing. Dirt can stop glue from sticking well. Use mild soap and water to clean stubborn stains. Avoid soaking the rug too much. Clean surfaces bond better during repairs.
Drying Techniques
Let the rug dry completely before fixing it. Hang it in a sunny spot or a warm room. Avoid direct heat like heaters or hair dryers. Heat can damage the rubber backing. Pat the rug with a dry towel to remove extra water. Proper drying prevents mold and keeps glue strong.
Assessing Damage Extent
Check the rubber backing for tears, holes, or cracks. Look under the rug to find hidden damage. Small tears need simple patching. Large holes might need a new rubber piece. Knowing the damage size helps you choose the right repair method. It saves time and effort later.
Fixing Small Tears And Holes
Small tears and holes can ruin the look of your bathroom rug with rubber backing. Fixing these minor damages quickly keeps the rug safe and durable. The repair process is simple and requires few materials. This section shows easy steps to mend your rug and make it look almost new again.
Applying Rubber Patch
Start by cleaning the damaged area well. Cut a rubber patch slightly larger than the tear or hole. Place the patch carefully over the damaged spot on the back of the rug. Make sure the patch covers the entire hole or tear completely. This step stops the tear from growing bigger.
Sealing With Adhesive
Use a strong adhesive made for rubber materials. Apply a thin layer of glue around the edges of the patch. Press the patch firmly into place on the rug’s backing. The glue seals the patch and keeps it from peeling off. Let the adhesive sit for a few minutes before the next step.
Pressing And Drying Tips
Place a flat, heavy object on the patch to press it down well. Keep the weight on the patch for at least one hour. This helps the patch stick tightly to the backing. Let the rug dry completely in a well-ventilated area. Avoid using the rug until the adhesive is fully dry.
Repairing Large Damaged Areas
Large damaged areas on bathroom rugs with rubber backing need special care. Fixing these spots helps make your rug last longer. It also keeps the bathroom safe and clean. The repair process involves cutting new rubber pieces, attaching them, and making sure they stick well. Follow these steps for a neat and strong repair.
Cutting Replacement Rubber
Start by measuring the damaged area on your rug. Cut a piece of replacement rubber slightly larger than the hole. Use scissors or a sharp knife for clean edges. Make sure the replacement rubber matches the thickness of the original backing. This helps keep the rug flat and comfortable.
Attaching Replacement Pieces
Place the replacement rubber under the damaged spot. Align it carefully to cover the entire area. Use clips or heavy objects to hold it in place. This prevents shifting while you work. Make sure the rug lies flat on top of the new backing piece.
Ensuring Strong Bond
Apply a strong adhesive designed for rubber surfaces. Spread it evenly on both the rug backing and replacement piece. Press them together firmly for several minutes. Let the glue dry completely before using the rug. This ensures a strong, lasting bond to prevent future damage.
Reinforcing The Backing
Reinforcing the backing of a bathroom rug with rubber backing helps it last longer. The rubber backing often wears out or peels. Repairing it keeps the rug stable and safe. Two simple ways to strengthen the backing include using fabric backing and applying protective coatings.
Using Fabric Backing
Adding fabric backing can support the rubber layer. Choose a durable fabric that resists moisture. Cut the fabric slightly larger than the damaged area. Use a strong adhesive to attach the fabric to the rug’s underside. Press the fabric firmly to avoid air bubbles. Let it dry completely before use. This method adds strength and prevents the rubber from peeling.
Applying Protective Coatings
Protective coatings shield the rubber from damage and wear. Select a coating made for rubber surfaces. Clean the rug’s backing before applying the coating. Use a brush or sponge to spread the coating evenly. Allow it to dry as directed on the product label. A coating helps the backing resist water and slipping. It extends the rug’s life and keeps it firm on the floor.
Preventing Future Damage
Preventing damage to bathroom rugs with rubber backing helps them last longer. Small steps keep the rubber strong and stop tears or cracks. Focus on smart placement and easy daily care. These actions protect the rug’s grip and appearance.
Proper Rug Placement
Place the rug on dry, flat floors only. Avoid putting rugs where water pools or spills often. Keep rugs away from direct sunlight. Sunlight breaks down rubber backing quickly. Choose spots with low foot traffic to reduce wear. Use a non-slip pad under the rug for extra grip. This stops slipping and lessens stress on rubber.
Regular Maintenance Tips
Clean the rug regularly to remove dirt and moisture. Use a damp cloth to wipe the rubber backing gently. Avoid harsh chemicals that can damage the rubber. Let the rug dry fully after washing or spills. Air drying works best to keep rubber flexible. Shake or vacuum the rug often to keep it fresh. Check the rug edges for early signs of wear. Fix small tears quickly to avoid bigger damage.
When To Replace The Rug
Knowing when to replace your bathroom rug with rubber backing saves time and effort. Not all damage can be fixed with repair. Some rugs lose their comfort and safety over time. Choosing the right moment to get a new rug keeps your bathroom fresh and secure.
Signs Repair Isn’t Enough
Tears that keep growing. Rubber backing that peels off completely. Mold or bad smell that won’t go away. Thin spots where water seeps through. These signs show the rug has worn out. Repairs may only last a short while. A new rug offers better safety and hygiene.
Choosing A Durable Replacement
Pick a rug with strong rubber backing. Look for materials that resist mold and mildew. Make sure it has a non-slip surface for safety. Choose easy-to-clean fabrics for bathroom use. A durable rug lasts longer and feels good underfoot. Proper replacement keeps your bathroom safe and cozy.
Frequently Asked Questions
How Do I Fix Peeling Rubber Backing On Bathroom Rugs?
Clean the area thoroughly and let it dry. Apply a strong adhesive designed for rubber and fabric. Press firmly and let it cure for 24 hours to ensure a lasting bond.
Can I Repair Bathroom Rugs At Home Easily?
Yes, repairing rubber-backed rugs at home is simple. Use basic materials like fabric glue or rubber adhesive. Follow step-by-step instructions to restore the backing and extend your rug’s life.
What Materials Are Best For Bathroom Rug Repair?
Use rubber adhesive or fabric glue for best results. Scissors, a clean cloth, and clamps help during the repair. These materials ensure a secure, waterproof fix for rubber-backed rugs.
How Long Does A Bathroom Rug Repair Last?
A proper repair can last several months to years. It depends on usage, quality of adhesive, and repair accuracy. Regular maintenance prolongs the life of your bathroom rug.
Conclusion
Repairing bathroom rugs with rubber backing is simple and cost-effective. Small tears or worn spots can last longer with basic fixes. Use common tools and materials you have at home. This saves money and reduces waste. Regular care keeps rugs safe and comfortable.
Enjoy a neat, slip-free bathroom floor every day. Try these easy steps to maintain your rugs well. Your bathroom will look fresh and stay safe. Easy repairs make a big difference over time. Keep your rugs strong and lasting longer.