Looking to create a perfect workspace right in your home? Making your own office desk is easier than you think, and it gives you the freedom to design something that fits your style and needs perfectly.
Imagine having a desk that not only saves you money but also boosts your productivity and comfort every day. Whether you’re short on space or want a unique setup, this guide will walk you through simple steps to build a practical and stylish desk at home.
Ready to turn your workspace dreams into reality? Keep reading and discover how you can make an office desk that works just for you.

Credit: chalkingupsuccess.com
Plan Your Desk Space
Planning your desk space is the first step to creating a functional home office. A well-planned desk helps boost focus and comfort. It fits perfectly in your room and meets your work needs. Careful planning avoids clutter and wasted space.
Measure Available Area
Start by measuring the space where the desk will go. Use a tape measure for accuracy. Note the width, depth, and height available. Check for doors, windows, and outlets near the area. These details affect desk placement and size.
Choose Desk Dimensions
Select desk dimensions that fit your available space. A desk too large can crowd the room. A desk too small limits work area. Standard desks are about 48 to 60 inches wide. Depth usually ranges from 24 to 30 inches. Pick a size that suits your tasks and room.
Consider Room Layout
Think about how the desk fits with other furniture. Keep enough space to move comfortably. Place the desk near natural light if possible. Avoid blocking doors or walkways. Plan for easy access to power outlets. This creates a pleasant and efficient workspace.
Select Materials
Selecting the right materials is key to building a sturdy and attractive office desk at home. The materials affect the desk’s look, strength, and cost. Choose materials that fit your needs and style.
Consider how long you want the desk to last. Think about the space and the desk’s size. The right materials help create a comfortable workspace.
Choose Wood Types
Wood is a popular choice for desks. Solid wood like oak or maple offers strong support and a classic look. Pine is softer but easier to work with. Plywood and MDF are good for smooth surfaces. Each wood type has unique colors and grains. Pick one that matches your room’s style.
Consider Budget-friendly Options
Building a desk does not have to be expensive. Affordable materials like plywood and MDF reduce costs. These materials are easy to cut and shape. Laminate sheets can cover cheaper wood for a polished finish. Use recycled wood or pallets to save money and add character. Budget-friendly options can still look great and last long.
Pick Finishes And Paints
Finishes protect the wood and add style. Clear varnish shows the wood’s natural beauty. Stains change the wood color while keeping the grain visible. Paint offers many color choices and hides imperfections. Choose water-based paints for easy cleaning and low odor. Test finishes on a small wood piece before applying to the whole desk.
Gather Tools And Supplies
Gathering the right tools and supplies is the first step to build your office desk at home. It helps the project run smoothly and safely. Having everything ready avoids delays and frustration.
Choosing the correct tools depends on your desk design. Basic tools work for simple desks, but more complex builds need power tools. Don’t forget safety gear to protect yourself during work. Also, some extra hardware might be necessary for assembly and finishing.
Essential Power Tools
Power tools speed up the building process. A drill helps make holes and insert screws. A circular saw cuts wood quickly and straight. A sander smooths the surface for painting or staining. These tools make the job easier and more precise.
Safety Gear
Safety gear protects your body during construction. Safety glasses shield your eyes from dust and debris. Ear protection reduces noise from loud tools. Gloves protect your hands from splinters and sharp edges. Wearing proper gear lowers the risk of injury.
Additional Hardware
Extra hardware holds your desk parts together. Screws and nails join wood pieces firmly. Wood glue adds strength to joints. Brackets and corner braces support stability. Pick hardware that matches your desk’s size and weight.

Credit: oakodenmark.dk
Cut And Prepare Wood
Cutting and preparing wood is the first hands-on step in making your office desk at home. This process shapes your wood pieces to fit the desk’s design. Proper preparation ensures a sturdy and neat desk. It also makes the assembly easier and the final desk more attractive.
Mark Measurements
Start by measuring the wood according to your desk plan. Use a tape measure for accuracy. Mark the cutting lines with a pencil. Double-check each measurement before cutting. Clear and precise marks help you cut straight and avoid mistakes.
Cut Wood Pieces
Use a saw to cut the wood along the marked lines. A circular saw or handsaw works well for this. Cut slowly and steadily to keep edges clean. Wear safety glasses and gloves for protection. Keep the wood steady with clamps while cutting to avoid slips.
Sand Surfaces Smooth
After cutting, smooth all wood surfaces with sandpaper. Start with coarse grit and move to finer grit for a polished finish. Sand edges and corners to remove splinters. Smooth surfaces prepare the wood for painting or staining. This step improves the desk’s look and feel.
Assemble Desk Components
Assembling the desk components is a key step in making your office desk at home. This process brings together all parts and creates the structure you will use daily. Careful assembly ensures your desk is stable and durable. Follow these clear steps to assemble your desk with ease and confidence.
Attach Desktop Boards
Start by aligning the desktop boards on a flat surface. Make sure the edges match perfectly for a smooth finish. Use clamps to hold the boards tightly together. Check the boards for any gaps or unevenness before moving on. Attach the boards using wood glue along the edges. Let the glue dry according to the instructions. This creates a strong bond between the boards. Once dry, sand the surface to remove any rough spots.
Build Desk Legs Or Frame
Choose a design for your desk legs or frame that fits your space. Cut the wood or metal pieces to the correct length. Assemble the legs or frame by joining the cut parts. Use screws or brackets to secure the pieces tightly. Make sure the legs are all the same height. This keeps the desk level and stable. Double-check measurements before final tightening of screws.
Secure Joints With Glue And Screws
Apply wood glue at each joint for extra strength. Press the parts together firmly and wipe away excess glue. Use screws to secure the joints firmly in place. Pre-drill holes to avoid splitting the wood. Tighten the screws evenly but do not over-tighten. This keeps the joints strong without damaging the material. Allow the glue to fully dry before moving the desk.
Finish Your Desk
Finishing your home office desk adds beauty and protects the wood. A good finish helps your desk last longer and look polished. This final step makes your workspace inviting and practical. Follow these simple steps for a smooth, durable finish.
Apply Paint Or Stain
Choose paint or stain that matches your room style. Use a brush or cloth to spread it evenly. Work in thin layers to avoid drips and blotches. Let the color soak in for rich, natural tones. Paint gives a solid look; stain shows the wood grain.
Add Protective Coating
Apply a clear protective coat after the paint or stain dries. Use polyurethane or varnish to shield the surface. This layer guards against scratches, spills, and daily wear. Brush gently and cover all areas, including edges. The coating adds shine and strength to your desk.
Let Finish Dry Completely
Allow your desk to dry in a dust-free space. Drying times vary by product but usually take several hours. Avoid touching the surface until fully dry to keep it smooth. Proper drying ensures a tough, lasting finish. Patience here pays off with a perfect desk surface.
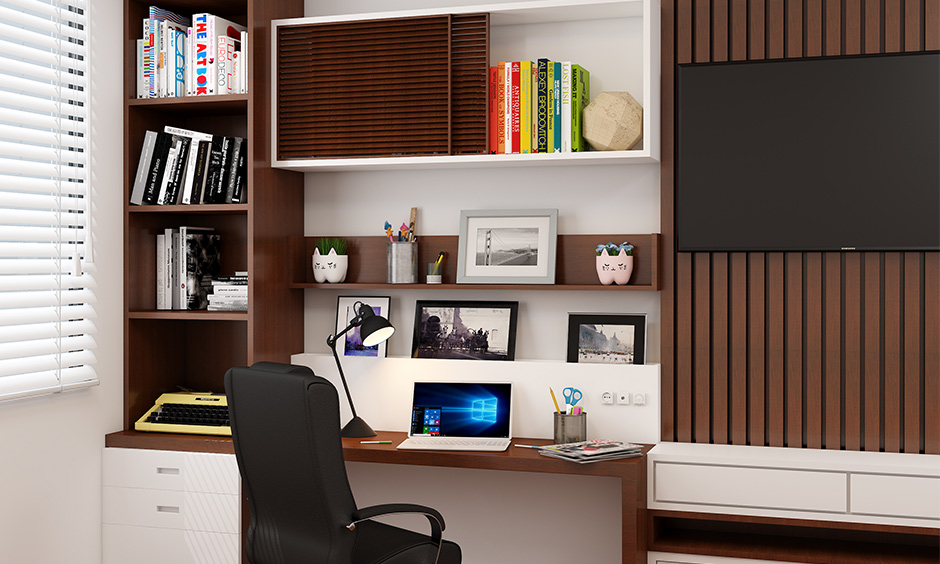
Arrange And Organize
Arranging and organizing your home office desk is key to creating a productive space. A well-placed and tidy desk reduces distractions and boosts focus. Thoughtful setup also makes daily tasks easier and faster.
Start by choosing the best spot for your desk. Then, add smart storage solutions to keep essentials close. Finally, arrange electronics neatly to avoid clutter and tangled cords.
Position Desk In Room
Place your desk where natural light is available. Light improves mood and reduces eye strain. Avoid spots with strong glare on your screen. Make sure there is enough space to move around comfortably. Position the desk near power outlets for easy access.
Add Storage Solutions
Use shelves or drawers to store supplies. Keep items you use often within arm’s reach. Use organizers for pens, papers, and small tools. Clear containers help you find things quickly. Vertical storage saves floor space and keeps things tidy.
Set Up Electronics Neatly
Organize cables with clips or ties to prevent tangling. Use a power strip with surge protection for all devices. Place your computer, monitor, and keyboard ergonomically. Hide wires behind or under the desk for a clean look. Keep chargers and gadgets in designated spots to reduce mess.
Credit: www.designcafe.com
Customize For Comfort
Creating a home office desk is more than just assembling a workspace. Comfort plays a key role in how productive and happy you feel. Customizing your desk area to fit your needs helps reduce strain and keeps you motivated.
Small changes make a big difference. Focus on comfort to build a space where you want to spend time. Below are simple ways to customize your desk for comfort.
Choose Ergonomic Chair
Pick a chair that supports your back well. Look for adjustable height and lumbar support. A good chair reduces back pain and improves posture. Sit with feet flat on the floor and knees at a right angle. Avoid chairs that are too soft or too hard.
Add Lighting Options
Use different light sources to avoid eye strain. Natural light is best, so place your desk near a window. Include a desk lamp with adjustable brightness. Warm light helps reduce glare and makes the area cozy. Change lighting based on the time of day and tasks.
Incorporate Personal Touches
Add items that make you feel good and relaxed. Photos, small plants, or artwork brighten your space. Keep favorite objects within reach for quick smiles. Personal touches make your desk inviting and boost your mood. Avoid clutter to keep focus and calmness.
Frequently Asked Questions
How To Create An Office Desk?
Measure your space and choose desk size. Cut and sand wood pieces. Assemble parts securely. Paint or stain the desk. Add legs or supports for stability.
Can I Build A Desk By Myself?
Yes, you can build a desk yourself using basic tools and materials like plywood. It’s affordable and beginner-friendly. Measure, cut, sand, assemble, and finish for a custom desk.
What Is The Best Material For A Diy Desk?
Hardwoods like oak and maple offer durability and a classic look for DIY desks. Engineered wood and metal provide strong, budget-friendly alternatives. Choose based on your desk’s use, style, and budget to ensure longevity and functionality.
What Is The Best Cheap Countertop For A Desk?
Laminate countertops are the best cheap option for desks. They are affordable, durable, low-maintenance, and come in various styles.
Conclusion
Creating a home office desk is simpler than it seems. Start with clear measurements and choose materials wisely. Use basic tools to assemble your desk step by step. Personalize it with paint or stain to match your style. A well-made desk boosts comfort and productivity daily.
Small effort brings a big difference to your workspace. Enjoy your new desk and work with ease!