Are your pendant lights hanging too low or looking out of place? You’re not alone.
Many people struggle with getting the perfect height for their pendant lighting. But here’s the good news: shortening a pendant light is easier than you think. In this guide, you’ll discover simple, step-by-step tips to adjust your pendant light quickly and safely.
Imagine how much better your room will look with the perfect lighting—no more awkward angles or blinding bulbs. Ready to transform your space? Let’s get started!
Tools Needed
Shortening a pendant light requires the right tools. These tools make the job easier and safer. Having them ready helps you work quickly and neatly.
Measuring Tape
Use a measuring tape to find the exact length needed. Measure twice to avoid mistakes. Accurate measurements ensure the pendant hangs perfectly.
Wire Cutters
Wire cutters help you trim the electrical wire cleanly. They make cutting quick and safe. Sharp cutters prevent damage to the wire ends.
Screwdrivers
Screwdrivers are essential for removing and securing screws. You need both flathead and Phillips types. They help open the fixture and fix parts tightly.
Wire Strippers
Wire strippers remove the insulation from wires without harming the metal inside. This tool makes connecting wires easier. Proper stripping ensures a good electrical connection.
Safety Precautions
Safety is the top priority when shortening a pendant light. Taking proper precautions protects you from shocks and accidents. Small mistakes can cause serious injuries or damage. Follow these simple steps to stay safe throughout the process.
Turn Off Power
Always switch off the power at the circuit breaker before starting. Double-check by using a voltage tester on the wires. Never trust the wall switch alone. This step prevents electric shocks and injury.
Use Insulated Tools
Choose tools with insulated handles to avoid electric shock. Regular tools may conduct electricity if wires are live. Use wire cutters, strippers, and pliers designed for electrical work. This keeps you safe while handling wires.
Work In A Well-lit Area
Good lighting helps you see wires clearly and avoid mistakes. Use a bright lamp or flashlight if needed. A well-lit space reduces risks and makes the job easier. It helps you spot hazards before they cause harm.
Measure Desired Height
Measuring the desired height for your pendant light is the first step in the shortening process. This ensures the light hangs at the perfect level for your space. Accurate measurement helps avoid mistakes and improves the room’s look and function.
Determine Ceiling Height
Start by measuring the height of your ceiling. Use a tape measure to find the distance from the floor to the ceiling. This number sets the base for your pendant light height. Knowing the ceiling height helps you decide how low the pendant should hang.
Mark Pendant Length
Decide how far you want the pendant light to hang from the ceiling. Use a pencil or tape to mark this length on the cord or chain. Make sure the mark matches the height you want the light to sit at. This step guides you during the shortening process.
Account For Fixture Size
Consider the size of the pendant light fixture itself. Add its height to the hanging length to get the total drop from the ceiling. This avoids the light hanging too low or too high. Proper measurement keeps the pendant balanced in the room.
Disconnect The Light
Disconnecting the pendant light is the first step to shortening it safely. This step stops electricity flow and protects you from shocks. Take your time and follow the process carefully.
Remove Light Bulb
Start by taking out the light bulb. Twist it counterclockwise until it comes loose. Set the bulb aside in a safe place. This avoids breaking it during work.
Unscrew Pendant Canopy
Next, unscrew the canopy that holds the light to the ceiling. Use a screwdriver if needed. Gently pull the canopy down to expose the wiring. Keep screws in a small container to avoid losing them.
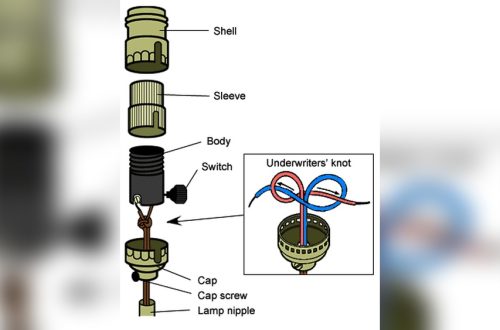
Detach Wiring
Before touching wires, turn off power at the breaker box. Use a voltage tester to confirm no electricity. Unscrew wire connectors or twist off wire nuts. Carefully separate the wires and tuck them back into the ceiling box.
Adjust Cord Length
Adjusting the cord length of a pendant light helps fit the light perfectly in your space. It makes the room look balanced and stylish. Follow these simple steps to shorten the cord safely and easily.
Loosen Cord Grip
Start by turning off the power to the light. Find the cord grip, usually near the ceiling plate. Use a screwdriver to loosen the grip screws. This allows the cord to slide freely. Be gentle to avoid damage to the fixture.
Cut Excess Cord
Measure the length you want to shorten. Mark the spot on the cord with a pencil. Use sharp scissors or wire cutters to cut the extra cord. Leave some extra length for wiring and adjustments.
Strip Wire Ends
Use a wire stripper to remove about half an inch of the outer insulation. Expose the inner wires carefully. Strip about a quarter inch of insulation from each wire end. This step prepares the wires for reconnection.
Reconnect Wiring
After shortening your pendant light, reconnecting the wiring is crucial. This step ensures the light works safely and properly. Follow these simple instructions to connect the wires correctly and avoid any hazards.
Match Wire Colors
First, identify the wire colors from your pendant light and ceiling. Usually, black or red wires carry power. White wires are neutral. Green or bare wires connect to the ground. Match each wire by color before joining them together.
Secure Wire Nuts
Twist the matching wires tightly together. Then, screw on a wire nut over the twisted wires. The wire nut holds the wires firmly and prevents them from coming loose. Use the right size wire nut for a safe connection.
Check Connections
Gently tug each wire nut to test security. Make sure no bare wire shows outside the nuts. Double-check that all wires are connected correctly by color. Proper connections stop shorts and keep your light working well.
Reassemble Pendant
After shortening the pendant light, reassembling it is the next step. This process ensures your light looks neat and works well. Follow these steps carefully to finish the job right.
Tuck Wires Neatly
Push the wires inside the ceiling box gently. Arrange them so they do not overlap or stick out. This keeps the look clean and safe. Tucking wires neatly helps avoid damage or shorts later.
Secure Canopy To Ceiling
Place the canopy over the mounting bracket. Use screws to attach it firmly to the ceiling. Check that it sits flat and does not wobble. A tight canopy supports the pendant light securely.
Install Light Bulb
Choose a bulb that matches the fixture’s specifications. Screw it in carefully without forcing. Make sure it fits snugly and is straight. Installing the bulb finishes your pendant light setup.
Test The Light
Testing the pendant light is an important step after shortening it. This ensures the light works correctly and looks just right. It helps spot any issues early. Follow these simple steps to test your pendant light safely and effectively.
Restore Power
Turn the power back on at the circuit breaker. This restores electricity to the pendant light. Make sure the power is fully on before proceeding. Safety first.
Switch On Light
Use the wall switch to turn on the pendant light. Check if the bulb lights up immediately. Look for flickering or dim light. These signs may mean a loose connection.
Adjust If Necessary
Observe the light height and position. Adjust the pendant length if it is too high or low. Make small changes until it fits perfectly in your space. Check the light again after each adjustment.
Tips For Different Pendant Types
Shortening pendant lights can improve the look and function of any room. Different pendant types need different methods. Understanding these methods helps you adjust the light safely and neatly. Below are tips for common pendant styles.
Chain Suspended Pendants
Chain pendants hang from linked metal pieces. To shorten, remove links carefully. Use pliers to open and close links without damage. Count links before cutting to keep balance. Secure the chain well after adjusting. Check that the pendant hangs straight and stable.
Rod Suspended Pendants
Rod pendants use metal rods for support. Shortening means removing rod sections. Unscrew the rods from each other gently. Use a thread seal tape to avoid leaks in electrical parts. Keep the rods aligned when reassembling. Test the light after shortening to ensure safety.
Cord Suspended Pendants
Cord pendants hang by flexible cords. To shorten, unplug the fixture first. Adjust the cord length by pulling it through the canopy. Tie a knot inside the canopy to hold the cord. Trim excess cord only if it’s safe and allowed. Make sure no wires are exposed before finishing.
Frequently Asked Questions
How Do I Shorten A Pendant Light Safely?
Turn off power before starting. Use wire cutters to trim excess cord. Adjust chain or rod length. Reconnect wires correctly. Secure the canopy. Always follow manufacturer instructions and local electrical codes.
What Tools Are Needed To Shorten Pendant Lights?
You need wire cutters, wire strippers, screwdriver, voltage tester, and pliers. These tools help safely cut, strip, and reconnect wires. Having the right tools ensures a proper and safe installation.
Can I Shorten A Pendant Light Without An Electrician?
Yes, if you have basic electrical knowledge. Always turn off power before working. Follow instructions carefully and use a voltage tester. If unsure, hire a professional to avoid safety risks.
How Much Can I Shorten A Pendant Light Cord?
You can shorten it as much as needed, but leave enough slack for adjustments. Avoid cutting the cord too short to maintain safety and functionality.
Conclusion
Shortening a pendant light is simple with the right steps. Measure carefully before cutting the cord. Use proper tools to keep the work safe. Adjust the length to fit your space perfectly. A well-fitted light improves your room’s look. Take your time and double-check each step.
This small change makes a big difference. Now, enjoy your pendant light hanging just right!