Are you looking to add a unique touch to your home lighting? Making a ceramic pendant light yourself is easier than you might think.
Imagine creating a beautiful, handmade piece that not only lights up your space but also reflects your personal style. In this guide, you’ll discover simple steps to craft your own ceramic pendant light, even if you’re new to ceramics. Ready to transform your room with a one-of-a-kind light fixture?
Keep reading, and you’ll have a stunning pendant light in no time.
Choosing The Right Materials
Choosing the right materials is the first step in making a ceramic pendant light. Good materials ensure your light looks great and lasts long. This section covers the basics you need to know about clay, tools, and light fixtures.
Selecting Clay Types
Clay comes in many types. Earthenware is soft and easy to shape. It fires at low temperatures and is good for beginners. Stoneware is harder and fires at higher temperatures. It is stronger and more durable. Porcelain is smooth and white. It is delicate but looks very elegant. Choose clay based on your skill and the look you want.
Essential Tools For Shaping
Shaping clay requires some basic tools. A wire cutter helps to slice clay blocks. A rib tool smooths surfaces and shapes curves. A needle tool cuts fine details. A sponge keeps the clay moist and smooth. A pottery wheel can speed up shaping but is optional. These tools make the process easier and more precise.
Picking The Perfect Light Fixture
The light fixture must fit inside the ceramic shade. Choose a socket that holds LED bulbs. LED bulbs stay cool and save energy. A cord set or chain helps hang the pendant light. Make sure the fixture matches your room style. Safety is key, so pick a fixture rated for your space.
Designing Your Pendant Light
Designing your ceramic pendant light is the first step to creating a unique piece. It shapes how your light will look and feel in your space. Good design balances style with function. Start by imagining the kind of light you want. Think about the mood it should create. Simple or bold? Smooth or textured? These choices guide your work.
Sketching helps turn your ideas into real plans. Size and shape decide how the light fits in a room. Texture and patterns add personality and charm. This section breaks down each part of design to help you craft your perfect pendant light.
Sketching Your Idea
Put your thoughts on paper. Sketching lets you see your design clearly. Draw rough shapes and lines. Use simple forms first. Don’t worry about details yet. Focus on the overall look and style. Sketch multiple versions to explore different ideas. This step saves time later during making.
Deciding On Size And Shape
Choose a size that fits your space well. Too big can overwhelm the room. Too small may not give enough light. Consider the height and width carefully. The shape affects the light’s spread and style. Round shapes give soft light. Angular shapes create sharp shadows. Pick a shape that suits your room’s mood and function.
Incorporating Texture And Patterns
Texture makes your pendant light interesting to touch and see. You can add grooves, bumps, or smooth areas. Patterns bring style and uniqueness. Try simple lines, dots, or geometric shapes. Think about how light will play on these surfaces. Textured designs can create beautiful shadows. Choose textures that match your room’s style.
Shaping The Pendant
Shaping the ceramic pendant is an important step in making a beautiful light. This process gives your pendant its form and style. You can choose different methods to shape the clay. Each way creates a unique look and feel.
Choosing the right technique depends on your skills and tools. You can hand build the pendant, use a pottery wheel, or add extra details and cutouts. Let’s explore these options.
Hand Building Techniques
Hand building is a simple way to shape your pendant. You use your hands and basic tools to form the clay. Pinching, coiling, and slab building are popular methods. Pinching creates small, round shapes. Coiling uses rolled clay strands to build walls. Slab building involves flattening clay into sheets. This method is easy and does not need special equipment. It allows more control and creativity in the shape.
Using A Pottery Wheel
A pottery wheel helps make smooth, round pendants. The wheel spins the clay as you shape it. This technique is faster for creating even forms. You center the clay on the wheel and pull it upwards. It needs practice to keep the shape balanced. The wheel works best for simple, curved designs. It gives a polished look to the pendant.
Adding Details And Cutouts
Details and cutouts add style and light effects. Use sharp tools or knives to carve patterns. Cutouts let light pass through the pendant. This creates interesting shadows on walls. You can make holes, shapes, or textured surfaces. Apply these features when the clay is soft but firm. Details make your pendant unique and eye-catching.
Drying And Firing Process
The drying and firing process is essential for making a strong ceramic pendant light. It removes moisture from the clay and makes it hard. This step prepares the pendant for the next stages like glazing and final firing. Careful drying and correct firing keep the pendant from cracking or breaking. Understanding this process helps create a beautiful and durable light fixture.
Proper Drying Tips
Dry the pendant slowly to avoid cracks. Keep it in a cool, dry place with good air flow. Cover it loosely with plastic to control drying speed. Turn the pendant regularly to dry all sides evenly. Avoid direct sunlight and heat sources. The clay should feel firm and no longer cold before firing.
Bisque Firing Explained
Bisque firing is the first kiln firing. It changes the clay from soft to hard but still porous. This firing removes all water and organic material. The temperature usually reaches around 1,800°F (980°C). Bisque-fired pieces are easier to handle and ready for glazing. This step strengthens the pendant without glazing it yet.
Glazing Options And Application
Choose a glaze that fits your pendant style and use. Brush, dip, or spray the glaze evenly on the bisque-fired pendant. Make sure the glaze covers all surfaces but avoid thick layers. Let the glaze dry completely before the final firing. Glazing adds color, texture, and a protective layer to the pendant.
Assembling The Light Fixture
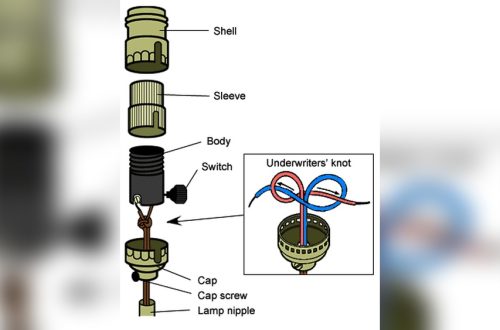
Assembling the light fixture is the next step after crafting your ceramic pendant. This process brings your design to life. It involves connecting the electrical parts and securing the pendant to the cord. Proper assembly ensures your light works safely and looks great.
Wiring Safety Basics
Always turn off the power before starting any wiring. Use a voltage tester to confirm no electricity flows. Choose wires that fit your fixture and socket. Connect wires by matching colors: black to black, white to white. Secure connections with wire nuts. Avoid loose wires to prevent shorts or shocks. Follow local electrical codes for safety.
Attaching The Pendant To The Cord
Thread the cord through the pendant’s hole carefully. Use the pendant’s built-in hardware to hold the cord tight. Tighten screws or clamps to secure the pendant firmly. Make sure the pendant hangs straight and stable. Adjust the cord length to fit your space. This step keeps the pendant safe and stylish.
Choosing Bulbs And Installation
Pick bulbs that fit your socket type and wattage limits. LED bulbs save energy and last longer. Check the bulb size fits inside your ceramic pendant. Screw the bulb gently into the socket. Test the light by turning on the power. Choose warm or cool light based on your room’s mood.
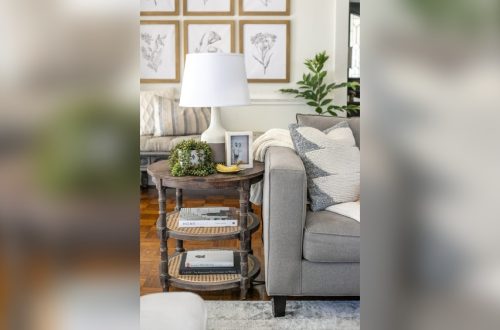
Styling And Placement Ideas
Styling and placement are key to showcasing your ceramic pendant light beautifully. The right spot can highlight its shape and color. It also helps set the mood in any room. Thoughtful styling makes your light a true centerpiece. Here are some ideas to inspire your setup.
Complementing Interior Themes
Ceramic pendant lights fit many styles. For modern spaces, choose simple shapes and neutral colors. Rustic rooms pair well with earthy tones and textured finishes. Coastal themes match whites and blues with smooth ceramics. Match the pendant’s style with your furniture and decor. Balance bold lights with calm surroundings. Soft colors and natural materials create harmony.
Creating Ambient Lighting
Hang your ceramic pendant light where it spreads soft light. Over dining tables or kitchen islands works well. Use a dimmer switch for flexible brightness. Group several pendants for a layered look. Keep enough space around each light to avoid shadows. Warm bulbs enhance cozy atmospheres. Think about how light flows in the room. Adjust height to control brightness and focus.
Maintenance And Care Tips
Clean ceramic pendant lights gently to keep them bright. Use a soft cloth and mild soap. Avoid harsh chemicals that can damage the finish. Check the wiring regularly for safety. Dust around the light often to prevent buildup. Replace bulbs with the right wattage to avoid overheating. Handle the light carefully during cleaning and changes. Proper care extends the beauty and function.
Frequently Asked Questions
What Materials Are Needed For A Ceramic Pendant Light?
You need clay, a pottery wheel or hand-building tools, glaze, kiln access, electrical components, and light bulbs. Safety gear like gloves and masks is also essential.
How Do You Shape A Ceramic Pendant Light?
Shape the clay using hand-building or a pottery wheel. Create a hollow form with an opening for wiring and light bulbs. Smooth edges and ensure even thickness.
What Type Of Glaze Is Best For Pendant Lights?
Use heat-resistant, non-toxic glazes suitable for ceramics. Matte or glossy finishes work well. Ensure the glaze is safe to use near light bulbs and heat.
How Do You Install Electrical Components Safely?
Use certified sockets and wiring. Drill holes carefully for wiring access. Secure components firmly inside the ceramic shade. Always turn off power before installation.
Conclusion
Making a ceramic pendant light is a fun and creative project. It lets you add a personal touch to your home decor. You only need some basic tools and materials to start. Each step is simple and easy to follow.
You can choose colors and shapes you like best. This craft also helps improve your skills and patience. Enjoy the process and the beautiful light you create. Try making one and brighten your space with handmade charm.