Are you looking to add a unique touch to your home lighting? Making a pendant light chandelier yourself is easier than you think—and it lets you create a piece that truly reflects your style.
Imagine the warm glow of a custom chandelier lighting up your space, catching the eye of every guest. In this guide, you’ll discover simple, step-by-step instructions to build your own stunning pendant light chandelier. By the end, you’ll have the confidence and know-how to transform your room with a beautiful, handmade centerpiece.
Ready to brighten up your home with your own creation? Let’s get started!
Materials And Tools Needed
Gathering the right materials and tools is the first step to build a pendant light chandelier. Choosing quality items makes the project easier and safer. Knowing exactly what you need saves time and effort.
This section explains the key materials and tools. It helps you prepare well before starting assembly. Clear information keeps the process smooth and enjoyable.
Choosing The Right Pendant Lights
Select pendant lights that match your room style and size. Consider the light’s shape, color, and brightness. Pick lights with easy-to-handle cords or chains. Check that the bulbs fit standard sockets for convenience. Opt for LED bulbs for energy savings and longer life.
Essential Tools For Assembly
Use a drill with bits for making holes in the ceiling. A screwdriver set is necessary for tightening screws securely. Wire strippers help prepare electrical wires safely. A voltage tester ensures power is off before work. Pliers assist in bending or twisting wires as needed.
Additional Supplies
Gather wire nuts to connect electrical wires safely. Use electrical tape to secure wire nuts and prevent short circuits. A sturdy ceiling hook or mounting bracket holds the chandelier in place. Measuring tape helps position lights evenly and at the right height. A ladder or step stool provides safe access to the ceiling.
Design Ideas And Planning
Designing and planning your pendant light chandelier is the first step. This stage sets the tone for the entire project. Good planning helps you avoid mistakes and saves time. It also ensures your chandelier fits well and looks great in your space.
Selecting A Style
Choose a style that fits your room’s look. Modern, rustic, industrial, or classic—pick what you like best. Consider the colors and shapes that match your furniture. Think about the size of the fixture too. A style that blends with your decor makes the room feel balanced.
Measuring Your Space
Measure the area where you will hang the chandelier. Note the ceiling height and the width of the room. Check the distance from the floor to the fixture. These numbers help decide the chandelier’s size and hanging length. Correct measurements ensure safety and good lighting.
Sketching The Layout
Draw a simple sketch of your planned chandelier. Include the number of pendants and their arrangement. Mark the exact spots for each light on your drawing. This visual guide helps during installation. Sketching clears any confusion before you start building.
Preparing The Pendant Lights
Preparing pendant lights is the first step in making a chandelier. This phase ensures safety and style. Proper preparation helps your project look great and last longer.
Focus on removing old fixtures carefully. Understand wiring basics for safe installation. Customize shades for a unique touch. Each step matters for a perfect finish.
Removing Existing Fixtures
Turn off the power at the circuit breaker. Use a voltage tester to check no electricity flows. Unscrew the old fixture from the ceiling. Carefully disconnect the wires and remove the fixture. Handle all parts gently to avoid damage.
Wiring Basics
Identify the live, neutral, and ground wires. Match new wires with the same colors. Use wire nuts to connect wires securely. Wrap connections with electrical tape for safety. Keep wires neat to avoid problems later.
Customizing The Shades
Choose shades that fit your style and space. Paint or decorate plain shades for a fresh look. Replace old shades with new ones if needed. Ensure shades fit well on the pendant lights. This step adds personality to your chandelier.
Assembling The Chandelier Frame
Assembling the chandelier frame is the first key step in creating your pendant light chandelier. The frame holds everything together and supports the lights. A strong, well-built frame ensures your chandelier is safe and looks great.
Choosing A Frame Material
Select a material that fits your style and strength needs. Wood offers a warm, natural look. Metal is sturdy and gives a modern feel. Consider lightweight options if you hang the chandelier from a ceiling that cannot hold much weight.
Think about how the material will hold the lights and wires. Choose one easy to work with for cutting and drilling. Avoid materials that may bend or break easily.
Building The Support Structure
Start by cutting your frame pieces to the right size. Use a ruler and pencil for accurate measurements. Join the pieces using screws, nails, or strong glue. Make sure the frame is square and stable.
Add extra supports if the chandelier will hold many lights. Reinforce corners for better strength. Test the frame by gently pressing on it to check for wobbling.
Attaching Pendant Lights
Mark where each pendant light will hang on the frame. Drill holes or hooks for the light cords. Secure the lights firmly to avoid movement.
Keep wires neat and hidden inside or along the frame. Use cable clips or ties to hold wires in place. Check the electrical connections are safe before hanging the chandelier.
Wiring And Electrical Setup
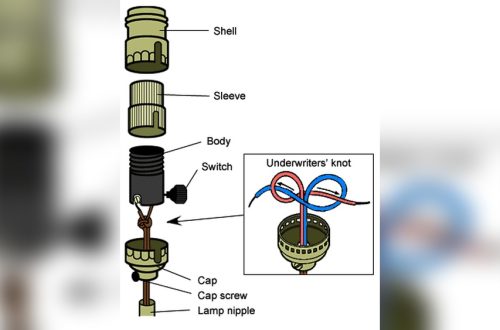
The wiring and electrical setup is a key step in making a pendant light chandelier. It ensures the light works safely and correctly. Careful handling of wires and connections is important. This part requires attention to detail and following safety rules. Proper wiring keeps the chandelier stable and avoids electrical problems. Here is how to do it right.
Connecting Wires Safely
Turn off the power before starting any wiring work. Use a voltage tester to confirm no electricity flows. Strip the wire ends carefully without damaging the copper inside. Match the wires by color: black to black, white to white, green or bare copper to ground. Twist wires together tightly and cover with wire nuts. Wrap electrical tape around the nuts for extra safety. Keep wires neat and avoid loose connections.
Testing Electrical Components
After wiring, check all parts before final installation. Use a multimeter to test for continuity and proper voltage. Make sure bulbs fit securely and sockets are not loose. Turn the power on briefly to test the light. Watch for flickering or sparks, which show a problem. Turn off power immediately if you see any issues. Fix all problems before finishing the setup.
Ensuring Code Compliance
Follow local electrical codes to keep the setup legal and safe. Use materials approved by safety standards like UL or CE. Check wire sizes and circuit breakers match the chandelier’s power needs. Install a proper junction box rated for ceiling fixtures. Secure all connections inside the box to prevent fire risks. Inspect the work or hire a licensed electrician for final approval. This step protects your home and family.
Hanging And Adjusting The Chandelier
Hanging and adjusting your pendant light chandelier is a crucial step. It ensures the fixture looks great and works safely. Proper installation helps avoid accidents and keeps your room stylish. Follow clear steps to mount, balance, and check your chandelier.
Mounting Hardware Installation
Start by attaching the mounting bracket to the ceiling box. Use screws that fit tightly and hold well. Make sure the bracket is secure and level. Connect the chandelier wires to the ceiling wires. Match colors: black to black, white to white, and green or copper to ground. Twist wire nuts on firmly. Tuck wires neatly inside the ceiling box.
Balancing And Height Adjustment
Adjust the chain or rod length to set the chandelier height. The light should hang at a comfortable level, not too low or high. Use a level tool to check if the chandelier is straight. Shift the fixture slightly until it balances evenly. A balanced chandelier looks better and prevents stress on hardware.
Final Safety Checks
Double-check all screws and wire connections. Pull gently on the fixture to test its strength. Turn on the power and test the light bulbs. Look for flickering or loose parts. Make sure no wires are exposed. Safety is key for a long-lasting chandelier.
Finishing Touches
Finishing touches bring your pendant light chandelier to life. They add style and personality. This stage is where creativity shines. Small details make a big difference. Focus on painting, decorating, and lighting to complete your project.
Painting And Decorating
Choose paint that suits your room’s style. Matte finishes give a soft look. Glossy paint adds shine and brightness. Use painter’s tape for clean lines. Let the paint dry fully before moving on. Decorating can include stencils or patterns. Simple designs often look best and timeless.
Adding Decorative Elements
Attach beads, crystals, or small chains for extra flair. Use hot glue or small hooks to secure them. Natural materials like wood or twine add warmth. Metal accents give a modern feel. Keep the decoration balanced and not too heavy. This keeps the chandelier safe and attractive.
Lighting Tips For Ambiance
Choose bulbs with warm light for cozy spaces. Dimmer switches help control brightness easily. Position bulbs so light spreads evenly. Avoid overly bright bulbs that cause glare. Consider LED bulbs for energy saving. Soft lighting enhances the mood and style of your chandelier.
Troubleshooting Common Issues
Troubleshooting common issues is a key part of making a pendant light chandelier work well. Problems can stop your chandelier from looking or working its best. Fixing these issues quickly will save time and keep your light safe.
Some issues are easy to solve with simple checks. Others may need careful attention to wiring or parts. Knowing how to spot and fix problems helps you keep your chandelier shining bright.
Fixing Wiring Problems
Wiring problems cause flickering or no light at all. First, turn off the power to stay safe. Check all wire connections to ensure they are tight. Loose wires cause poor contact and power issues. Use a voltage tester to find if power reaches the wires. Replace damaged wires immediately to avoid fire risks. If unsure, ask an electrician for help.
Dealing With Uneven Pendants
Uneven pendants ruin the look of your chandelier. Measure each pendant’s length and compare them. Adjust the cords or chains to the same length. Use a level tool to check if pendants hang straight. Tighten any loose hooks or fasteners. This keeps the pendants balanced and the light even.
Replacing Bulbs And Parts
Burnt-out bulbs lower your chandelier’s glow. Always use bulbs with the right wattage and size. Turn off the power before changing bulbs. Check sockets for corrosion or damage before inserting new bulbs. Replace any faulty parts like sockets or switches. Keep spare bulbs and parts ready for quick fixes.
Frequently Asked Questions
What Materials Are Needed To Make A Pendant Light Chandelier?
You need a pendant light kit, chandelier frame, wiring, bulbs, and mounting hardware. Optional tools include a drill and screwdriver.
How Do I Safely Install A Pendant Light Chandelier?
Turn off power at the circuit breaker. Follow wiring instructions carefully and secure the chandelier firmly to the ceiling.
Can I Customize The Pendant Light Chandelier Design?
Yes, you can choose different frame shapes, colors, bulb types, and shades to match your decor style.
How Long Does It Take To Make A Pendant Light Chandelier?
On average, it takes 2 to 4 hours depending on your experience and the chandelier’s complexity.
Conclusion
Creating a pendant light chandelier adds charm to any room. The steps are simple and easy to follow. Choose materials that fit your style and space. Safety matters—always check your wiring carefully. Enjoy the process and take your time. A handmade chandelier brings a personal touch.
Brighten your home with your own design. Try this project to add warmth and light.