Are you ready to brighten up your space with the Orion LED Floor Lamp but unsure where to start? Assembling a new lamp might seem tricky, but with the right steps, you’ll have it standing tall and glowing in no time.
This guide will walk you through every part of the process, making it simple and stress-free. By the end, you’ll not only have a stylish light fixture but also the satisfaction of putting it together yourself. Keep reading, and let’s get your Orion lamp shining!

Credit: www.amazon.com
Tools Needed
Gathering the right tools makes assembling the Orion LED floor lamp easier. The process is simple but needs some basic equipment. Having these tools ready helps you work faster and avoid mistakes.
Screwdriver
A screwdriver is essential for tightening screws. Most lamps require a Phillips-head screwdriver. This tool fits the cross-shaped screw heads perfectly. Keep it handy to secure all parts firmly.
Allen Wrench
Some parts use hex screws that need an Allen wrench. This small, L-shaped tool fits into hexagonal sockets. Usually, the lamp kit includes one. If not, a set of Allen wrenches works well.
Measuring Tape
A measuring tape helps check distances and ensure correct lamp height. It also makes sure parts align properly. Simple but useful for precise assembly.
Soft Cloth
A soft cloth protects the lamp’s surface during assembly. Wipe dust or fingerprints off the parts. Prevent scratches and keep the lamp looking new.
Unboxing The Lamp
Unboxing the Orion LED Floor Lamp starts your assembly journey. This step ensures you have all parts before you begin. Carefully opening the box helps avoid damage to the lamp.
Take your time to handle each component with care. Organizing parts on a clean surface makes assembly easier. Check for any missing or broken pieces right away.
Preparing Your Workspace
Clear a flat area to unpack the lamp safely. Use a soft cloth or mat to protect the parts. Good lighting helps you see small pieces clearly.
Removing The Packaging
Open the box gently to avoid tearing the contents. Remove any plastic wrap and protective foam. Keep the packaging for possible returns or storage.
Checking The Contents
Compare the parts with the instruction list. Identify the lamp base, pole sections, LED light, and hardware. Ensure all screws and tools are included.
Inspecting For Damage
Look for dents, scratches, or cracks on each part. Report any damage to the seller immediately. Do not try to assemble damaged parts.
Identifying Parts
Before assembling the Orion LED floor lamp, knowing its parts helps. This makes the process smooth and fast. Each part has a role in making the lamp work well. Identifying them first avoids mistakes during assembly.
Base
The base is the lamp’s bottom part. It keeps the lamp steady and upright. It is usually heavy to stop the lamp from tipping over.
Pole Sections
The pole sections are long tubes. They connect to form the lamp’s main body. They click or screw together easily.
Led Light Head
The LED light head is the lamp’s top part. It holds the LED bulb and controls light direction. It may have a switch or dimmer.
Power Cord
The power cord plugs the lamp into an outlet. It often comes attached to the base or the bottom pole section. Check its length to place the lamp well.
Assembly Screws And Tools
Small screws and tools come with the lamp. These help secure the parts firmly. Keep them handy during assembly.
Credit: www.copenhagenliving.com
Attaching The Base
Attaching the base is the first step in assembling the Orion LED floor lamp. This part keeps the lamp stable and safe to use. Take your time to do it right. A strong base means your lamp will stand firm and last longer.
Gather the base and the screws from the package. Make sure you have a screwdriver ready. Clear a flat space to work on. This helps avoid losing small parts.
Position The Base Correctly
Place the base on the floor with the flat side down. The bottom should feel steady and not wobble. Align the lamp pole with the hole in the base. The pole must fit snugly into the base.
Secure The Base With Screws
Insert the screws into the holes on the base. Tighten each screw with the screwdriver. Turn slowly to avoid stripping the screws. Check if the base feels tight and does not move. Tight screws keep the lamp steady and safe.
Double Check Stability
Lift the lamp slightly and set it down again. The base should hold firm without shifting. If it moves, tighten the screws more. A stable base prevents the lamp from tipping over.
Connecting The Pole Sections
Connecting the pole sections is an important step in assembling the Orion LED floor lamp. Each pole piece fits together to create a strong, tall stand. Proper connection ensures the lamp stands steady and looks neat.
Take your time with this step. Aligning the poles correctly makes the assembly easier and safer. The following instructions explain how to join the pole sections smoothly.
Identify Each Pole Section
Lay out all pole sections on a flat surface. Look for markings or labels that show the order. Usually, the bottom section is thicker and heavier.
Align The Connecting Ends
Notice the ends of each pole. One end fits inside the next section. Match the shapes carefully. Align the grooves or threads to avoid damage.
Insert And Twist To Secure
Push the narrower end gently into the wider section. Turn the pole clockwise to tighten. Keep twisting until it feels snug but not forced.
Check Stability Of The Connected Poles
Hold the connected poles upright. Wiggle them lightly to test firmness. If loose, twist again or realign the sections. Firm poles ensure safe lamp use.

Credit: www.copenhagenliving.com
Installing The Led Light
Installing the LED light in the Orion LED floor lamp is a simple step. It brings the lamp to life and ensures bright, efficient lighting. Follow these clear instructions to fit the LED light correctly and safely.
Unpack The Led Light Carefully
Take the LED light out of its box with care. Avoid touching the bulb surface to keep it clean. Place the light on a soft, flat surface before installation.
Connect The Led Light To The Lamp Base
Locate the socket at the lamp base. Insert the LED light firmly but gently into the socket. Make sure it fits snugly to avoid loose connections.
Secure The Led Light With The Holder
Use the lamp’s holder to fix the LED light in place. Tighten any screws or clips without overdoing it. This step keeps the light stable and prevents wobbling.
Check The Electrical Connection
Ensure the power cord is plugged in properly. Look for any loose wires around the socket. A secure connection prevents flickering and power issues.
Test The Led Light
Turn on the lamp switch to test the light. The LED should glow bright and steady. If not, check the connection again or try reinstalling the bulb.
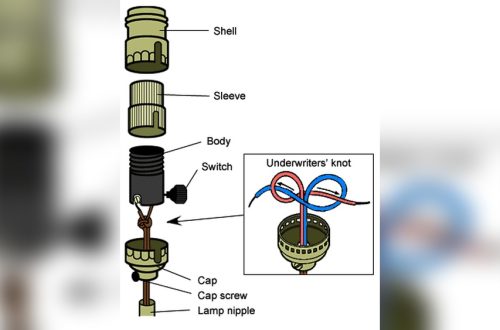
Securing The Wiring
Securing the wiring is a key step in assembling the Orion LED floor lamp. Proper wiring ensures the lamp works safely and lasts longer. Loose or exposed wires can cause problems or damage.
Follow clear steps to keep the wiring neat and secure. This helps avoid accidental pulls or wear over time. Take your time and handle the wires gently.
Identify The Wiring Components
First, find all wires and connectors. The lamp usually has a power cord, internal wiring, and connectors. Check each part for damage before assembly. Use only parts from the lamp package.
Route The Wires Carefully
Guide the wires through the lamp’s pole or base. Avoid sharp bends or tight loops. Keep wires away from screws or moving parts. This prevents cuts or breaks during use.
Secure Wires With Clips Or Ties
Use cable clips or zip ties included in the box. Attach wires firmly but do not squeeze them too tight. This holds wires in place and stops them from moving. Trim extra tie length for a clean look.
Connect Wires Firmly
Join wires using the correct connectors or screws. Make sure connections are tight and no bare wire shows. Loose connections can cause flickering or short circuits.
Test The Wiring
Before final assembly, plug in the lamp. Turn it on to check if the light works well. If it flickers or does not light, recheck all connections. Fix issues before closing the lamp.
Testing The Lamp
Testing the Orion LED floor lamp is a key step in assembly. It confirms the lamp works safely and correctly. This step also helps spot issues before use. Follow simple instructions to test the lamp properly. Check every part carefully to avoid problems later.
Checking The Power Connection
Plug the lamp into a working outlet. Ensure the power cord is firmly connected. Look for any loose wires or damaged plugs. A secure connection prevents electrical hazards.
Turning On The Lamp
Use the switch to turn the lamp on. The light should come on immediately. If it does not, check the bulb and wiring. Replace the bulb if it is faulty.
Testing The Brightness And Settings
Adjust the lamp settings if available. Test dimming or color temperature controls. Confirm each function responds correctly. This ensures you get the desired lighting effect.
Inspecting For Flickering Or Noise
Watch the lamp for flickering light. Listen for buzzing or unusual sounds. These may indicate electrical issues. Stop use and check connections if problems appear.
Troubleshooting Common Issues
Troubleshooting common issues with the Orion LED floor lamp helps save time and avoid frustration. Many problems are simple and easy to fix. Knowing the right steps keeps your lamp working well and brightens your space.
Check each part carefully. Small mistakes during assembly cause most issues. Follow these tips to solve problems quickly and enjoy your lamp.
Checking The Power Connection
Make sure the lamp is plugged into a working outlet. Check the power cord for any damage. Sometimes the plug is loose. Push it firmly into the socket. Test another device on the same outlet to confirm it has power.
Fixing Flickering Or Dim Light
Loose bulb connections cause flickering. Turn off the lamp and tighten the bulb gently. Use the correct bulb type and wattage. Clean the bulb and socket from dust. Dirty connections can affect the light.
Resetting The Lamp Switch
The switch may stick or not respond. Turn the lamp off and on several times. Unplug the lamp for a minute, then plug it back in. This can reset the switch. Replace the switch if it still does not work.
Aligning The Lamp Parts Properly
Misaligned parts cause instability or poor lighting. Check all screws and joints are tight. Adjust the lamp head to the correct angle. Follow the assembly steps again if needed. Proper alignment ensures good light and safety.
Maintenance Tips
Maintaining your Orion LED Floor Lamp keeps it shining bright and working well. Regular care helps avoid problems and extends the lamp’s life. Follow these simple steps to keep your lamp clean and safe.
Cleaning The Lamp Surface
Turn off and unplug the lamp before cleaning. Use a soft, dry cloth to wipe dust from the surface. Avoid wet cloths or harsh cleaners that can damage the finish. Clean gently around the bulbs and switches.
Checking The Led Bulbs
Inspect the LED bulbs regularly for any flickering or dim light. Replace bulbs only with the recommended type for your lamp. Handle bulbs carefully to avoid damage. Proper bulbs ensure good light quality and safety.
Securing Loose Parts
Look over the lamp for any loose screws or joints. Tighten them with a small screwdriver to keep the lamp steady. Loose parts can cause wobbling or damage over time. Regular checks keep the lamp stable and safe.
Managing The Power Cord
Keep the power cord untangled and away from sharp edges. Check for any cuts or frays on the cord regularly. Replace the cord if it shows damage to avoid electrical hazards. Proper cord care supports safe lamp use.
Frequently Asked Questions
How Do I Start Assembling The Orion Led Floor Lamp?
Begin by unpacking all parts carefully. Identify each component using the manual. Start with the lamp base, securing it firmly.
What Tools Are Needed For Assembly?
Most Orion LED floor lamps require only a screwdriver. Some models might include an Allen wrench. Check the instruction manual before starting.
How To Connect The Led Bulb To The Lamp?
Insert the LED bulb into the socket carefully. Ensure it fits snugly without forcing. Avoid touching the bulb glass to prevent damage.
Can I Assemble The Lamp Alone?
Yes, the Orion LED floor lamp is designed for single-person assembly. Follow steps methodically for safe and easy setup.
Conclusion
Assembling the Orion LED floor lamp is simple and quick. Follow the steps carefully to avoid mistakes. Take your time with each part for best results. The lamp will brighten any room once fully assembled. Enjoy the soft, energy-saving light it provides.
This guide helps you set up your lamp with ease. Now, your space looks better and feels cozy. Keep instructions handy for future reference or moves. A well-lit room improves mood and comfort greatly. You did a great job putting it together!