Changing a pendant light might seem tricky, but it doesn’t have to be. Imagine giving your room a fresh new look with just one simple update.
You can do this yourself, even if you’ve never worked with lighting before. In this guide, you’ll discover easy steps to safely and quickly change your pendant light, saving time and money. Ready to brighten up your space? Keep reading and let’s get started!
Tools And Materials Needed
Before starting to change a pendant light, gather all necessary tools and materials. Having everything ready makes the job easier and safer. This section lists essential tools and helps you pick the right pendant light for your space.
Essential Tools
You will need a few basic tools to change a pendant light. A screwdriver, usually a flathead and a Phillips, is key for removing screws. A voltage tester ensures the power is off before you touch wires. Wire strippers help prepare the wires for connection. Pliers can assist with twisting wires together. Finally, a ladder or step stool helps you reach the fixture safely.
Choosing The Right Pendant Light
Select a pendant light that fits your room’s style and size. Measure the space so the light hangs at the right height. Consider the bulb type for brightness and energy use. Check the fixture’s weight and make sure your ceiling can support it. Also, match the wiring requirements with your home’s electrical system.
Safety Precautions
Changing a pendant light needs care and attention. Safety is the top priority. Electrical work can be risky without the right steps. Follow these safety rules to protect yourself and your home.
Turning Off Power
Start by switching off the power at the circuit breaker. Do not rely only on the light switch. Cutting power at the source stops electricity flow. This step prevents shocks and accidents. Double-check that the power is off before touching wires.
Using A Voltage Tester
Use a voltage tester to confirm no electricity is present. This tool shows if wires still have power. Touch the tester to each wire carefully. No light or sound means the power is off. If the tester shows power, switch off the breaker again. Never skip this step for your safety.
Removing The Old Pendant Light
Removing the old pendant light is the first step in updating your room’s look. This task requires care and attention to avoid damage or injury. Taking time to do it right ensures a smooth process for installing the new fixture.
Detaching The Fixture
Turn off the power at the circuit breaker. Never rely on just the wall switch. Use a ladder to reach the pendant light safely. Remove any bulbs and shades from the fixture. Locate the screws or nuts holding the fixture to the ceiling. Unscrew them carefully, supporting the fixture with one hand. Slowly lower the pendant light from the ceiling mount.
Handling Wiring Safely
Check that the power is off with a voltage tester. Gently pull the fixture away to expose the wiring. Note how the wires connect: usually black to black, white to white, and green or copper to ground. Unscrew the wire connectors to separate the wires. Keep the wires apart to avoid contact. Wrap wire ends with electrical tape for safety. Never touch wires with bare hands while power is on.

Credit: electriciancourses4u.co.uk
Preparing For Installation
Preparing for installation is the first step to change a pendant light safely and correctly. This stage helps avoid problems later. It ensures the new light fits well and works properly.
Focus on two key tasks before starting: checking the electrical box and setting the right height and position. Both steps are important for a smooth installation.
Inspecting The Electrical Box
Start by turning off the power at the breaker. This keeps you safe from electric shock. Remove the old light fixture carefully. Look inside the electrical box. Check for any damage or loose wires. The box must be strong and secure. If it looks worn or cracked, replace it before installing the new light.
Adjusting Height And Position
Decide how low or high the pendant will hang. Consider the room size and table or floor height below. Most pendant lights hang 28 to 34 inches above a table. Use a measuring tape to set the exact length. Adjust the chain or rod to this length. Make sure the light is centered in the room or above the furniture. Proper height and position improve both look and function.
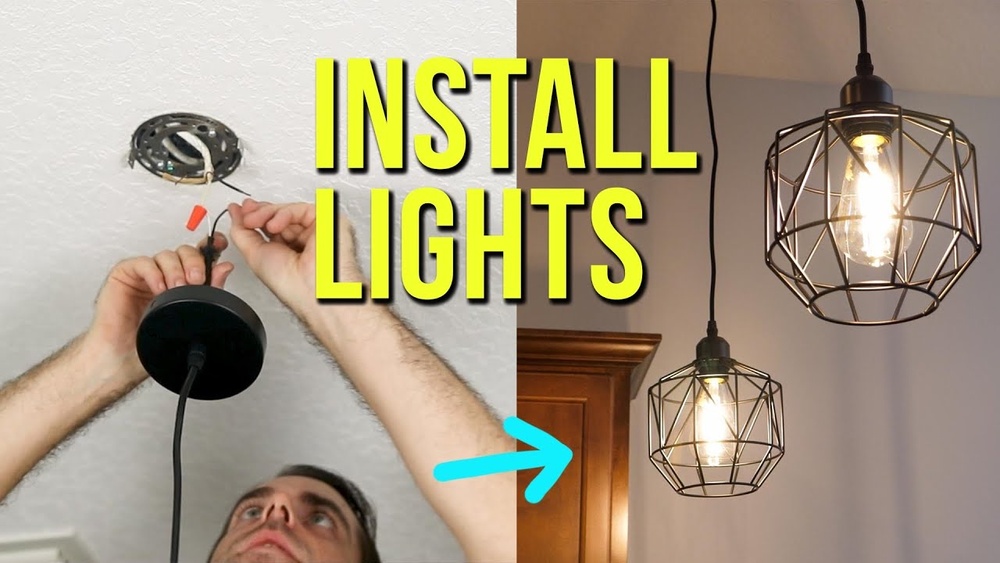
Installing The New Pendant Light
Installing the new pendant light is the next important step. This part involves connecting the wires and securing the fixture safely to the ceiling. Careful attention ensures your new light works well and looks great.
Connecting The Wires
Start by matching the wires from the ceiling to the wires on the pendant light. Usually, black or red wires are live, white wires are neutral, and green or bare wires are ground.
Use wire connectors to join the same color wires together. Twist the connectors tightly to make a strong connection. Wrap electrical tape around the connectors for extra safety.
Push the connected wires gently back into the electrical box. Make sure no bare wire shows outside the connectors.
Securing The Fixture
Attach the mounting bracket to the electrical box using screws. The bracket holds the pendant light in place.
Lift the pendant light and align it with the bracket. Secure the fixture with screws or nuts provided in the kit.
Check the fixture is tight and stable. It should not wobble or move.
Finally, install the light bulb and test the light by turning the power on.

Credit: www.youtube.com
Final Adjustments
After installing your pendant light, it is important to make final adjustments. These steps ensure your new light works well and looks great. Small checks and touches can improve both function and style.
Testing The Light
Turn the power back on and switch on the pendant light. Check if it lights up without flickering. Look for any loose parts or wires. Make sure the light is steady and bright enough for the room. Test the switch to confirm it operates smoothly. If the light does not turn on, turn off the power and check connections again.
Adding Decorative Touches
Adjust the height of the pendant light for the best look. Make sure it hangs evenly and at the right level. Clean the light cover or shade to remove dust and fingerprints. Add bulbs that match the style and brightness you want. Consider adding dimmers for mood lighting. These small details make your pendant light more attractive and functional.
Troubleshooting Tips
Changing a pendant light can sometimes lead to small problems. Troubleshooting tips help fix these issues quickly. These tips save time and keep your light working well. Below are common problems and easy solutions.
Fixing Flickering Lights
Flickering lights are often caused by loose bulbs or poor connections. Check if the bulb is tight in the socket. Turn off the power before doing this. Replace the bulb if flickering continues. Use a bulb that matches the fixture’s wattage. Sometimes, the switch or wiring may cause flicker. If unsure, call an electrician to check the wiring.
Dealing With Loose Fixtures
A loose pendant light swings or moves too much. This happens when screws or mounting parts are not tight. Turn off the power first. Use a screwdriver to tighten screws on the fixture and mounting bracket. Check the ceiling box to make sure it is secure. If the fixture still moves, the mounting bracket might need replacing. Keep the light steady for safety and a neat look.

Credit: prettyhandygirl.com
Frequently Asked Questions
How Do I Safely Turn Off Power Before Changing A Pendant Light?
Always switch off the circuit breaker controlling the light. Use a voltage tester to confirm no electricity flows. This ensures safety and prevents electrical shocks during the process.
What Tools Are Needed To Change A Pendant Light?
You will need a screwdriver, wire stripper, voltage tester, and possibly pliers. Having these tools ready makes the replacement process smooth and efficient.
Can I Change A Pendant Light Without An Electrician?
Yes, if you follow safety steps and understand wiring basics. Turn off power, use proper tools, and carefully handle electrical connections. Call a professional if unsure or uncomfortable.
How Do I Remove The Old Pendant Light Fixture?
First, turn off power and remove the bulb. Unscrew the fixture from the ceiling mount and disconnect wires carefully. Keep track of screws for reinstallation.
Conclusion
Changing a pendant light is easier than it seems. Turn off the power first to stay safe. Follow each step carefully and take your time. A new light can brighten your space quickly. You will feel proud after finishing the job.
Try this simple project to update your home today. Small changes can make a big difference. Now you know how to change a pendant light.