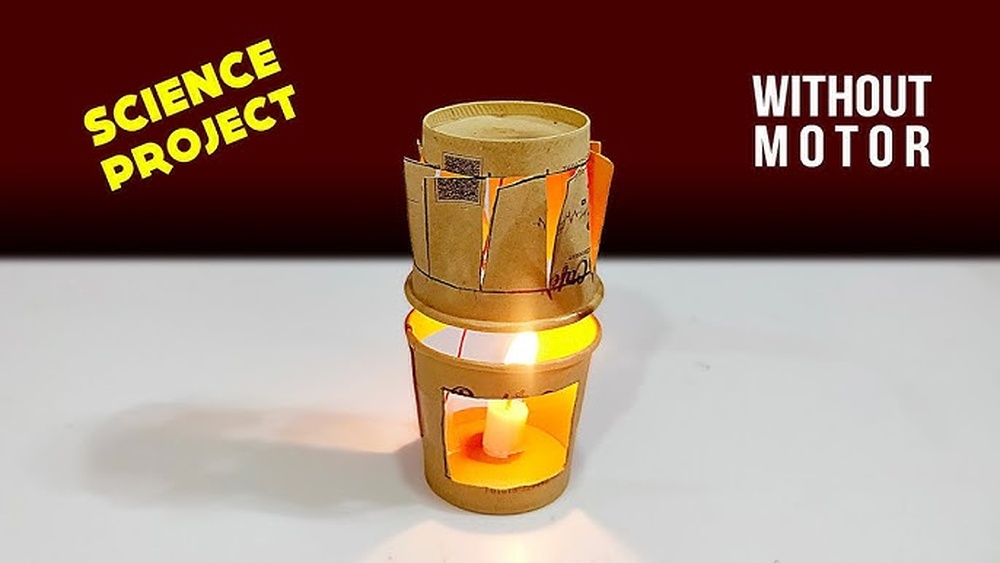
Imagine adding a warm, magical glow to your room that moves gently, creating a calming and unique atmosphere. You might think this kind of effect needs fancy gadgets or expensive lamps, but what if you could make it yourself?
In this guide, you’ll learn exactly how to create a rotating candle lamp using simple materials. It’s easier than you think, and once you see it in action, you’ll wonder why you didn’t try it sooner. Ready to light up your space in a whole new way?
Let’s get started!
Materials Needed
Gathering the right materials makes building a rotating candle lamp simple. You need basic supplies to create the lamp’s structure and make it spin. Some extra decorative items help give the lamp a unique look. Prepare all items before starting to work. This saves time and keeps the process smooth.
Basic Supplies
- Small electric motor (3-6V DC motor works well)
- Battery holder with batteries (AA or AAA)
- Switch to turn the motor on and off
- Plastic or wooden base (to hold parts steady)
- Thin metal or plastic rod (to hold the candle platform)
- Small platform or disc (to place the candle on)
- Wires and solder or tape (for electrical connections)
- Hot glue gun or strong adhesive
- Tea light candle or LED candle
Optional Decorative Items
- Colored paint or markers (to decorate the base and platform)
- Beads, small stones, or shells (for decoration)
- Ribbon or lace (to wrap around the base)
- Glitter or stickers (for extra shine)
- Small figurines or charms (to place around the candle)

Credit: www.youtube.com
Choosing The Right Candle
Choosing the right candle is key to making a rotating candle lamp. The candle must fit well and burn safely. It should also look nice while spinning. Picking the best candle helps the lamp work smoothly and adds charm to your space.
Types Of Candles
There are many types of candles to pick from. Pillar candles are thick and stand alone. They burn for a long time and provide steady light. Tea light candles are small and come in metal cups. They are perfect for compact lamps. Taper candles are tall and thin. They give a classic look but need a holder. Choose a candle that fits your lamp design and size. Consider the burn time for how long you want the lamp to glow.
Safety Considerations
Safety is very important with any candle project. Use candles that burn evenly to avoid dripping wax. Make sure the candle is stable on the lamp base. Avoid candles with scents or dyes that may cause smoke. Keep the lamp away from flammable materials. Never leave a burning candle unattended. Proper candle choice reduces risks and keeps your lamp safe and beautiful.
Building The Rotating Base
Building the rotating base is the key step in making a candle lamp spin smoothly. This part holds the motor and supports the candle platform. A strong, steady base keeps the lamp balanced and safe. Follow the steps below to create a base that works well and looks neat.
Selecting A Motor
Choose a motor with low speed and steady rotation. A small DC motor or a hobby motor works best. It should run quietly to avoid noise distractions. Check the motor’s voltage and power needs. Make sure it matches your power source. A motor with a gear reduction can help control the speed better. Slow rotation is ideal for a relaxing candle lamp effect.
Assembling The Base
Start with a flat, sturdy platform, like wood or plastic. Attach the motor firmly in the center. Use screws or strong glue to fix it in place. Connect the motor shaft to a small rotating disc or platform. This will hold your candle. Test the motor’s spin before securing the platform completely. Make sure the rotation is smooth and steady. Add rubber feet or pads under the base. This reduces slipping and protects surfaces. Your rotating base is now ready to hold the candle safely.

Credit: www.walmart.com
Attaching The Candle Holder
Attaching the candle holder is a key step in building a rotating candle lamp. This part supports the candle and must be stable. A well-attached holder ensures the candle stays safe and steady while the lamp rotates. Choose the right holder and mounting method to keep everything balanced and secure.
Holder Options
Select a candle holder that fits your candle size perfectly. Metal holders work well for heat resistance and durability. Glass holders add style but require careful handling. Wooden holders offer a rustic look but need fireproof coating. Consider the holder’s weight too, as it affects rotation speed.
Secure Mounting Techniques
Use strong adhesives like epoxy for a lasting bond. Screws provide extra stability, especially on wooden bases. Double-check the holder is level before fixing it in place. Clamp the holder during drying to avoid movement. Test the holder’s strength by gently shaking it. Safety first to avoid accidents.
Wiring And Power Setup
Setting up the wiring and power is a key step in making a rotating candle lamp. This part connects the motor, light, and power source. Proper wiring ensures the lamp works safely and smoothly. Clear steps and good materials make the process easier and safer.
Electrical Components
Start with a small electric motor to spin the lamp. Choose a motor with low voltage, usually 3 to 6 volts. Use a battery pack or adapter to power the motor. Include a switch to turn the lamp on and off. Use insulated wires to connect all parts. Add a small light bulb or LED near the candle holder for extra glow. Secure all connections with electrical tape or wire nuts. Double-check the voltage and current ratings of all parts to avoid damage.
Safety Tips
Work in a dry area to avoid electric shocks. Use insulated tools to handle wires. Never touch live wires with bare hands. Keep wires away from the candle flame. Use heat-resistant materials near the candle. Test the wiring before lighting the candle. Turn off power when making adjustments. Dispose of damaged wires and parts safely. Safety ensures your rotating candle lamp works well without risks.
Adding Finishing Touches
Adding finishing touches to your rotating candle lamp gives it a polished look. These final steps enhance both style and function. Small details can make your lamp stand out beautifully.
Painting And Decorating
Choose paint that suits your room’s theme. Acrylic paints work well on wood and metal. Use light coats to avoid drips and uneven surfaces. Let each coat dry completely before adding another. Add patterns or simple designs for a unique touch. Stickers or small decals also add charm without much effort. Finish with a clear sealant to protect the paint from heat and dust.
Testing The Rotation
Turn on the rotating base and observe the movement. The rotation should be smooth and steady. If it wobbles, check for loose parts or uneven surfaces. Adjust the base or tighten screws if needed. Make sure the candle holder stays balanced during rotation. Test with a lit candle to ensure safety and stability. Proper rotation makes the lamp both functional and beautiful.
Troubleshooting Common Issues
Troubleshooting common issues helps keep your rotating candle lamp working well. Some problems may stop it from spinning smoothly or cause it to wobble. Understanding how to fix these issues saves time and frustration.
Motor Problems
The motor might not spin the lamp at all. Check if the power source is connected properly. Sometimes dust or debris blocks the motor. Clean it gently with a dry cloth. If the motor sounds loud or shaky, it may need oiling. Use a small drop of light machine oil. Replace the motor if it still does not work after cleaning.
Balance And Stability
The lamp may wobble or tip over while rotating. Make sure the base is flat and steady. Check if the candle or holder is centered on the rotating platform. Uneven weight causes poor balance. Adjust the candle position or add small weights to balance the lamp. Avoid heavy or large candles that can make it unstable.
Creative Variations
Creative variations make your rotating candle lamp unique and fun. Small changes can bring new looks and moods. Experimenting with styles and lights keeps your project fresh and exciting.
Using Different Candle Styles
Try different candles to change the lamp’s feel. Pillar candles offer a classic, sturdy look. Tea lights add a soft, subtle glow. Scented candles can fill the room with fragrance. Colored candles create vibrant, eye-catching effects. Mixing candle styles adds depth and interest.
Incorporating Led Lights
LED lights provide a safe and bright alternative. Use flickering LED candles for a realistic effect. Color-changing LEDs add a dynamic vibe. Battery-powered LEDs reduce heat and fire risk. Combining LEDs with real candles enhances ambiance and safety.

Credit: www.walmart.com
Frequently Asked Questions
What Materials Are Needed For A Rotating Candle Lamp?
You need a small electric motor, candle holder, battery, wires, and a base. These components help create rotation and support the candle safely.
How Does The Rotation Mechanism Work In The Lamp?
The electric motor spins the candle holder using battery power. Wires connect the battery to the motor, enabling smooth rotation.
Is It Safe To Use A Real Candle In This Lamp?
Yes, but ensure the candle is secured and away from flammable materials. Supervise while lit to prevent accidents.
Can I Customize The Lamp’s Design And Size?
Absolutely. You can choose different candle holders, base materials, and motor sizes to fit your style and space.
Conclusion
Making a rotating candle lamp is a fun and simple project. You only need a few materials and some patience. The gentle spin adds charm to any room. It creates a cozy, calming light effect. Try different designs to match your style.
This lamp also makes a nice handmade gift. Enjoy crafting and lighting up your space beautifully. Keep practicing to improve your skills. Small steps lead to great results. Give it a try and see the magic yourself.