Setting up your artificial Christmas tree can feel tricky if you’re not sure where to start. But imagine how great it will look once it’s all fluffed and lit, ready to brighten your home and bring holiday cheer.
In this guide, you’ll discover simple, step-by-step tips to make putting your tree together quick and stress-free. Whether this is your first time or you want to get better at it, you’ll find easy tricks to save time and get your tree looking perfect.
Keep reading—you’re just moments away from creating a beautiful centerpiece for your holiday celebrations.
Choosing The Right Tree
Choosing the right artificial Christmas tree sets the tone for your holiday decor. The perfect tree fits your space and style. It lasts for many seasons and brings joy every year. Understanding your options helps you pick the best tree.
Types Of Artificial Trees
There are many types of artificial Christmas trees. Some mimic real pine trees with detailed branches. Others have a modern, slim design. You can find trees with white, green, or frosted tips. Choose a type that matches your holiday theme.
Size And Shape Considerations
Measure your room before buying a tree. Check the height and width to fit your space. Tall trees suit big rooms, while smaller trees fit tight spaces. Shapes vary from full and bushy to slim and sparse. Pick a shape that matches your room’s style.
Material And Quality
Look at the tree’s material for durability. PVC trees are affordable and common. PE trees look more real and last longer. Check the branch tips for softness and strength. A good tree stays fluffy and holds decorations well.
Credit: www.hykolity.com
Unpacking And Preparing
Unpacking and preparing your artificial Christmas tree is the first step to a festive home. Taking time here makes assembly easier and faster. It helps avoid damage and missing parts. A smooth start sets a good tone for decorating.
Unboxing Your Tree
Carefully open the box on a flat surface. Use scissors or a box cutter to cut tape. Avoid cutting too deep to protect the tree inside. Remove all packing materials gently. Lay out the tree sections for easy access.
Checking For Missing Parts
Look at the instruction manual to identify all parts. Check each section of the tree for damages or missing pieces. Make sure the stand and branches are included. Missing parts delay setup and cause frustration. Contact the seller quickly if anything is missing.
Preparing The Assembly Area
Choose a spacious area with good lighting. A clean floor prevents dirt and damage. Lay down a blanket or sheet to protect the floor. Keep tools handy, like gloves or a step stool. Clear the space to avoid accidents during setup.
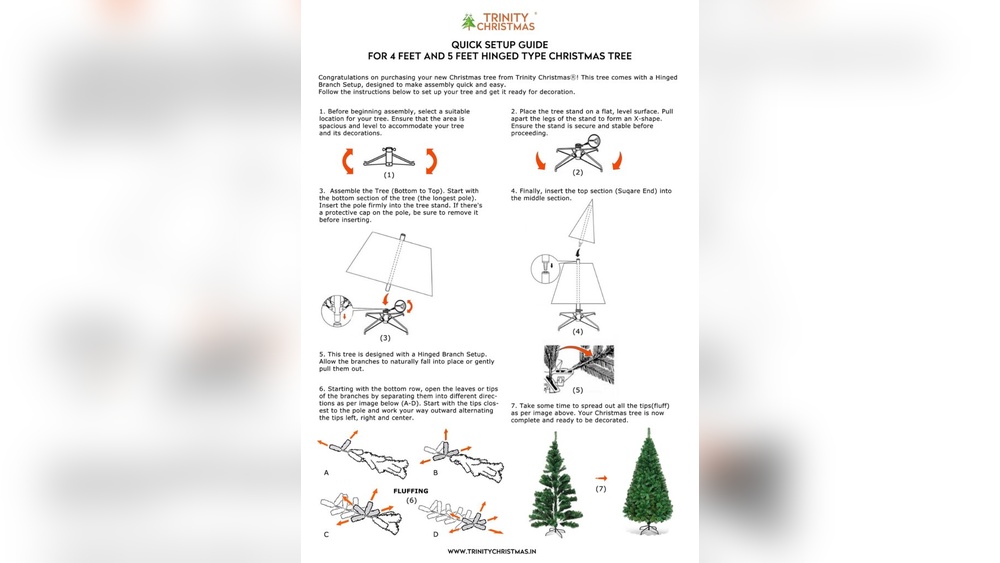
Assembling The Base
Assembling the base is the first step in putting your artificial Christmas tree together. A strong and stable base keeps your tree upright and safe. Taking time to set up the stand and secure the trunk helps avoid accidents.
Follow these simple steps to start your tree assembly with confidence.
Setting Up The Stand
Begin by spreading out the tree stand on a flat surface. Make sure all parts are clean and free of dust. Open the legs fully to provide maximum stability. Some stands require screwing the legs in place. Use a screwdriver if needed. The stand should feel solid and not wobble. This base supports the whole tree, so take care with this step.
Securing The Tree Trunk
Place the tree trunk into the center of the stand. Align it straight to avoid a crooked tree. Tighten the screws or clamps around the trunk firmly. Check that the trunk does not move side to side. A loose trunk can cause the tree to fall. Adjust the screws evenly on all sides for balance. Once secure, your tree base is ready for the next steps.

Credit: www.youtube.com
Connecting Tree Sections
Connecting the sections of your artificial Christmas tree is an important step. Proper connection ensures the tree stands firm and looks natural. This part is simple but requires attention to detail.
Each section fits into the next. Aligning and locking them correctly makes the tree stable and ready for decorating.
Aligning The Branches
Start by placing the bottom section on the stand. Look at the branches on this section. They should spread out evenly. Now, take the middle section. Check the branches here. They must align with the bottom section’s branches. This creates a full, balanced look. Avoid overlapping branches too much. Spread them gently to fill gaps. Proper alignment helps the tree look natural and full.
Locking The Pieces Together
Each section has a metal or plastic connector. Insert the top of one section into the bottom of the next. Push firmly until you feel it click or lock in place. This keeps the tree from wobbling. Make sure the connection is tight. Loose connections can cause the tree to tilt. Check each joint before moving to the next section. Lock all pieces securely for a strong and stable tree.
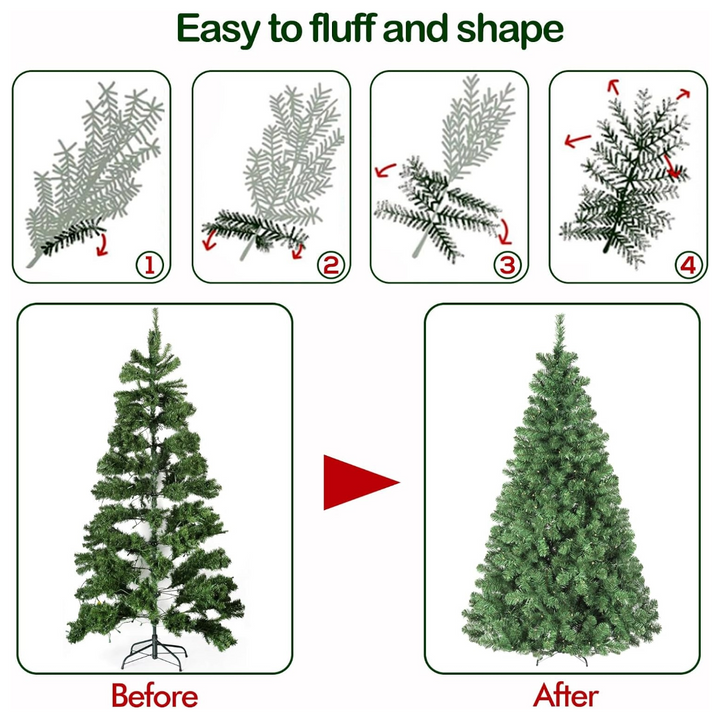
Fluffing The Branches
Fluffing the branches is a key step in assembling an artificial Christmas tree. This process makes the tree look full and natural. It takes time, but the result is worth it. Each branch needs attention to achieve the best appearance.
Shaping The Tree
Start by gently pulling each branch outward. Spread the smaller twigs along the branch. This creates space and prevents clumps. Bend the tips slightly up or down for a natural shape. Work from the bottom to the top of the tree. Shape the branches evenly on all sides. Avoid pressing branches too hard to keep them soft.
Creating A Full Look
Focus on filling gaps between branches. Adjust twigs to cover empty spots. Fluff each branch fully to avoid flat areas. Look at the tree from different angles. Add extra fluff where the tree looks thin. This step gives your tree a lush, green appearance. Take your time for a well-balanced look.
Adding Lights
Adding lights to your artificial Christmas tree brings it to life. Lights create a warm, festive glow. They highlight the tree’s shape and decorations. Choosing and placing lights takes some planning. This section guides you through the best ways to add lights to your tree.
Pre-lit Vs. Separate Lights
Pre-lit trees come with lights already attached. They save time and effort during setup. The lights are evenly spaced and ready to use. Separate lights offer more control over style and color. You can choose different types and lengths. Separate lights work well if your tree is plain or unlit. Both options have benefits. Pick the one that fits your needs and budget.
Wrapping Lights Evenly
Start with the tree’s base and work upwards. Wrap lights around branches, moving inward and outward. Keep the lights close to branch tips for a natural look. Space the lights evenly to avoid dark spots. Use clips or twist ties to secure loose strands. Test the lights before decorating. This makes sure they work and look good. Even lighting creates a balanced, bright tree.
Final Touches
After assembling your artificial Christmas tree, the final touches bring it to life. These steps make your tree look festive and keep it safe. Focus on decorating and stabilizing to enjoy your tree all season long.
Adding Decorations
Start by placing lights evenly around the tree. Wrap them from the bottom to the top. Next, hang ornaments in different sizes and colors. Spread them out for balance. Use hooks or ribbon to secure each decoration. Add a tree topper to finish the look. Garlands or tinsel can add extra sparkle. Step back often to check the overall design.
Ensuring Stability
Make sure the tree stands firm. Tighten all screws and joints in the stand. Check that the base is flat on the floor. Use weights if the tree feels wobbly. Avoid placing the tree near doors or vents. This prevents it from tipping over. A stable tree keeps decorations safe and prevents accidents.

Credit: www.webechristmas.com
Storage Tips
Proper storage helps keep your artificial Christmas tree in great shape. It protects the tree from dust, damage, and keeps it ready for next year. Follow simple steps to store it safely and easily.
Disassembling The Tree
Start by removing all decorations and lights. Take off the top sections first. Then, carefully separate the branches from the main trunk. Avoid forcing parts apart to prevent breakage. Lay each piece flat to keep branches from bending.
Packing For Next Year
Use the original box or a sturdy storage container. Wrap branches in tissue paper or plastic to protect them. Store the tree in a cool, dry place away from direct sunlight. Label the box clearly to find it quickly next season.
Frequently Asked Questions
How Do I Start Assembling An Artificial Christmas Tree?
Begin by unpacking all parts carefully. Locate the base and secure it firmly. Then, insert the main tree pole into the base until it locks. This ensures a stable foundation for adding the tree sections.
What Is The Best Way To Attach Tree Sections?
Attach the sections from bottom to top. Each section fits into the one below it. Push firmly until you hear a click or feel it lock. This prevents wobbling and keeps the tree sturdy.
How Should I Fluff The Branches For A Full Look?
Start from the bottom branches and work upwards. Gently separate and bend each branch tip outward. Fluff densely to fill gaps and create a natural appearance. This enhances the tree’s volume and beauty.
Can I Add Lights Before Or After Assembly?
It’s best to add lights after the tree is fully assembled. This allows even distribution and easier access to branches. Secure lights tightly to avoid slipping and ensure a bright, uniform glow.
Conclusion
Putting together an artificial Christmas tree is simple and fun. Start by unpacking all parts carefully. Connect the sections firmly for a stable tree. Fluff the branches to make the tree look full. Take your time to shape each branch nicely.
Adding lights and decorations brings your tree to life. Enjoy the festive spirit with your beautiful tree. Celebrate the season with a tree you built yourself. This easy process saves time and effort every year. Your holiday space will feel warm and inviting.