Thinking about changing your pendant light but not sure where to start? You’re in the right place.
Swapping out a pendant light can instantly transform the look and feel of any room. Whether you want something brighter, more stylish, or just a fresh update, this guide will walk you through every step. You’ll learn how to do it safely and easily, even if you’re not an expert.
By the end, you’ll have the confidence to upgrade your space and make your lighting work perfectly for you. Keep reading to discover how simple it really is to change your pendant light.

Credit: gharpedia.com
Tools And Materials Needed
Changing a pendant light requires the right tools and materials. Having these ready makes the task easier and safer. This section covers what you need before starting.
Essential Tools
Gather a screwdriver set with flathead and Phillips heads. A voltage tester is important to check power is off. Wire strippers help prepare the wires for connection. Needle-nose pliers assist in bending and holding wires. A ladder or step stool is necessary to reach the fixture. Electrical tape ensures secure and safe wire connections. Finally, a flashlight helps if the work area is dim.
Choosing The Right Pendant Light
Pick a pendant light that fits your room size and style. Check the fixture’s weight to ensure your ceiling can support it. Consider the bulb type and brightness for the space. Measure the hanging length to avoid obstruction. Choose a light with easy installation instructions. Confirm the electrical requirements match your home’s wiring. These details prevent problems during installation.

Credit: electriciancourses4u.co.uk
Preparing For The Upgrade
Preparing to change your pendant light is an important step. Proper preparation ensures a safe and smooth upgrade. Take your time to get everything ready before starting the work. Follow clear steps to avoid any risks or mistakes.
Turn Off Power Safely
Safety comes first. Always turn off the power to the room where the light is. Find the correct circuit breaker in your fuse box. Switch it off to cut the electricity flow. Use a voltage tester to double-check that the power is off. This step protects you from electric shocks while working.
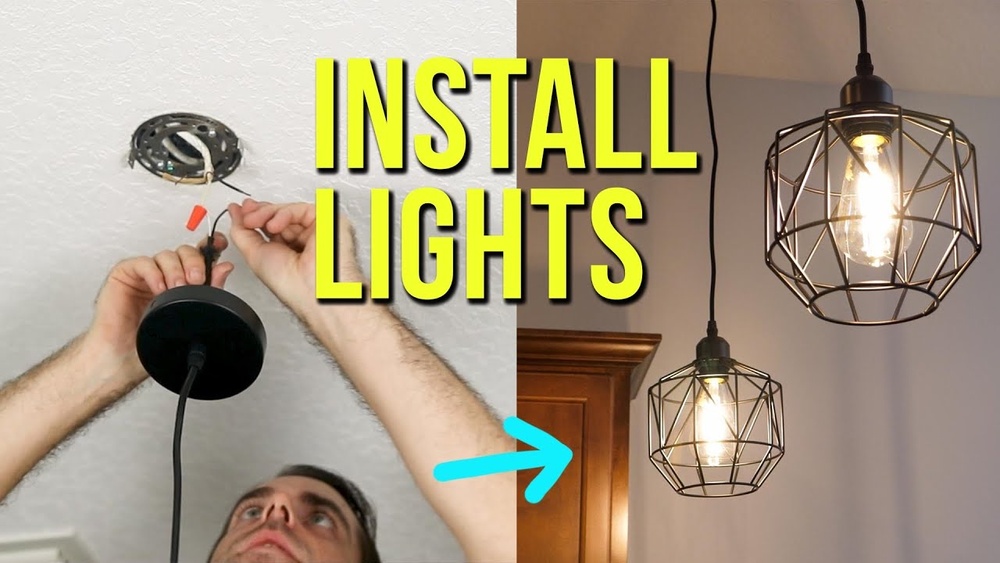
Remove Existing Fixture
Start by removing the old pendant light carefully. Unscrew the light bulb and shade if needed. Next, take off the fixture’s mounting screws. Gently lower the fixture and disconnect the wires. Remember the wire positions to connect the new light correctly. Keep all screws and parts for reuse if possible.
Wiring The New Pendant
Wiring the new pendant is an important step in changing your light fixture. It connects the electrical power to your new pendant light. Proper wiring ensures safety and makes the light work perfectly. Take your time and follow these simple steps to wire your new pendant correctly.
Match Wires Correctly
Identify the wires coming from the ceiling and the new pendant light. Usually, black or red wires are hot, white wires are neutral, and green or bare wires are ground. Connect the black wire from the ceiling to the black wire of the pendant. Connect the white wire to the white wire. Attach the ground wire to the green or bare wire. Matching wires correctly prevents electrical problems.
Secure Connections
Use wire nuts to join the wires securely. Twist wires together tightly before placing the wire nut. Make sure no copper is exposed outside the wire nut. Tug gently on wires to confirm a strong connection. Wrap connections with electrical tape for extra safety. Secure connections stop sparks and keep your light working well.
Mounting The Pendant Light
Mounting the pendant light is a key step in changing your light fixture. It involves securing the fixture safely to the ceiling. This ensures your new light hangs properly and looks great. Follow these simple steps to mount the pendant light correctly.
Attach Mounting Bracket
Start by attaching the mounting bracket to the ceiling box. Use screws that fit the holes on the bracket. Tighten the screws firmly to keep the bracket stable. The bracket holds the pendant light in place. Make sure it is secure before moving to the next step.
Install Pendant Fixture
Lift the pendant fixture and align it with the mounting bracket. Connect the wires: match black to black, white to white, and ground wire to ground. Use wire nuts to secure the connections. Push the wires into the ceiling box carefully. Attach the fixture base to the mounting bracket with screws. Tighten the screws to hold the fixture firmly. Check that the pendant light hangs straight and steady.
Final Adjustments
Final adjustments make sure your new pendant light looks perfect and works well. This step is important for both style and safety. You can change the height and position to fit your space. Also, testing the light ensures everything functions properly before you finish.
Adjust Height And Position
Set the pendant light at the right height for your room. Too low can block views or hit heads. Too high may not provide enough light. Move it side to side to center over tables or counters. Tighten screws or clips to keep it steady. A well-placed light adds charm and comfort.
Test The Light
Turn on the power to check the light bulb. Make sure it turns on without flickering. Check the switch and any dimmer controls. Look for loose wires or unusual sounds. Fix problems before closing the ceiling or wall. A safe, working light brightens your home and mood.
Style Tips For Your Pendant
Choosing the right style for your pendant light can change your room’s look. The style of your pendant should match the room’s design. This makes your space feel balanced and inviting.
Simple style tips help you pick the best pendant. Think about the room’s colors, shapes, and materials. Your pendant light should fit naturally with these elements. This way, your light adds beauty and function.
Choosing Complementary Designs
Pick a pendant design that matches your room’s style. For modern rooms, choose sleek, clean lines. Rustic rooms look great with wood or metal finishes. Traditional spaces suit classic shapes and warm tones. Matching styles keeps the room feeling calm and put together.
Consider the size of your pendant too. Big pendants work well in large rooms. Small pendants fit better in cozy spaces. The right size balances the room and looks neat.
Mixing With Other Lighting
Mix your pendant with other lights for a layered look. Use ceiling lights, lamps, or wall sconces to add depth. Each light should have a different purpose and style. This creates a cozy and well-lit room.
Make sure the colors and materials of all lights blend well. This avoids clashes and keeps your space stylish. Mix soft and bright lights for comfort and function. The right combination makes your room feel warm and welcoming.
Troubleshooting Common Issues
Troubleshooting common problems can save time and effort while changing a pendant light. Some issues may seem complex but have simple solutions. Knowing how to spot and fix these problems helps ensure safety and a smooth installation process.
Flickering Lights
Flickering lights often mean a loose bulb or poor connection. First, turn off the power at the breaker. Check if the bulb is screwed in tightly. If it is, try replacing the bulb with a new one. Faulty bulbs cause flickering too.
Another cause could be a loose wire connection in the fixture or switch. Tighten any loose wires carefully. If flickering continues, the dimmer switch might be incompatible with the bulb type. Replace the switch or use a compatible bulb.
Loose Fixtures
Loose fixtures create safety risks and look unfinished. Check if the mounting bracket is properly secured to the ceiling box. Tighten any loose screws or bolts. The fixture should hold firmly without wobbling.
Sometimes the fixture’s weight causes strain on the mounting hardware. Use stronger anchors or support brackets if needed. Ensure all parts fit according to the manufacturer’s instructions. Never force parts together.

Credit: www.youtube.com
Frequently Asked Questions
How Do I Safely Turn Off Power To Change Pendant Light?
Always switch off the circuit breaker before changing a pendant light. Use a voltage tester to ensure no electricity flows. This prevents electrical shocks and accidents during installation or removal of the fixture.
What Tools Are Needed To Replace A Pendant Light?
You typically need a screwdriver, wire stripper, voltage tester, ladder, and electrical tape. These tools help safely remove the old light and install the new fixture efficiently.
How To Choose The Right Pendant Light Size?
Measure your room and ceiling height to select a suitable pendant size. The fixture should complement the space without overwhelming it or looking too small.
Can I Change A Pendant Light Without An Electrician?
Yes, if you have basic electrical knowledge and follow safety precautions. Turn off power, use proper tools, and carefully connect wires according to instructions.
Conclusion
Changing a pendant light is simple with the right steps. Always turn off the power first. Take your time to remove the old fixture carefully. Follow safety tips to avoid accidents. Choose a new pendant light that fits your space.
Install it securely and check the wiring. Enjoy the fresh look and better lighting in your room. Small changes make a big difference in your home’s style. Trying this project yourself saves money and feels rewarding. Give your space a quick update with a new pendant light.