Thinking about adding a pendant light to your space but not sure where to start? You’re in the right place.
Fitting a pendant light might seem tricky, but with the right steps, you can do it yourself and transform your room instantly. Imagine the warm glow and stylish touch hanging just right above your table or in your hallway. Keep reading, and you’ll discover simple, clear instructions that make the whole process easy and even enjoyable.
By the end, you’ll feel confident to brighten your home exactly how you want. Let’s get started!
Credit: blog.jim-lawrence.co.uk
Choosing The Right Pendant Light
Choosing the right pendant light can change the look and feel of a room. It adds style and improves lighting. Picking the best one takes some thought. Consider the room’s size, style, and lighting needs. This guide helps you choose a pendant light that fits well.
Selecting The Perfect Style
Think about the room’s purpose. A kitchen may need a bright, simple light. A living room can use a decorative, soft light. Pendant lights come in many styles: modern, vintage, industrial, and more. Choose a style that feels right for your space. The right style makes the room look complete and inviting.
Considering Size And Scale
Size matters for pendant lights. A light that is too big or too small will look odd. Measure the space before buying. For small rooms, choose smaller pendants. Large rooms need bigger or multiple lights. The light should fit the space without crowding or looking lost.
Matching Your Room’s Theme
Your pendant light should match the room’s theme. Think about colors and materials in the room. A wooden pendant suits a rustic room. A metal pendant fits a modern or industrial space. Matching the theme keeps the room looking balanced and stylish.

Credit: www.homdiyhardware.com
Tools And Materials Needed
Fitting a pendant light requires the right tools and materials to ensure a safe and smooth installation. Having everything ready saves time and avoids frustration. This section covers the basic tools, safety gear, and workspace preparation needed before starting the job.
Essential Tools List
- Screwdriver set (flathead and Phillips)
- Wire stripper
- Voltage tester
- Drill with bits
- Measuring tape
- Wire cutters
- Step ladder
- Electrical tape
- Light fixture mounting bracket (usually included)
Safety Gear To Use
- Insulated gloves to protect from electric shock
- Safety goggles to shield eyes from dust and debris
- Non-slip shoes for stable footing
- Dust mask if the ceiling is old or dusty
Preparing Your Workspace
Clear the area beneath the installation point. Remove furniture or cover it to protect from dust. Switch off the power at the breaker to avoid electric shock.
Gather all tools and materials in one spot. Use a sturdy ladder that reaches the ceiling comfortably. Good lighting helps to see wires and screws clearly.
Preparing For Installation
Preparing for installation is the first step to fit a pendant light safely and correctly. This stage helps avoid accidents and ensures the new light works well. Taking time to prepare saves effort and prevents problems later.
Focus on safety and proper checks before starting the installation. Follow each step carefully for the best results.
Turning Off Power Safely
Start by turning off the power at the main circuit breaker. This stops electricity from flowing to the light fixture. Test the light switch to confirm the power is off. Use a voltage tester on the wires to be sure no current is present. Safety is the top priority here.
Removing Old Fixtures
Remove the old light fixture carefully. Unscrew the fixture base from the ceiling or wall. Lower the fixture gently to expose the wiring. Disconnect the wires by unscrewing the wire nuts. Keep the wires separated and away from metal parts to avoid shocks.
Checking Electrical Wiring
Inspect the wiring for damage or wear. Look for frayed wires or loose connections. If the wires look old or unsafe, consider hiring an electrician. Make sure the wires match the new pendant light’s requirements. Proper wiring ensures the light works well and lasts longer.
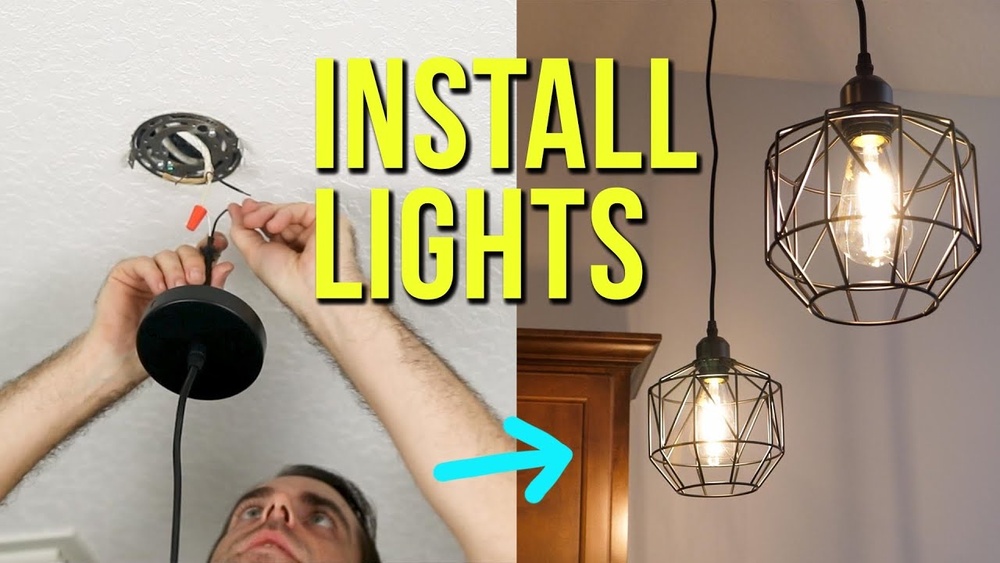
Step-by-step Installation
Installing a pendant light can change the look of your room quickly. The process is simple and clear. Follow these steps carefully to fit your new light safely and correctly. This guide helps you through each part of the installation.
Mounting The Bracket
First, turn off the power at the circuit breaker. Safety is the top priority. Find the ceiling box where the light will hang. Attach the mounting bracket to the box using screws. Make sure it is tight and secure. The bracket supports the entire pendant light.
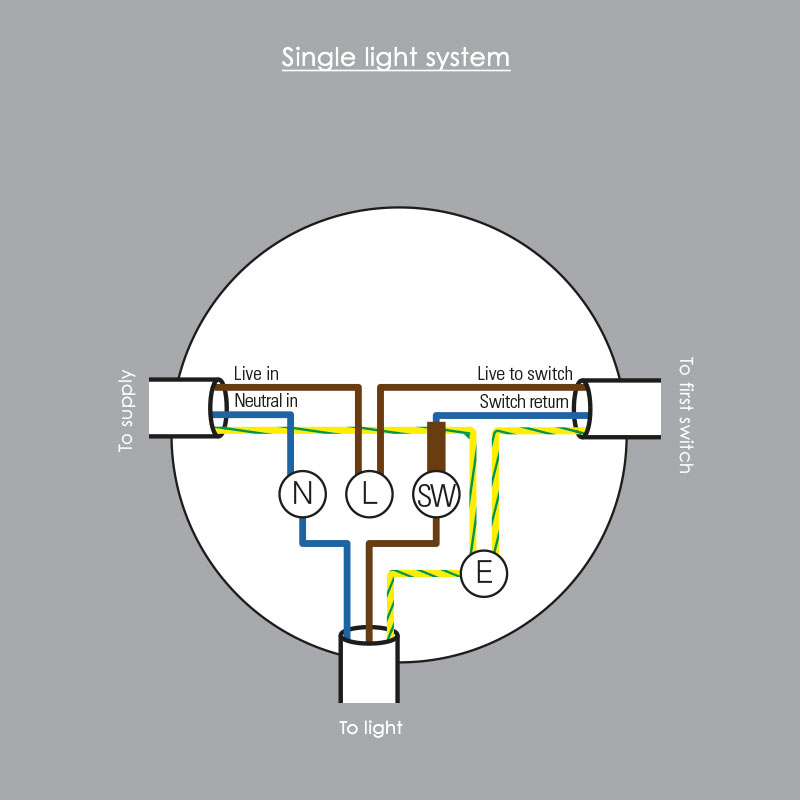
Connecting Wires Correctly
Next, match the wires from the ceiling to the pendant light wires. Usually, black or red wires are live, white is neutral, and green or copper is ground. Twist the matching wires together. Use wire nuts to cover the connections. Double-check that all wires are connected firmly.
Securing The Pendant Light
Now, lift the pendant light and hook it onto the mounting bracket. Tighten any screws or nuts to hold it in place. Adjust the length of the cord if needed. Finally, install the light bulb and switch the power back on. Your pendant light is ready to shine.
Adjusting Height And Position
Adjusting the height and position of a pendant light is key to making your room look great. It helps the light work well and creates the right mood. Setting the correct height keeps the space balanced and safe, especially over tables or counters. Positioning the light properly also improves how it lights the room and matches your décor. Careful adjustment makes the pendant light both useful and stylish.
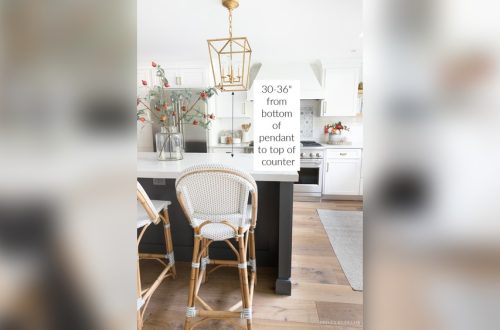
Measuring Ideal Drop Length
Start by measuring the distance from the ceiling to the surface below. For dining tables, keep the pendant about 28 to 34 inches above. For kitchen islands, aim for 30 to 36 inches of drop. In open areas, leave at least 7 feet of clearance from the floor. Use a tape measure and mark the spot before hanging. This step ensures the light hangs at the perfect height for comfort and style.
Aligning With Room Features
Match the pendant light’s position with key room features. Center it over tables, kitchen islands, or seating areas. Keep it aligned with other lights or fixtures for a neat look. Consider windows, doors, and furniture placement. Proper alignment helps the pendant light fit naturally into the room design. It also improves how well the light spreads across the space.
Final Positioning Tips
Double-check the height and position before fixing the light. Make small adjustments to avoid glare or shadows. Ensure the light does not block views or walkways. Test the light at different times of the day. Adjust as needed for the best look and function. Taking time now saves trouble later and enhances your room’s appeal.
Testing And Finishing Touches
After installing a pendant light, testing and adding finishing touches is important. These steps ensure your light works safely and looks great. This part of the process brings everything together for a perfect finish.
Restoring Power And Testing
First, turn the power back on at the circuit breaker. This allows electricity to flow to the new light. Use the light switch to check if the pendant light turns on. Watch for any flickering or strange sounds. If the light does not work, turn off the power and check your wiring again. Safety is key during this step.
Adding Light Bulbs
Choose bulbs that match the fixture’s requirements. Look at the maximum wattage allowed and bulb type. Screw the bulbs in gently but firmly. Avoid touching LED bulbs with bare hands to keep them clean. Test each bulb to ensure it lights up properly. The right bulbs enhance the look and function of your pendant light.
Cleaning And Maintenance Tips
Remove dust and fingerprints from the pendant light before use. Use a soft cloth or duster to clean the fixture carefully. Avoid harsh chemicals that can damage finishes. Regular cleaning keeps your light bright and attractive. Check the fixture every few months to tighten any loose parts. Proper care extends the life of your pendant light.
Troubleshooting Common Issues
Installing a pendant light can be a simple task, but sometimes issues arise. Troubleshooting these problems helps keep your light safe and working well. This section covers common problems and easy solutions.
Fixing Flickering Lights
Flickering lights can be annoying and unsafe. Check if the bulb is tight in the socket. A loose bulb often causes flickering. Try replacing the bulb with a new one. Use bulbs with the correct wattage for the fixture. If flickering continues, the switch or wiring might be faulty. In this case, call a professional electrician.
Dealing With Loose Fixtures
Loose pendant lights sway or hang unevenly. First, turn off the power to avoid shocks. Tighten all screws and mounting brackets. Make sure the fixture hangs straight and secure. Sometimes, the ceiling hook or bracket needs reinforcement. Use proper tools and parts designed for your light. A stable fixture looks better and lasts longer.
Handling Wiring Problems
Wiring issues can prevent your pendant light from working. Check that all wires connect tightly and correctly. Match wires by color: usually black to black, white to white, and green or bare wire to ground. Look for damaged or frayed wires and replace them. Avoid guessing wiring setups. If unsure, ask an electrician to inspect the wiring safely.

Credit: electriciancourses4u.co.uk
Frequently Asked Questions
How Do I Measure For Pendant Light Height?
Measure from the ceiling to the desired hanging point. Usually, 28 to 34 inches above a table is ideal. Adjust height based on room size and purpose to ensure proper lighting and aesthetics.
What Tools Are Needed To Fit A Pendant Light?
You’ll need a screwdriver, wire stripper, voltage tester, and ladder. Additionally, use wire connectors and electrical tape for safety. Always switch off power before starting installation.
Can I Install A Pendant Light Myself?
Yes, if you have basic electrical knowledge and follow safety guidelines. Turn off power at the breaker, carefully connect wires, and securely mount the fixture. When in doubt, consult a professional electrician.
How Do I Choose The Right Pendant Light Size?
Select a size proportional to your room and furniture. Large pendants suit spacious areas; smaller ones fit compact spaces. Consider the light’s diameter and height for balanced visual appeal.
Conclusion
Fitting a pendant light can change your room’s look and feel. Follow each step carefully for safety and style. Choose the right height to suit your space. Make sure the wiring is secure before turning on the power. Take your time to get a neat finish.
A well-installed pendant light adds charm and warmth. Enjoy the new light and the cozy atmosphere it creates. Simple tools and clear instructions make the job easier. Try it yourself and brighten your home today.