Hanging a pendant light can completely change the look and feel of your space. But if you’re unsure where to start or worried about making mistakes, you’re not alone.
You want your light to hang just right—at the perfect height and securely in place—so it looks great and works safely. In this guide, you’ll discover simple, clear steps to hang your pendant light like a pro. By the end, you’ll have the confidence and know-how to brighten your room exactly how you imagined.
Keep reading, and let’s make your lighting project easy and rewarding.
Choosing The Right Pendant Light
Choosing the right pendant light is key to enhancing any room’s look and feel. The right choice brightens the space and fits the room’s purpose. It should blend well with the room’s size, height, and style.
Selecting Style And Size
Pick a pendant light style that fits the room’s mood. Modern, rustic, or classic designs all offer different vibes. Size matters too. A small light may get lost in a big room. A large light can overwhelm a small space. Choose a size that balances well with your room.
Considering Room Height And Space
Room height affects how low the light should hang. High ceilings allow for longer pendants. Low ceilings need shorter fixtures to avoid crowding. Leave enough headroom for walking under the light. Also, consider the room’s width. Wide rooms can hold multiple pendants. Narrow rooms may look cluttered with too many lights.
Matching Existing Decor
Your pendant light should match your current decor style. Look at your furniture and color scheme. Choose finishes and colors that blend with these elements. A pendant that fits your style creates a harmonious look. It ties the room together and feels intentional.
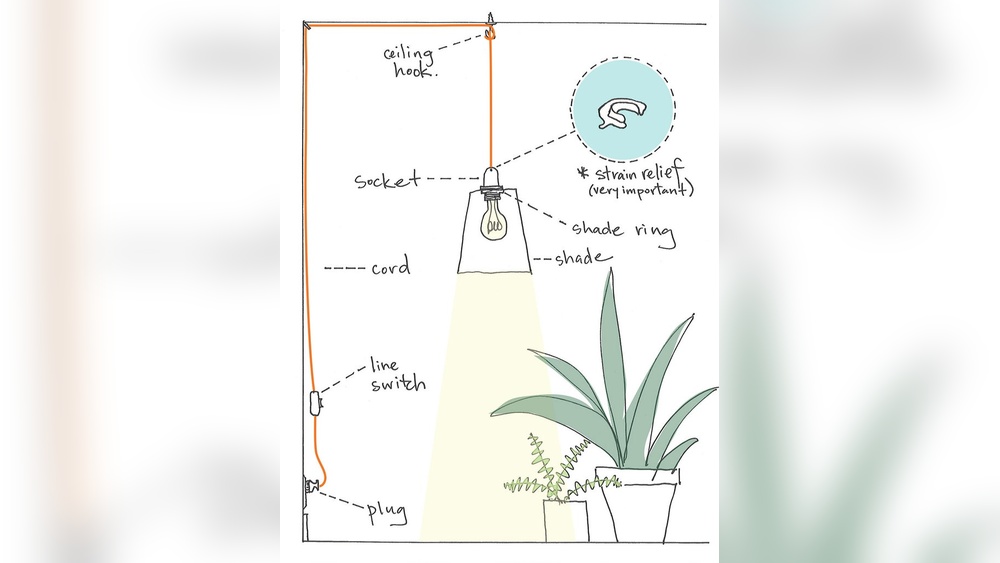
Credit: www.locallifesc.com
Tools And Materials Needed
Hanging a pendant light requires some basic tools and materials. Having everything ready makes the job faster and safer. Gather all items before starting your project. This helps avoid interruptions and confusion.
Essential Tools
You need a few key tools to hang a pendant light. A screwdriver is important for screws and fixtures. A drill helps make holes in the ceiling. Wire strippers prepare electrical wires for connection. A voltage tester ensures no live wires are active. A tape measure checks the right height for your light.
Safety Gear
Safety comes first when working with electricity and heights. Wear safety glasses to protect your eyes. Use gloves to avoid cuts and shocks. A sturdy ladder helps reach the ceiling safely. A dust mask keeps you safe from dust and debris. These items keep you safe during installation.
Additional Supplies
You may need extra items depending on your light and ceiling. Wire nuts connect electrical wires securely. Electrical tape adds extra protection to connections. A ceiling hook or mounting bracket supports the light fixture. A pencil marks where to drill holes. Having these supplies makes installation smooth.
Preparing The Installation Area
Preparing the installation area is an important step before hanging a pendant light. It ensures safety and makes the process smooth. Taking time to prepare helps avoid mistakes and saves time later. Follow these simple steps carefully.
Turning Off Power
Always turn off the power at the circuit breaker before starting. This stops electricity flow and protects you from shocks. Double-check by using a voltage tester on the wires. Never skip this step for your safety.
Measuring And Marking Placement
Measure the desired spot for your pendant light carefully. Mark the ceiling where the light will hang. Use a pencil and a ladder to reach high areas safely. Accurate marks make installation easier and keep the light centered.
Checking Electrical Box Compatibility
Check if the electrical box can support your pendant light’s weight. It should be strong and secure, usually metal or high-quality plastic. If unsure, replace it with a box designed for ceiling fixtures. Proper support prevents accidents and keeps the light stable.

Credit: www.instructables.com
Step-by-step Hanging Process
Hanging a pendant light can change the look of any room. The process is simple if you follow clear steps. This guide breaks down the task into easy parts. Each step ensures safety and a neat finish. Let’s start with assembling the pendant light.
Assembling The Pendant Light
First, unpack all parts from the box. Check the instructions that come with the light. Attach the shade or glass to the fixture. Secure any screws or clips tightly. Make sure the light bulb fits the socket. Avoid forcing parts together to prevent damage.
Connecting Wires Safely
Turn off the power at the breaker box. Use a voltage tester to confirm no electricity flows. Match the wires by color: black to black, white to white, green to ground. Twist wire connectors over the joined wires firmly. Wrap electrical tape around connectors for extra safety. Tuck wires neatly into the ceiling box.
Securing The Fixture To The Ceiling
Attach the mounting bracket to the ceiling box with screws. Lift the pendant light and align it with the bracket. Connect the fixture to the bracket using the provided screws. Check that the light hangs straight and does not wobble. Restore power and test the pendant light.
Adjusting Height And Position
Adjusting the height and position of your pendant light is key to good lighting and style. This step helps the light fit your space perfectly. It also makes sure the light shines where you need it most. Take your time to get it right.
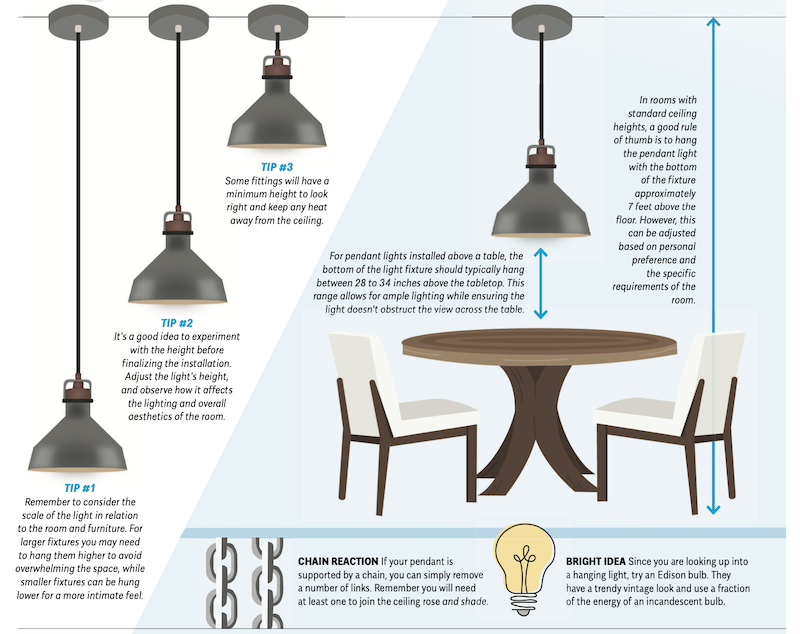
Setting The Cord Length
Start by measuring how low the light should hang. Most pendants hang 28 to 34 inches above a table. For other areas, keep the light at least 7 feet from the floor. Adjust the cord to this length. Cut any extra cord safely or tuck it away neatly.
Leveling The Pendant
Check if the pendant hangs straight. Use a small level tool or a phone app. Adjust the canopy or swivel hook to fix any tilt. A level light looks clean and balanced. It also spreads light evenly across the room.
Testing Light Placement
Turn on the light to see its effect. Notice if it casts shadows or glares. Move the pendant slightly if the light feels too harsh or dim. Try different heights to find the best look. The right placement brightens your space and adds charm.

Credit: www.youtube.com
Troubleshooting Common Issues
Hanging a pendant light can bring charm and style to any room. Sometimes, small problems may arise after installation. These issues can be fixed with simple steps. Troubleshooting common problems helps keep your light working well and looking good.
Fixing Flickering Lights
Flickering lights can be annoying and may signal a problem. Start by checking the bulb. Make sure it is screwed in tightly. Replace the bulb if flickering continues. Use bulbs that match the fixture’s recommended wattage.
Loose connections can also cause flickering. Turn off the power and check wire connections inside the fixture. Tighten any loose wires carefully. If flickering remains, the switch or dimmer might be faulty. Consider replacing them.
Dealing With Loose Fixtures
A pendant light that swings or feels loose is unsafe. Turn off the power before adjusting. Check the mounting bracket and screws. Tighten any loose screws holding the fixture to the ceiling.
Sometimes, the ceiling box may be too small or damaged. Use a proper ceiling box designed for pendant lights. Secure the box firmly to the ceiling joist. This support keeps the fixture stable and secure.
Addressing Wiring Problems
Incorrect wiring can cause lights not to work or flicker. Always turn off power at the circuit breaker before checking wires. Match wire colors: black to black, white to white, and green or bare copper to ground.
Use wire nuts to secure connections tightly. Avoid loose or exposed wires, which are dangerous. If unsure about wiring, seek help from a licensed electrician. Proper wiring ensures safety and proper light function.
Tips For Maintenance And Care
Taking care of your pendant light keeps it looking great and working well. Simple maintenance helps avoid big repairs later. A clean and well-kept light brightens your space and lasts longer.
Cleaning The Pendant Light
Turn off the power before cleaning. Use a soft cloth to wipe dust and dirt. Avoid wetting electrical parts. For glass shades, use a mild soap solution. Dry all parts completely before turning the light on again.
Replacing Bulbs Safely
Switch off the power at the breaker. Let the bulb cool down before handling. Use the right bulb type and wattage. Hold the bulb gently and screw it in carefully. Turn the power back on only after the bulb is secure.
Regular Inspections
Check the fixture for loose parts every few months. Look for signs of wear or damage on wires and mounts. Tighten screws if needed. Early checks prevent accidents and keep your pendant light safe.
Frequently Asked Questions
How Do I Choose The Right Pendant Light Height?
Choose a height that fits the room and purpose. For dining areas, hang 30-36 inches above the table. In living spaces, 7 feet from the floor is ideal. Adjust based on ceiling height and fixture size to ensure balanced lighting and aesthetics.
What Tools Are Needed To Hang A Pendant Light?
You need a screwdriver, drill, wire stripper, voltage tester, and ladder. Also, have wire nuts and electrical tape handy. These tools ensure safe and secure installation of your pendant light fixture.
How Do I Safely Install A Pendant Light?
Turn off power at the circuit breaker first. Use a voltage tester to confirm no electricity flows. Secure the mounting bracket, connect wires properly, and attach the fixture. Always follow manufacturer instructions and local electrical codes for safety.
Can I Hang Multiple Pendant Lights In One Area?
Yes, spacing is key. Space pendants 24-30 inches apart for balance. Use multiple fixtures to enhance lighting and style. This method works well over kitchen islands and dining tables for even light distribution.
Conclusion
Hanging a pendant light can change your room’s look and feel. Follow the steps carefully for a safe setup. Choose the right spot and tools before you start. Take your time to connect wires properly. Test the light to make sure it works well.
Enjoy the new style and brighter space you created. Simple tasks like this boost your home’s comfort and charm.