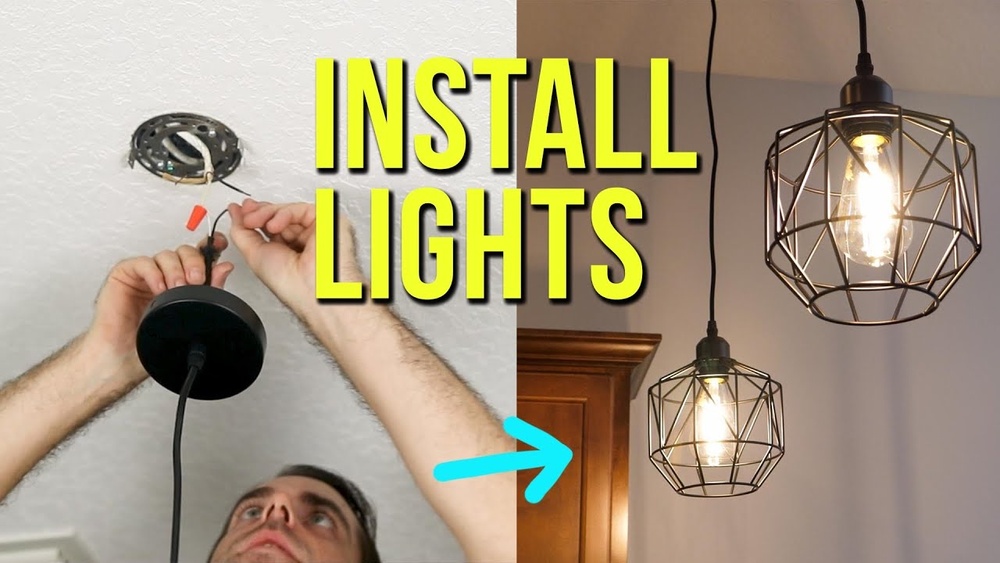
Are you ready to give your space a fresh, stylish look? Installing a pendant light can instantly transform any room, adding warmth and character.
But if you’re worried it’s too complicated or risky, don’t be. This guide will walk you through every step, making the process simple and safe for you. By the end, you’ll not only have a beautiful new light fixture but also the confidence to tackle similar projects on your own.
Let’s get started and brighten up your home!
Choosing The Right Pendant Light
Choosing the right pendant light sets the tone for your room. It combines function and style to brighten your space. This choice affects the room’s mood and usability. Consider the room’s purpose and lighting needs carefully. The right pendant light can enhance the atmosphere and highlight your decor.
Selecting The Perfect Style
Start by deciding the style that fits your space. Modern, vintage, industrial, or rustic styles offer different vibes. Pick a style that feels natural and matches your taste. The pendant light should look like it belongs in the room. Style harmony creates a comfortable and inviting space.
Considering Size And Scale
Size matters. A pendant light too big can overwhelm the room. Too small, and it might not provide enough light. Measure the space where you want to hang the light. Consider ceiling height and room size. Choose a pendant that balances well with your room’s dimensions.
Matching Your Room’s Decor
The pendant light should blend with the room’s decor. Look at colors, materials, and shapes already in the space. Metal, glass, or fabric shades can match different decor styles. A well-matched pendant light feels like part of the room, not an afterthought.
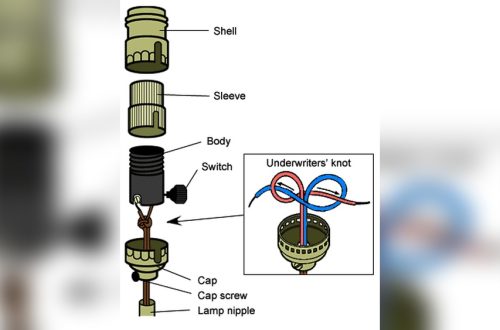
Credit: www.homdiyhardware.com
Tools And Materials Needed
Installing a pendant light needs the right tools and materials. These help you work safely and efficiently. Preparing everything before starting saves time and avoids mistakes.
Basic Tools Checklist
- Screwdriver (flathead and Phillips)
- Wire stripper
- Voltage tester
- Drill with bits
- Measuring tape
- Pliers
- Step ladder
Safety Equipment
- Insulated gloves
- Safety goggles
- Dust mask
- Non-slip shoes
Additional Supplies
- Wire nuts
- Electrical tape
- Mounting bracket (usually included)
- Light bulbs
- Extension cord (if needed)
Preparing For Installation
Preparing for installation is the first step to a safe and successful pendant light setup. This stage helps you avoid accidents and ensures everything fits perfectly. Taking time now saves headaches later.
Before handling any electrical parts, you must follow some basic safety and preparation steps. These steps protect you and your home.
Turning Off The Power
Start by turning off the power at the circuit breaker. This stops electricity flow to the light fixture. Use a tester to confirm no power runs through the wires. Never skip this step.
Removing Old Fixtures
Carefully remove the old fixture from the ceiling. Unscrew any mounting screws and gently pull the light down. Disconnect the wires by loosening the wire nuts. Keep parts you might reuse.
Inspecting Electrical Wiring
Check the wiring for damage or wear before installing the new light. Look for frayed wires, loose connections, or exposed copper. Replace or fix any issues to avoid hazards.
Step-by-step Installation Guide
Installing a pendant light is a simple way to brighten any room. This step-by-step guide helps you install your pendant light safely and correctly. Follow each step carefully to ensure a secure and attractive fixture.
Mounting The Bracket
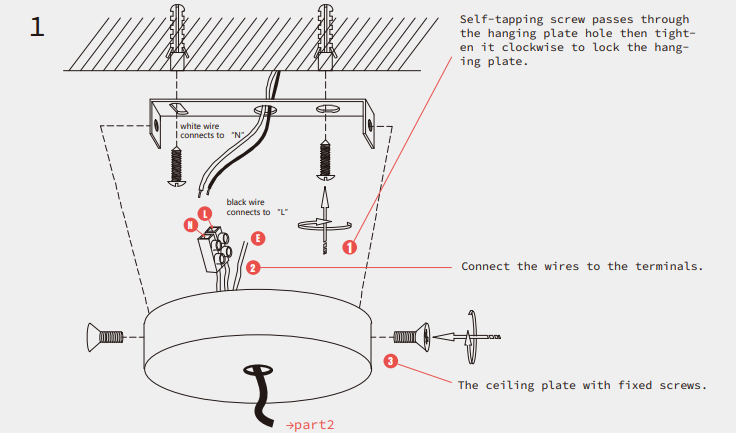
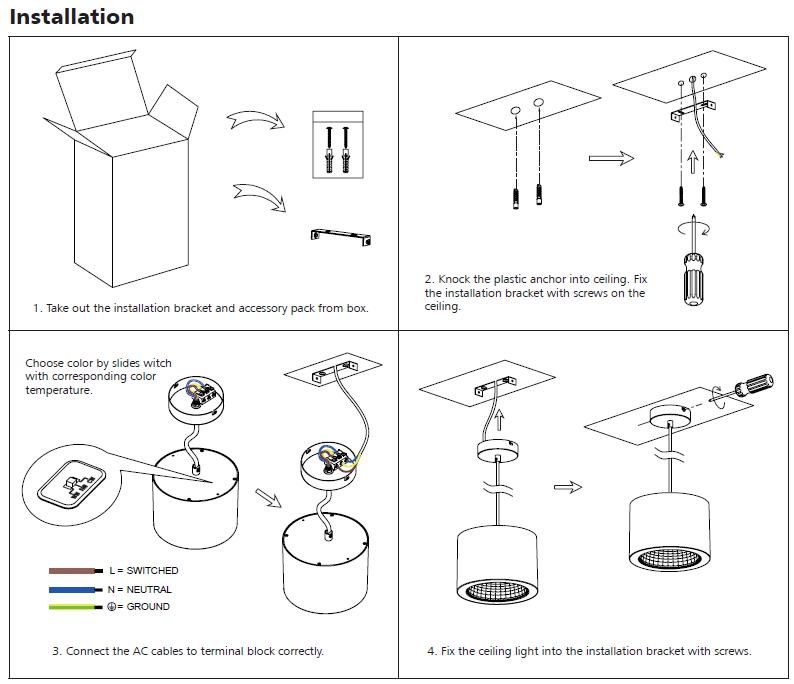
Start by turning off the power at the circuit breaker. Remove the old light fixture if needed. Attach the mounting bracket to the electrical box using screws. Make sure the bracket is tight and level. This bracket will hold your pendant light securely.
Wiring The Pendant Light
Connect the wires from the pendant light to the house wires. Match black to black (hot), white to white (neutral), and green or copper to ground. Use wire nuts to secure the connections. Wrap electrical tape around the wire nuts for extra safety. Carefully tuck the wires into the electrical box.
Securing The Fixture
Lift the pendant light and align it with the mounting bracket. Attach the fixture with screws or nuts provided. Check that the light is steady and does not wobble. Tighten all screws but avoid over-tightening to prevent damage. Confirm the fixture is flush with the ceiling.
Adjusting The Height
Most pendant lights have adjustable cords or rods. Set the height by shortening or lengthening the cord. Make sure the light hangs evenly and at the desired height. Secure the cord or rod in place using the locking mechanism. Check the height before turning the power back on.
Testing And Final Touches
After installing your pendant light, testing and final touches are crucial. This step ensures safety and perfect appearance. It also confirms the light works well. Taking time here prevents future problems.
Restoring Power Safely
Turn the circuit breaker back on carefully. Avoid touching wires or metal parts. Use a dry hand and stand on a dry surface. Double-check that the switch controlling the light is off before restoring power. Safety first—never rush this step.
Checking Light Functionality
Flip the light switch and observe the pendant light. It should turn on smoothly without flickering. If it does flicker, turn off power and check connections again. Make sure the bulb is the right type and wattage. Test the light from different angles to ensure even lighting.
Adding Decorative Elements
Attach any covers, shades, or decorative pieces included. Align these parts carefully to avoid damage. Clean the light fixture gently with a soft cloth. Avoid harsh chemicals that may dull the finish. Little details improve the overall look and feel of the room.

Credit: www.wikihow.com
Troubleshooting Common Issues
Troubleshooting common issues during pendant light installation saves time and frustration. Some problems may occur even after careful installation. Knowing simple fixes helps keep your light working well.
Below are easy solutions for frequent problems like flickering lights, loose fixtures, and wiring issues. These tips ensure your pendant light looks great and functions safely.
Fixing Flickering Lights
Flickering lights often mean a loose bulb or poor connection. First, turn off the power and check if the bulb is screwed in tightly. Replace the bulb if it is old or faulty.
Loose wiring inside the fixture can also cause flickering. Inspect the wires and secure any loose connections. Use wire nuts to hold wires firmly together. Flickering may also come from a dimmer switch not compatible with your bulb type.
Addressing Loose Fixtures
Loose pendant lights can wobble or tilt. This usually happens if mounting screws are not tight. Turn off power before tightening all screws on the mounting bracket and canopy.
Check the ceiling box to confirm it is sturdy. A weak box may need replacing or reinforcement. Use a level tool to keep the fixture straight. A secure fixture prevents damage and keeps the light safe.
Dealing With Wiring Problems
Wiring problems cause the light not to turn on or create safety risks. Always switch off the breaker before handling wires. Verify that all wires match colors: black to black, white to white, and ground to ground.
Look for damaged insulation or frayed wires. Replace any worn parts immediately. Use electrical tape for extra security on wire nuts. Testing connections with a voltage tester ensures proper flow.
Maintenance Tips For Longevity
Maintaining your pendant light helps it last longer and look great. Small efforts keep it working well and safe. Follow these simple tips to care for your fixture regularly. These steps make a big difference over time.
Regular Cleaning
Dust and dirt can build up on your pendant light. Use a soft cloth to wipe the surface gently. Avoid wetting electrical parts. Clean weekly or as needed to keep it bright and shiny. Clean bulbs carefully to avoid damage.
Replacing Bulbs
Change bulbs when they burn out or flicker. Use the correct wattage and type for your fixture. Turn off power before replacing bulbs for safety. Handle bulbs with a cloth to avoid oils from your skin. Proper bulbs keep your light bright and safe.
Inspecting For Wear
Check your pendant light for loose parts or frayed wires. Tighten screws and fix any damage quickly. Look for discoloration or cracks on the shade. Early checks prevent bigger problems and keep your light safe. Inspect every few months to catch issues early.
Credit: www.upshine.com
Frequently Asked Questions
What Tools Do I Need To Install A Pendant Light?
You need a screwdriver, wire strippers, voltage tester, ladder, and electrical tape. These tools ensure safe and efficient installation.
How High Should I Hang A Pendant Light?
Hang the pendant light 28 to 34 inches above the table or surface. This height provides optimal lighting and aesthetic balance.
Can I Install A Pendant Light Without An Electrician?
Yes, if you have basic electrical knowledge and follow safety precautions. Always turn off power before starting installation to avoid risks.
How Do I Choose The Right Pendant Light Size?
Select a pendant size based on room dimensions and ceiling height. Larger rooms or higher ceilings need bigger or multiple pendants for balance.
Conclusion
Installing a pendant light can brighten any room quickly. Follow each step carefully for a safe setup. Always turn off the power before starting the work. Use the right tools and check the wiring twice. Take your time to avoid mistakes or accidents.
Once installed, enjoy the new look and feel. A simple change can make a big difference. Keep these tips handy for future lighting projects. You now have the confidence to add style and light.