Are you ready to create a stunning centerpiece for your holiday celebrations? Building an artificial Christmas tree with lights might sound tricky, but it’s easier than you think.
Imagine a tree that lights up perfectly, fits your space just right, and shines brightly all season long. In this guide, you’ll discover simple steps to build your own glowing masterpiece. Keep reading, and by the end, you’ll have everything you need to bring magic into your home this Christmas.
Choosing Materials
Choosing the right materials is key to building an artificial Christmas tree with lights. The materials affect how the tree looks and how well it holds up. Careful choices make the tree sturdy and beautiful. Focus on three main parts: the frame, the branches, and the lights. Each part plays a big role in the final tree.
Selecting The Frame
The frame is the base of the tree. Pick a strong metal frame for stability. Steel frames last longer and support heavy branches well. Avoid weak or thin frames that bend easily. A good frame keeps the tree upright and safe. Choose a frame size that fits your space and style.
Picking The Branches
Branches give the tree its shape and fullness. Use PVC or PE branches for a natural look. PVC branches are soft and easy to shape. PE branches look more real with detailed needles. Mix branch types for a fuller effect. Make sure branches attach firmly to the frame. Strong branches hold decorations better.
Choosing The Lights
Lights bring the tree to life with a warm glow. LED lights use less power and last longer. Pick warm white or multicolor lights for a festive mood. Check the light strands for safety and durability. Choose lights with a timer or remote for easy control. Plan where to place lights evenly on branches.
.jpg)
Credit: www.create-enjoy.com
Preparing The Frame
Preparing the frame is the first step in building an artificial Christmas tree with lights. A strong frame keeps the tree steady and supports all the decorations. This part takes some time but is easy to do with clear steps. Focus on building a solid base, attaching the trunk firmly, and securing the branch supports well. These steps create a good structure for your tree.
Let’s start with assembling the base to give your tree a firm foundation. Then, attach the trunk to hold the tree upright. Finally, secure the branch supports for the lights and leaves. Follow each step carefully for the best results.
Assembling The Base
Begin with a flat and sturdy surface to work on. Use a metal or wood tripod stand for stability. Spread the legs wide to prevent the tree from tipping. Make sure the base is level before moving on. Tighten all screws or bolts firmly. A solid base keeps the whole tree safe and steady.
Attaching The Trunk
Place the trunk pipe or pole into the base slot. Push down firmly to fit it tightly. Use screws or clamps to lock the trunk in place. Check that the trunk stands straight and does not wobble. The trunk must be strong enough to hold all branches and lights. A straight trunk makes the tree look neat and tall.
Securing Branch Supports
Attach branch holders or arms evenly around the trunk. Space them out from bottom to top for balance. Use screws or clips to fix each branch support tightly. Make sure the supports do not move or bend easily. These arms will hold the branches and lights securely. Proper spacing and strong supports help create a full, beautiful tree.
Crafting Branches
Crafting branches is a key step in building your artificial Christmas tree. Well-made branches give the tree a natural, full look. They hold the lights and decorations securely. This part needs care and patience. Each branch should look real and fit well on the tree frame.
Start by shaping the branches properly. Then add leaves or needles to make them look green and lush. Finally, attach each branch to the tree frame with strength and balance. These steps help build a sturdy and beautiful tree.
Cutting And Shaping Branches
Begin with strong wire or plastic rods for branch bases. Cut them to various lengths for a natural look. Use wire cutters for clean cuts. Bend the branches gently to form natural angles. Avoid sharp bends to prevent breaking. Shape each branch to match the tree’s size and style.
Adding Foliage
Attach artificial needles or leaves to the branches carefully. Use hot glue or thin wire to secure them. Space the foliage evenly for a full appearance. Mix different shades of green for depth. Trim any excess leaves to keep the branch tidy. This step makes branches look alive and ready to hold lights.
Attaching Branches To Frame
Place each branch on the tree frame starting from the bottom. Secure branches tightly with wire or clips. Check the balance to keep the tree stable. Layer branches closely for a thick look. Test if branches can support lights and ornaments. Proper attachment ensures your tree stays beautiful all season.
Credit: www.homedepot.com
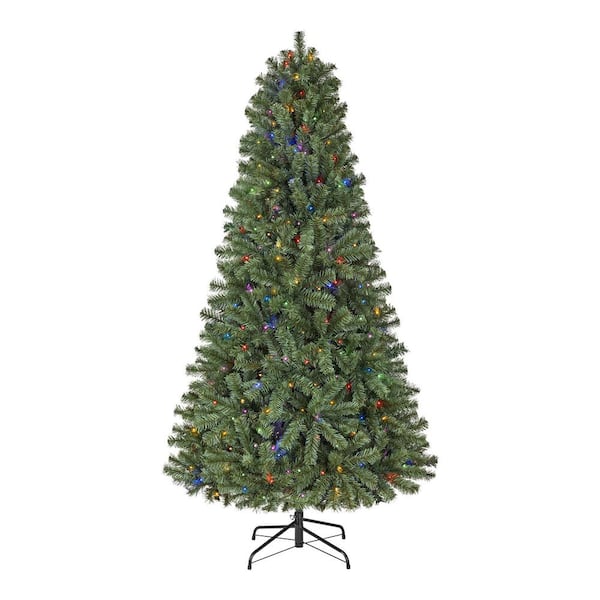
Installing Lights
Installing lights on an artificial Christmas tree brings it to life. Lights add a warm, festive glow. They create a magical atmosphere in any room. Proper installation makes the tree look beautiful and safe to use. Follow simple steps to light your tree perfectly.
Choosing Light Types
Pick lights that suit your tree size and style. LED lights use less energy and last longer. Mini string lights give a classic look. Larger bulbs create a vintage feel. Battery-operated lights work well for trees without nearby plugs. Consider color options: white lights offer elegance, while multicolor lights bring fun.
Wrapping Lights Around Branches
Start from the bottom and work upward. Wrap lights around each branch, close to the trunk. This method hides wires and creates depth. Avoid placing lights only on outer tips. Secure lights gently, so branches stay flexible. Check for even spacing to make lights glow consistently.
Hiding Wires
Keep wires hidden for a clean appearance. Tuck wires behind branches and needles. Use green wire covers for better blending. Avoid visible plugs or extension cords. Secure wires with small clips or twist ties. Hidden wires make the tree look neat and enhance the festive mood.
Adding Finishing Touches
Adding finishing touches to your artificial Christmas tree brings it to life. These final steps make the tree look full and festive. Small details create a warm and inviting holiday feel. Focus on fluffing, decorating, and testing the lights to complete your tree.
Fluffing And Shaping
Start by fluffing each branch. Spread out the needles to fill gaps. Use your hands to shape branches outward and upward. This makes the tree look natural and full. Take time to adjust every branch for the best shape.
Adding Decorations
Place ornaments evenly around the tree. Mix different sizes and colors for balance. Hang heavier ornaments near the trunk for support. Add garlands or ribbons to wrap around the tree. Space decorations to avoid clutter and highlight each piece.
Testing The Lights
Plug in the lights to check they work. Look for dark spots or flickering bulbs. Replace any broken bulbs immediately. Make sure lights wrap evenly around the branches. Proper lighting adds sparkle and warmth to your tree.
Maintenance Tips
Keeping your artificial Christmas tree with lights in good shape takes simple care. Proper maintenance makes sure your tree stays bright and fresh for many holidays. Regular upkeep saves you time and money later on. Below are key tips to help your tree last longer and look great.
Storage Suggestions
Store your tree in a cool, dry place. Avoid damp areas to stop mold and damage. Use the original box or a special tree storage bag. Keep lights wrapped carefully to prevent tangles. Store tree parts separately if possible. Label boxes to find everything quickly next year.
Light Replacement
Check lights before setting up the tree each season. Replace any broken or burned-out bulbs right away. Use bulbs that match your tree’s light type and voltage. Keep spare bulbs and fuses handy for quick fixes. Test lights in small sections to find problems fast. Avoid overloading power outlets to prevent hazards.
Cleaning The Tree
Dust your tree regularly to keep it shiny. Use a soft cloth or feather duster gently. Avoid harsh chemicals that can harm the branches or lights. For stubborn dirt, a damp cloth with mild soap works well. Let the tree dry completely before storing or decorating. Clean lights carefully to keep them bright and safe.

Credit: www.royalchristmas.eu
Frequently Asked Questions
How Do I Choose The Best Artificial Christmas Tree?
Select a tree with realistic branches and sturdy construction. Consider height, fullness, and easy assembly. Quality trees last for years and look great.
What Lights Work Best For Artificial Christmas Trees?
LED string lights are energy-efficient, bright, and long-lasting. Choose warm white or multicolor bulbs for a festive look. Ensure lights are safe and designed for indoor use.
How Can I Safely Attach Lights To The Tree?
Wrap lights gently around branches without forcing wires. Use twist ties or clips to secure lights evenly. Avoid overloading electrical outlets to prevent hazards.
What Materials Do I Need To Build A Tree With Lights?
You need a frame, artificial branches, string lights, zip ties, and a tree stand. Optional decorations include garlands and ornaments to enhance the look.
Conclusion
Building an artificial Christmas tree with lights brings joy and warmth. It takes patience and simple steps to create a beautiful tree. You control the look and brightness of your tree. Each light adds a festive touch that feels special.
This project saves money and offers fun for the whole family. Enjoy decorating your home with a tree you made yourself. Brighten your holidays with a glowing, handcrafted tree. Celebrate the season with light and love.