Are you tired of the plain look that recessed lighting gives your room? Changing recessed lights to pendant lights can completely transform your space, adding style and personality.
But you might be wondering, “Is it hard to make the switch? ” Don’t worry—this guide will walk you through every step in a simple, clear way. By the end, you’ll know exactly how to upgrade your lighting and create a cozy, inviting atmosphere that suits your taste.
Ready to give your home a fresh new look? Let’s dive in!
Tools And Materials Needed
Changing recessed lighting to pendant lights needs the right tools and materials. This section lists everything required. Having these ready makes the project smoother and safer.
Basic Electrical Tools
These tools help cut, strip, and connect wires safely. You need wire strippers, a voltage tester, and a screwdriver set. A pair of needle-nose pliers also helps with wire bending.
Lighting Fixtures And Hardware
Choose pendant lights that fit your room’s style and size. The kit should include mounting brackets and screws. Make sure the fixtures come with clear instructions.
Safety Equipment
Safety matters most during electrical work. Wear insulated gloves and safety goggles. Use a sturdy ladder to reach the ceiling comfortably.
Electrical Supplies
Have extra wire, wire nuts, and electrical tape on hand. These help secure connections and prevent shorts. Use wire that matches your home’s electrical code.
Tools For Ceiling Preparation
You might need a drywall saw or hole cutter. These tools help create or adjust holes for the new fixture. Keep a dust mask nearby to avoid inhaling debris.

Credit: prettyhandygirl.com
Safety Precautions
Changing recessed lighting to pendant lighting can improve your room’s style and brightness. Safety must be a top priority during this process. Electrical work can be risky without the right steps.
Follow safety rules to avoid shocks, burns, or fire hazards. Proper planning and care protect you and your home.
Turn Off The Power
Always switch off the power at the circuit breaker. Never trust the wall switch alone. Use a voltage tester to confirm the wires are not live.
Use Proper Tools And Equipment
Choose tools made for electrical work. Insulated screwdrivers and wire strippers reduce injury risk. Wear safety glasses and gloves during the job.
Check The Ceiling Structure
Ensure the ceiling can support the new pendant light. Recessed lighting holes may be too small. Use a support brace if needed to hold the fixture securely.
Follow Electrical Codes
Adhere to local electrical codes and rules. These guidelines ensure safe and legal installations. Check with your local building department if unsure.
Seek Professional Help If Unsure
Hire an electrician if you doubt any step. Faulty wiring can cause serious accidents. Professionals have the skills and tools to do the job safely.
Turn Off Power
Changing recessed lighting to pendant lights requires care and safety. The first and most important step is to turn off the power. This stops electricity from flowing to the light fixture. It helps protect you from electric shock.
Never start any electrical work without turning off the power. It keeps you and your home safe. Follow the steps below to switch off the power correctly.
Locate The Circuit Breaker
Find the main electrical panel in your home. It usually sits in the basement, garage, or utility room. The panel holds switches called circuit breakers. Each breaker controls power to a part of your house.
Identify The Correct Breaker
Look for the breaker that controls the recessed lighting. It may be labeled “lighting” or “recessed lights.” If not labeled, turn off breakers one by one. Check the light fixture to see when the power stops.
Switch Off The Breaker
Flip the correct circuit breaker to the off position. This cuts power to the recessed lights. Confirm the power is off by turning on the light switch. The light should not turn on.
Use A Voltage Tester
Before touching wires, test with a voltage tester. Hold the tester near the light wires. No light or sound means power is off. This step ensures your safety.
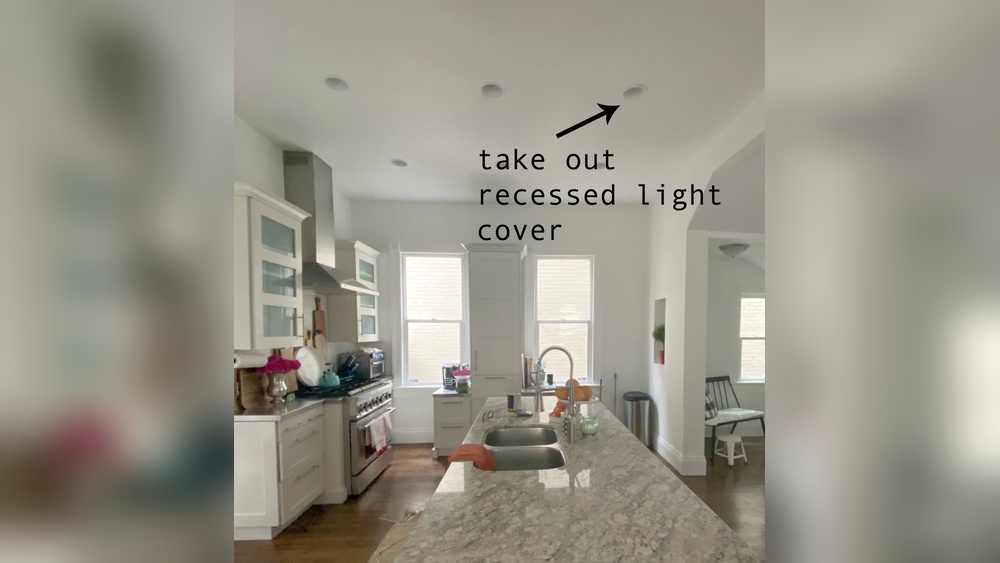
Remove Recessed Light
Removing recessed lighting is the first step in changing to pendant lights. It requires care and some basic tools. Safety matters most. Always turn off the power before starting. This prevents shocks or accidents. The process involves removing the light trim, bulb, and fixture housing from the ceiling.
Taking out recessed lighting creates space for new pendant fixtures. It also lets you check wiring and ceiling condition. The job is simple if you follow clear steps. This section breaks down how to safely and cleanly remove recessed lights.
Turn Off Power At The Circuit Breaker
Locate the circuit breaker for the room. Switch off power to avoid electric shock. Test the light switch to confirm power is off. Use a non-contact voltage tester for safety. Never start work without cutting power first.
Remove The Light Bulb And Trim
Unscrew and take out the light bulb carefully. The bulb might be hot, so wait for it to cool. Next, pull down the trim ring gently. Some trims have springs or clips. Release them slowly to avoid damage.
Detach The Housing From The Ceiling
Look inside the recessed can for mounting screws. Use a screwdriver to remove these screws. The housing might be held by clips inside the ceiling. Press clips to free the fixture. Pull the housing down carefully.
Disconnect The Wiring
Once the housing is out, find the wire nuts connecting wires. Twist off wire nuts to separate wires. Keep wires apart to prevent shorts. Cover exposed wires with electrical tape for safety. This step prepares the ceiling for new pendant wiring.
Prepare Electrical Box
Start by turning off the power to the electrical box. Remove the old recessed light and check the wiring. Make sure the box is secure and ready for the new pendant fixture installation.
Safety is the first step. Switch off the power at the circuit breaker.
Double-check the light switch to confirm the power is off.
Remove The Old Fixture
Carefully unscrew the recessed light trim and bulb.
Disconnect the wiring from the recessed light housing.
Take out the old fixture to expose the electrical box.
Inspect The Electrical Box
Check if the electrical box is securely attached to the ceiling joist.
Look for any damage, rust, or loose screws.
Replace the box if it is weak or not safe for a pendant.
Choose The Right Electrical Box
Select a box rated for ceiling fixtures and weight of your pendant.
Use a box designed for support and easy wiring access.
Install A Support Brace
Install a brace between ceiling joists to hold the new box firmly.
Ensure it can carry the pendant’s weight safely.
Prepare Wiring
Strip the wire ends about half an inch for connections.
Use wire nuts to keep wires secure and neat.
Make sure wiring meets local electrical codes.
Install Mounting Bracket
Installing the mounting bracket is the next step after removing the recessed light. This bracket will hold the pendant light securely in place. It must be attached to the ceiling joist or a support brace for stability.
Use the right tools to make the process easier and safer. A drill, screwdriver, and a stud finder are essential. Make sure the power is turned off before starting any electrical work.
Locate The Ceiling Joist
Find the ceiling joist near the recessed light hole. Use a stud finder to spot the joist. Mark the edges with a pencil. This ensures the bracket attaches to solid wood.
Attach The Mounting Bracket
Place the mounting bracket over the hole. Align it with the joist marks. Use screws to fix the bracket firmly to the joist. Avoid loose or wobbly fittings.
Check The Bracket Stability
Push and pull the bracket gently. Confirm it does not move or shift. A stable bracket supports the pendant light safely. Loose brackets can cause damage or accidents.
Connect Wires
Connecting wires is a key step in changing recessed lighting to pendant lighting. It ensures the new fixture receives power safely and works properly. You must handle wires carefully to avoid electrical hazards. Turn off the power before starting any wiring work. Use a voltage tester to confirm the power is off.
Follow the wiring instructions that come with your pendant light. Different fixtures might have different wiring setups. Understanding wire colors helps connect wires correctly and safely.
Identify The Wires
Start by identifying each wire in the ceiling box. Usually, black or red wires carry the current. White wires are neutral and complete the circuit. Green or bare copper wires are ground wires for safety. Label wires with tape for easy reference.
Match Wire Colors
Match the pendant light wires to the ceiling wires by color. Connect black to black or red. Connect white to white. Attach green or bare copper wire to the ground wire or grounding screw. Proper matching prevents short circuits and damage.
Use Wire Connectors
Twist wires together and secure them with wire connectors. Use connectors that fit the wire size. Twist firmly but do not over-tighten. Cover exposed wire ends completely. This prevents sparks and keeps connections strong.
Secure The Connections
Tuck wires neatly into the electrical box. Avoid pinching or bending wires too much. Attach the pendant mounting bracket firmly. Loose wiring or fixtures cause poor contact and safety risks.
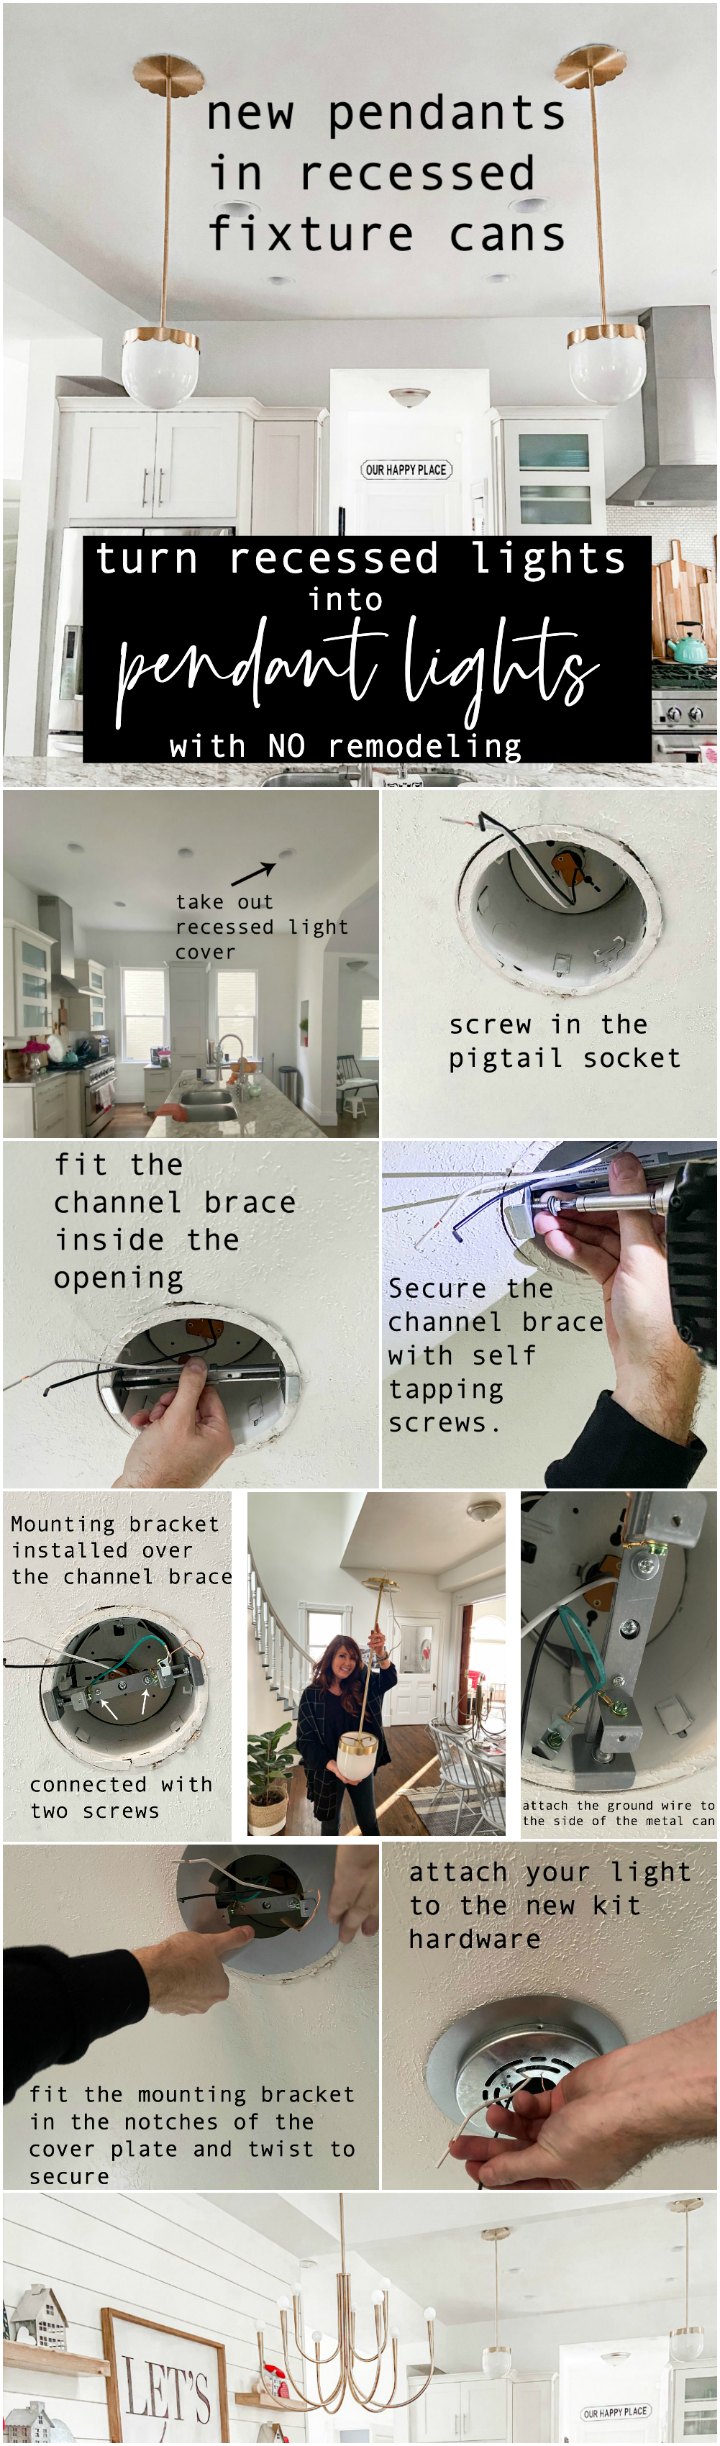
Credit: tatertotsandjello.com
Attach Pendant Fixture
Changing recessed lighting to a pendant fixture adds style and focus to any room. Start by turning off power, then remove the old light and install the pendant’s mounting bracket. Finally, connect the wires and secure the pendant in place.
Prepare The Electrical Box
Turn off the power at the circuit breaker. Confirm power is off using a voltage tester. Remove the recessed light trim and bulb. Unscrew the recessed housing from the ceiling. Check that the electrical box can support a pendant fixture. Use a brace or new box if needed for safety.
Connect The Wires
Match the wires from the pendant fixture to the house wires. Connect black (hot) wires together with a wire nut. Join white (neutral) wires in the same way. Attach the ground wire from the fixture to the grounding screw or wire. Secure all connections tightly to avoid electrical issues.
Mount The Pendant Fixture
Attach the mounting bracket to the electrical box. Align the pendant canopy with the bracket. Push the canopy up to the ceiling. Use screws to secure the canopy in place. Adjust the pendant length by shortening or lengthening the cord. Make sure the fixture hangs straight and firm.
Test The New Light
Testing the new pendant light is a key step after installation. It ensures the fixture works properly and safely. This step helps spot any wiring issues or bulb problems before finalizing the setup.
Turn on the power and watch the light closely. The bulb should glow steadily without flickering. The pendant should hang securely without wobbling or tilting. Pay attention to any unusual sounds or smells.
Check the light’s brightness and angle. Adjust the height or direction for the best effect. Make sure the light covers the area evenly and creates the mood you want.
Turn On The Power
Switch on the circuit breaker or wall switch controlling the new pendant. Confirm the light bulb illuminates immediately. If it doesn’t turn on, double-check wiring connections.
Inspect For Flickering Or Buzzing
Watch the light for flickers or buzzing sounds. Flickering means a loose connection or incompatible bulb. Buzzing can signal electrical issues needing correction.
Adjust Height And Position
Set the pendant’s height to suit the room’s purpose. Lower lights suit dining areas; higher lights work for general lighting. Tilt or rotate the fixture for optimal light spread.
Test Multiple Bulb Types
Try different bulbs to see which gives the best light color and brightness. LED bulbs save energy and last longer. Choose the bulb that fits your style and lighting needs.
Adjust Pendant Height
Adjusting the pendant height is important for both style and function. The right height improves light spread and fits your room’s look. Too low or too high can make the space feel off. Knowing how to set the pendant at the correct height makes a big difference.
Start by measuring the ceiling height. Then decide the ideal distance from the floor to the bottom of the pendant. This distance changes depending on the room’s purpose and the furniture below.
Measure Ceiling Height
Use a tape measure to find the exact height of your ceiling. This helps decide how long the pendant cord should be. Note the measurement carefully for accurate adjustment.
Determine Ideal Pendant Height
For dining areas, hang the pendant 28 to 34 inches above the table. In kitchens or workspaces, keep the light 30 to 36 inches above counters. For open rooms, aim for 7 feet from floor to pendant bottom.
Adjust The Cord Or Chain
Most pendants have adjustable cords or chains. Shorten or lengthen it to reach the desired height. Use wire cutters or pliers if needed. Secure the cord tightly to avoid slipping.
Test And Fine-tune
Turn on the light and check how it looks. Make sure it does not block sightlines or hang too low. Adjust again if the light feels too dim or harsh.
Tips For Choosing Pendant Lights
Choosing the right pendant lights can change your room’s look and feel. They bring style, light, and focus to your space. Picking the best pendant light is important for a smooth switch from recessed lighting.
Keep these tips in mind to find pendant lights that fit well and look great.
Consider The Room Size And Ceiling Height
Large rooms need bigger or multiple pendants to fill space. Small rooms suit smaller pendants. High ceilings allow longer hanging lights. Low ceilings need short or flush designs.
Match Your Style And Decor
Choose pendants that match your room’s style. Modern rooms work well with sleek, simple designs. Rustic rooms look good with metal or wood finishes. Classic rooms fit glass or crystal pendants.
Check The Light Output
Look for the right brightness. Bright lights work well in kitchens and workspaces. Softer lights create a cozy mood in dining or living rooms. Adjustable bulbs add flexibility.
Pick The Right Shape And Size
Round pendants suit islands and tables. Linear pendants work for long counters. Clustered small pendants create a fun look. Ensure the size fits your space and furniture.
Think About Installation And Wiring
Make sure your ceiling can support the new fixtures. Check if wiring needs changes from recessed lights. Some pendants need professional installation. Measure carefully before buying.
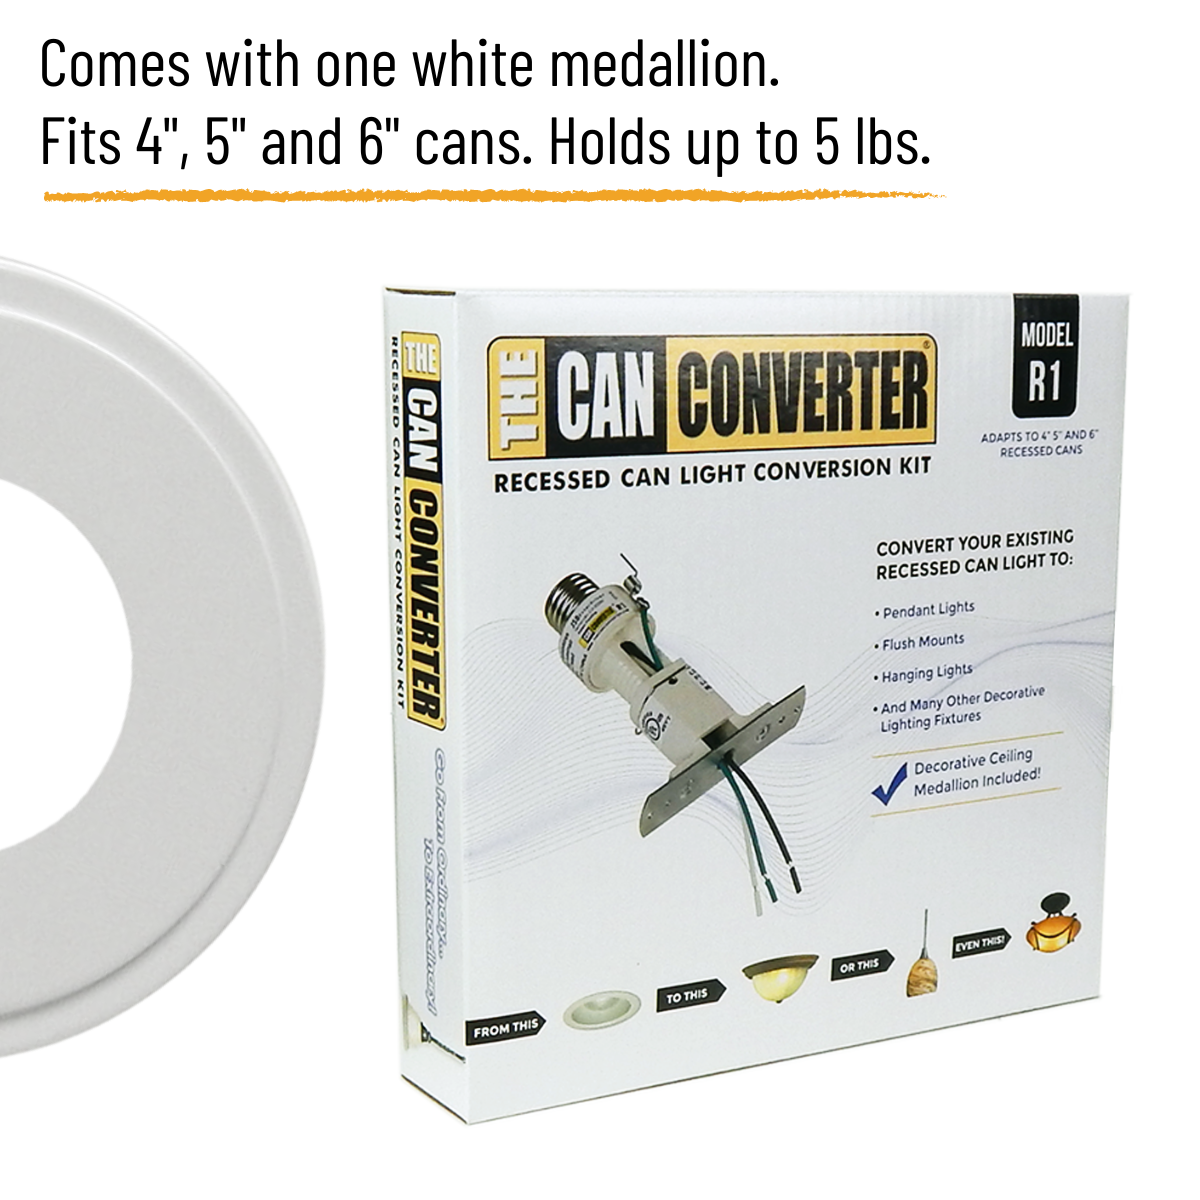
Credit: thecanconverter.com
Frequently Asked Questions
How Do I Replace Recessed Lighting With Pendant Lights?
Turn off power, remove recessed fixtures, and install pendant mounting brackets. Connect wiring to pendant fixtures, secure them, and restore power. Use proper tools and follow electrical codes for safety.
What Tools Are Needed To Change Recessed To Pendant Lighting?
You need a voltage tester, wire strippers, screwdriver, pliers, and a ladder. Also, use mounting brackets and electrical tape. These tools ensure safe removal and installation of pendant lights.
Can I Use The Existing Wiring For Pendant Lights?
Yes, typically the existing wiring can be reused if it’s in good condition. Ensure wires match the pendant’s requirements and connections are secure. If unsure, consult an electrician for safety.
How Long Does It Take To Switch Recessed Lights To Pendants?
The process usually takes 1 to 3 hours depending on fixture complexity and experience. Preparation and safety checks might add extra time. Hiring a professional can speed up the process.
Conclusion
Changing recessed lighting to pendant lights can brighten your room’s style. You only need a few tools and some basic steps. Take your time and follow safety tips carefully. Choose pendant lights that match your space and taste. This small change can make a big difference in your home.
Enjoy the new look and cozy atmosphere created by your pendant lights.