Are you struggling to fit your artificial Christmas tree into your space just right? Whether it’s too tall for your ceiling or too wide for your cozy corner, resizing your tree can make all the difference.
Imagine having a tree that perfectly fits your room, looks beautiful, and still gives you that festive feeling you love. In this guide, you’ll discover simple, step-by-step tips to resize your artificial Christmas tree easily and safely. Keep reading to transform your holiday setup and create the perfect centerpiece for your celebrations!
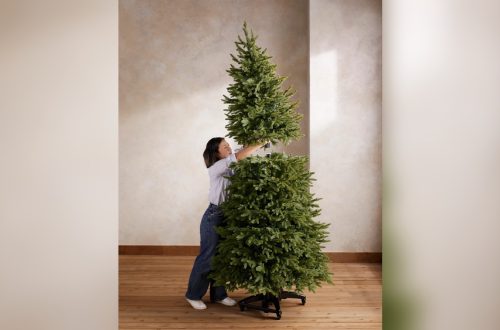
Choosing The Right Tree Size
Choosing the right size for your artificial Christmas tree is very important. The right tree fits your space well and looks beautiful. A tree that is too big or too small can make your room feel crowded or empty. This guide helps you pick the perfect tree size for your home.
Measuring Your Space
Start by measuring the area where you want to place the tree. Check the width and depth of the spot. Make sure there is enough space around the tree for decorations and movement. Write down these measurements before shopping.
Considering Ceiling Height
Measure the height of your ceiling carefully. Leave about 6 to 12 inches between the top of the tree and the ceiling. This space allows room for a tree topper and prevents the tree from looking cramped. Tall ceilings can fit bigger trees easily.
Selecting Tree Height And Width
Choose a tree height that fits well within your ceiling space. Match the tree width to the space width. A wide tree in a small room will feel overwhelming. Pick a size that balances the room and complements your decorations.

Credit: www.greenbay.com
Tools Needed For Resizing
Resizing an artificial Christmas tree needs the right tools. Using proper tools makes the job easier and safer. Gather all necessary items before starting. This helps avoid interruptions and mistakes.
Essential Cutting Tools
Sharp cutters or pruning shears work best for trimming branches. Use wire cutters to cut metal branches cleanly. A small saw can help with thicker parts. Choose tools that fit your hand well.
Safety Gear
Wear gloves to protect your hands from sharp edges. Safety glasses keep your eyes safe from flying debris. Long sleeves prevent scratches on your arms. Use a dust mask if you feel dust around.
Additional Supplies
Have a clean cloth to wipe dust and debris. Use zip ties to secure loose branches after cutting. Keep a trash bag nearby for cut branches and scraps. A measuring tape helps keep cuts even and accurate.
Preparing The Tree
Preparing your artificial Christmas tree for resizing is the first step. It makes the process safer and easier. Proper preparation helps you avoid damage to the tree. It also lets you work with clear parts.
Start by taking the tree apart carefully. Then clean and check each section. Finally, mark where you will cut. These steps keep your tree looking good after resizing.
Disassembling Branches
Begin by removing all branches from the tree. Take them off one by one. Lay them out on a flat surface. This gives you space to work and see each part clearly. Handle branches gently to avoid breaking any tips.
Cleaning And Inspecting
Dust and dirt can hide damage. Use a soft cloth to clean each branch. Look closely for broken wires or missing needles. Check the trunk too. Fix small problems before cutting. This keeps your tree strong and neat.
Marking Cut Lines
Use a pencil or tape to mark where you will cut. Measure twice to get the right size. Mark branches and the trunk carefully. Clear marks help you cut straight. This step prevents mistakes and keeps the tree balanced.
Cutting Branches And Trunk
Cutting branches and the trunk is a key step in resizing an artificial Christmas tree. It helps fit the tree in smaller spaces and keeps it looking full. Careful cutting keeps the tree safe and stable. Use the right tools and cut slowly to avoid damage.
Trimming Branch Length
Cut branches to reduce the tree’s width. Use sharp scissors or wire cutters. Trim a little at a time. Cut near the base of the branch for a clean look. Keep the branch tips even to maintain shape.
Shortening The Trunk
Shorten the trunk to fit lower ceilings or small rooms. Measure how much to cut before starting. Use a saw with a fine blade for a smooth cut. Cut straight across for easy reassembly. Sand the cut edge to avoid rough spots.
Maintaining Tree Stability
Check the tree’s balance after cutting. Make sure the base holds the tree firmly. Use extra support if needed, like a heavier stand or added weights. Avoid cutting too much from the bottom to keep strength. Stability keeps the tree safe and upright during holidays.
Reassembling The Tree
Reassembling your artificial Christmas tree is a key step after resizing. It brings the tree back to life and ensures it looks full and natural. Careful reassembly helps the tree keep its shape and stand firm. Follow these simple steps to get your tree ready for decorating.
Reattaching Branches
Start by placing the main trunk sections back together. Attach each branch carefully to the trunk. Use the original slots or clips for a secure fit. Make sure each branch fits tightly to avoid wobbling. Attach branches from bottom to top for easy access.
Fluffing And Shaping
Fluff each branch by spreading out the needles gently. Pull the tips of the branches in different directions. This creates a fuller, natural look. Take your time to shape the tree evenly on all sides. Avoid pressing too hard to keep the needles intact.
Checking For Balance
Stand the tree upright and check if it leans to one side. Adjust the branches or trunk sections to balance the tree. Tighten any loose connections at the base. Place the tree on a flat surface to ensure stability. A balanced tree stays safe and looks great.
Tips For A Natural Look
Resizing an artificial Christmas tree can change its shape and size. Keeping it natural looks is important. Simple tips help the tree stay full and real-looking. These tips focus on branch placement, hiding cut edges, and decoration placement. Follow these ideas to keep the tree beautiful and natural.
Even Branch Distribution
Spread the branches evenly around the tree. Avoid bunches or empty spots. Bend each branch gently to fill gaps. Make sure branches face different directions. This balance makes the tree look full and natural. Check the tree from all sides. Adjust branches until it looks right from every angle.
Hiding Cut Edges
Cut edges can look sharp and fake. Cover them with extra branches or small pinecones. Use green floral tape to wrap visible cuts. Place the hidden parts towards the back. This hides rough spots and keeps the tree looking smooth. Try to keep all cuts out of direct view.
Adding Decorations Strategically
Put bigger ornaments near the bottom and small ones on top. Hang decorations inside the branches, not just outside. Use garlands or ribbons to cover empty spots. Place lights deep in the tree to add depth. This layering adds texture and a natural feel. Spread decorations evenly for a balanced look.
Storing Your Resized Tree
Storing your resized artificial Christmas tree properly helps keep it in good shape. Careful storage protects your tree from damage and dust. It also makes setup easier next holiday season. Follow these tips to store your tree safely and maintain its look for years.
Proper Storage Techniques
Choose a cool, dry place to store your tree. Avoid damp basements or hot attics. Use a tree storage bag or large box. Label the container for easy identification. Store the tree flat or upright, depending on space. Keep heavy items away from the tree to prevent crushing.
Protecting Branches
Wrap branches gently with tissue paper or bubble wrap. This stops them from bending or breaking. Avoid folding or forcing branches into tight spaces. Use twist ties or Velcro straps to hold branches close. Handle the tree carefully to keep its shape intact.
Preparing For Next Season
Clean your tree before storing it. Remove dust and any leftover decorations. Check for missing or broken parts and fix them. Store all accessories together in a labeled box. This saves time and effort next year. Proper preparation keeps your tree ready for use.
Credit: shopping.yahoo.com

Credit: cailinicoastal.com
Frequently Asked Questions
How Do I Safely Resize An Artificial Christmas Tree?
To resize an artificial Christmas tree, carefully remove sections from the top or bottom. Use sharp scissors or pruning shears. Always check the tree’s structure before cutting. Reshape branches gently to maintain its natural look and stability.
Can I Shorten Artificial Tree Branches Without Damage?
Yes, you can shorten branches by trimming the wire stems. Cut small amounts at a time to avoid damage. Use pliers to bend and reshape branches after trimming. This helps keep the tree’s fullness intact.
What Tools Are Needed To Resize A Fake Christmas Tree?
You need pruning shears, wire cutters, and gloves. A measuring tape helps ensure accurate resizing. Use pliers for bending branches. Having a clean workspace prevents losing small parts during the process.
Is Resizing An Artificial Tree Reversible Or Permanent?
Resizing is mostly permanent since branches and sections are cut. However, some adjustments like bending branches can be reversed. Plan carefully before cutting to avoid irreversible mistakes.
Conclusion
Resizing an artificial Christmas tree is easier than it seems. Follow simple steps to cut and reshape branches carefully. Take your time and work slowly for best results. Use proper tools to keep your tree neat and safe. Adjusting tree size helps fit it perfectly in your space.
Enjoy decorating your tree just the way you want. A smaller or larger tree can still look beautiful. Keep these tips in mind for a festive holiday season.