Are you ready to transform your room with a stylish pendant light but unsure how to hang it properly? Hanging a pendant light with a cord might seem tricky at first, but with the right steps, you can do it yourself and add a personal touch to your space.
Imagine the warm glow filling your room exactly where you want it. In this guide, you’ll discover simple, clear instructions that make the process easy and safe. Keep reading, and by the end, you’ll have the confidence to hang your pendant light like a pro.
Choosing The Right Pendant Light
Choosing the right pendant light is important for both style and function. The right light can brighten your space and add charm. Focus on the cord style, light bulb type, and how the light fits your room’s decor. These factors make the installation easier and the look better.
Selecting The Cord Style And Length
The cord style affects the overall look of your pendant light. Choose a cord that matches your room’s theme. Fabric cords add a soft touch, while metal cords look modern. Measure the height from ceiling to where you want the light to hang. Pick a cord length that fits well without hanging too low or too high.
Considering The Light Bulb Type
The bulb type changes the light’s brightness and color. LED bulbs save energy and last long. Incandescent bulbs give warm, cozy light. Check the bulb size and shape to fit the pendant light. Brightness matters for tasks like reading or cooking. Pick a bulb that suits your needs and light fixture.
Matching With Room Decor
The pendant light should blend well with your room’s style. For a modern look, choose sleek and simple designs. Rustic or vintage rooms go well with metal or wood finishes. Color matters too. Pick a light color that matches your walls and furniture. This keeps the space balanced and attractive.
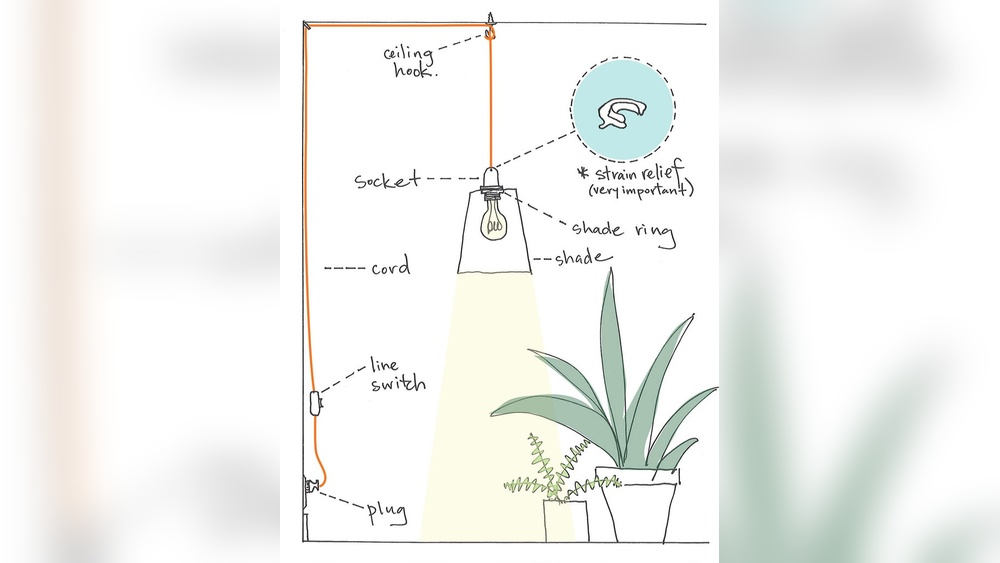
Credit: www.colorcord.com
Gathering Necessary Tools And Materials
Gathering the right tools and materials is the first step to hang a pendant light with a cord. Having everything ready makes the process smooth and safe. It also helps avoid unnecessary trips to the store or delays in the project.
This section explains what tools you need for installation. It also covers the safety gear to protect yourself during the work. Prepare well to ensure a safe and easy pendant light hanging.
Essential Tools For Installation
Start with a screwdriver set. You need both flathead and Phillips screwdrivers.
A drill with bits is important for making holes in the ceiling. Use the right size bit for your anchors.
Wire strippers help remove insulation from the wires. This is necessary for proper electrical connections.
A voltage tester checks if the power is off before you start. It prevents electrical shocks.
A ladder or step stool helps you reach the ceiling safely.
Finally, a tape measure ensures the pendant hangs at the right height.
Safety Equipment To Use
Wear safety glasses to protect your eyes from dust and debris.
Use insulated gloves to avoid electric shock while handling wires.
Wear a dust mask if you are drilling into old ceilings or plaster.
Keep a flashlight or headlamp nearby for better visibility in dark spaces.
Ensure the ladder is stable and placed on a flat surface.
Turn off power at the breaker box before starting any electrical work.
Preparing The Installation Area
Preparing the installation area is the first step to hang a pendant light safely and correctly. It helps avoid mistakes and ensures the light fits perfectly. Taking time to prepare makes the process smoother and safer.
Turning Off The Power
Safety is the top priority. Turn off the power at the circuit breaker. Do not rely on just the light switch. Use a voltage tester to confirm no electricity flows to the wires. This step prevents shocks and accidents during installation.
Measuring And Marking The Spot
Find the right place for your pendant light. Measure the distance from the wall or other lights. Mark the exact spot on the ceiling with a pencil. Double-check the measurements to ensure the light hangs in the perfect position.
Checking Ceiling Support
Check if the ceiling can hold the pendant light’s weight. Look for a ceiling joist or a strong support beam. Use a stud finder to locate these supports. If no support exists, install a brace or anchor for safety. Proper support keeps the light secure and stable.
Installing The Ceiling Hook Or Mount
Installing the ceiling hook or mount is a key step in hanging a pendant light with a cord. It holds the light securely and ensures it hangs straight. This step involves selecting the right hardware and fixing it safely to the ceiling. Proper installation prevents accidents and keeps your light looking neat.
Choosing The Right Mounting Hardware
Pick hardware that fits your ceiling type. Drywall, plaster, and wood need different hooks or anchors. Use a hook that can hold the weight of your pendant light. Check the package for weight limits. A strong, durable hook is best to avoid falling or sagging.
Securing The Hook To The Ceiling
Locate a ceiling stud or use a drywall anchor for support. Drill a small pilot hole to make screwing easier. Screw the hook firmly into the hole by hand or with a screwdriver. Test the hook’s strength by pulling gently. It should not move or loosen.
Wiring The Pendant Light
Wiring the pendant light is a key step for safe and proper installation. It connects your light to the power source. Careful wiring avoids electrical hazards and ensures the light works well. This part requires focus and patience. Follow these clear steps to wire your pendant light correctly.
Connecting The Electrical Wires
Turn off the power at the breaker before starting. Identify the wires: usually black (live), white (neutral), and green or copper (ground). Match the pendant light wires with the house wires. Connect black to black, white to white, and ground to ground. Hold the wires together firmly for a secure connection.
Using Wire Nuts And Electrical Tape
Twist a wire nut onto each connected pair of wires. Make sure the wire nut fits tightly and covers all exposed wire ends. Wrap electrical tape around the wire nuts for extra security. This prevents the nuts from loosening over time. Check that no bare wires are visible outside the wire nuts.
Testing The Wiring Connections
Turn the power back on at the breaker. Use a voltage tester to check the wires for current. Turn on the pendant light switch. The light should turn on without flickering or issues. If the light does not work, turn off the power and recheck all connections carefully.

Credit: www.colorcord.com
Adjusting The Cord Length
Adjusting the cord length is key to hanging a pendant light properly. It lets you fit the light to your space and style. Too long or too short cords can spoil the look and function.
Careful cord adjustment ensures safety and neatness. Follow simple steps to shorten the cord and set the right height.
Shortening The Cord Safely
Turn off power before handling the cord. Unplug or switch off the circuit at the breaker.
Measure how much cord you need to remove. Mark the cut point clearly with a pencil.
Cut the cord with sharp scissors or wire cutters. Avoid frayed ends for safety.
Strip the outer insulation about half an inch. Expose the inner wires carefully without damage.
Connect wires to the light’s terminal screws. Match colors: usually black to black, white to white.
Use electrical tape or wire nuts to secure connections. This prevents short circuits and loose wires.
Setting The Desired Hanging Height
Decide the perfect height for your pendant light. Consider table height or room size.
Measure from the ceiling to the light bulb’s bottom. Adjust the cord length to meet this mark.
Use the cord grip or strain relief on the fixture. Lock the cord at the right length firmly.
Check the light’s position with a tape measure. Make small changes until you find the best fit.
Turn the power back on and test the light. Ensure it hangs straight and bright.
Attaching The Pendant Light Fixture
Attaching the pendant light fixture is an important step for safety and style. Proper attachment keeps the light secure and stable. This process involves securing the fixture to the mount and installing the light bulb. Follow these steps carefully to ensure your pendant light hangs correctly and looks great.
Securing The Light To The Mount
Start by connecting the pendant light’s cord to the ceiling mount. Check that the electrical wires are properly matched—usually black to black and white to white. Use wire nuts to twist the wires together tightly.
Next, push the wires neatly into the ceiling box. Align the fixture base with the mounting bracket. Use screws to fasten the fixture securely to the bracket. Make sure it feels stable and does not wobble.
Installing The Light Bulb
Choose the right bulb type and wattage for your pendant light. Screw the bulb gently into the socket until it is snug. Avoid over-tightening, which can damage the bulb or socket.
Turn on the power to test the light. The bulb should light up without flickering. Replace the bulb if it does not fit or work properly.
Final Safety Checks And Testing
After hanging your pendant light, safety checks and testing are crucial. These steps ensure the light is secure and works correctly. Taking time here prevents accidents and electrical issues. Follow the guidelines carefully to confirm everything is set up right.
Ensuring Stability And Security
Check the pendant light’s mounting bracket. Make sure all screws are tight and secure. The light should not wobble or move when gently pushed. Inspect the cord for any damage or loose connections. Confirm the canopy sits flush against the ceiling. Use a ladder carefully while making these checks.
Restoring Power And Testing Light
Turn the power back on at the circuit breaker. Switch on the pendant light using the wall switch. Watch for any flickering or unusual noises from the bulb. If the light stays steady, it means wiring is done right. If problems occur, switch off power and double-check connections. Testing the light confirms safety and proper function.
Tips For Maintenance And Care
Taking care of your pendant light keeps it looking great and working well. Regular maintenance helps prevent damage and saves money on repairs. Simple steps can make your light last longer and shine brighter.
Cleaning The Pendant Light
Turn off the light and let it cool before cleaning. Use a soft cloth to wipe dust from the shade and cord. Avoid using water on electrical parts. For stubborn dirt, lightly dampen the cloth with mild soap. Dry the light completely to avoid rust or damage.
Replacing Bulbs Safely
Always switch off the power before changing bulbs. Wait until the bulb cools down to avoid burns. Use the correct bulb type and wattage for your fixture. Screw the new bulb in gently to prevent breaking. Check that the bulb fits well and works properly after installation.

Credit: www.instructables.com
Frequently Asked Questions
How Do I Safely Hang A Pendant Light With A Cord?
Start by turning off power at the breaker. Use a sturdy ceiling hook or bracket. Secure the cord properly to avoid strain. Always follow manufacturer instructions and local electrical codes for safety.
What Tools Are Needed To Hang A Pendant Light?
You’ll need a drill, screwdriver, wire stripper, voltage tester, ceiling hook, and pliers. These tools help you install the light securely and connect wires safely.
How Do I Adjust The Length Of A Pendant Light Cord?
Most cords can be shortened by pulling excess wire through the canopy. Cut the cord if necessary, then strip and reconnect wires. Always ensure the cord length suits your space and safety requirements.
Can I Hang A Pendant Light Without Electrical Wiring?
Yes, you can use a battery-operated or plug-in pendant light. Plug-in models hang from a ceiling hook and connect to a wall outlet, avoiding hardwiring.
Conclusion
Hanging a pendant light with a cord is simple and rewarding. Careful steps keep the process safe and neat. Measure twice, cut once, and follow instructions closely. Choose the right spot to brighten your space well. A well-hung light adds style and warmth instantly.
Take your time, and enjoy the new look. Bright rooms make happy homes. Now, your room has a fresh, cozy glow.