Putting together your artificial Christmas tree can feel tricky if you’ve never done it before. But don’t worry—this guide will make it simple and even enjoyable.
Imagine the joy of seeing your tree standing tall, ready to be decorated just the way you like. You’ll learn step-by-step how to assemble it quickly, avoid common mistakes, and get that perfect, full look every time. Keep reading, and by the end, you’ll have your tree set up like a pro, making your holiday season brighter and stress-free.
Choosing The Right Tree
Picking the right artificial Christmas tree makes a big difference. It sets the mood for your holiday space. A good tree fits your room and style perfectly. It also lasts for many seasons. Consider your space size, decoration style, and budget. These points help you find the best tree for your home.
Understanding the types, sizes, and materials helps you choose wisely. This guide breaks down each factor clearly. It makes your decision easy and fun.
Types Of Artificial Trees
Artificial trees come in various types. Some mimic real pine trees closely. Others have a more modern or unique look. Classic green trees are popular for a traditional feel. White or frosted trees create a winter wonderland effect. Some trees have built-in lights for convenience. Choose a type that matches your holiday style and atmosphere.
Size And Shape Options
Size matters for your room and decoration space. Small trees work well in tight spots or apartments. Larger trees create a bold holiday statement in big rooms. Shapes vary too. Full and bushy trees look lush and natural. Slim trees save space and fit narrow corners. Measure your space before buying to avoid crowding or empty spots.
Materials And Quality
Material affects how real the tree looks and feels. PVC is common and affordable but less natural. PE material looks more like real pine needles. High-quality trees use a mix of materials for realism. Check how sturdy the branches feel. Strong branches hold heavier ornaments better. A well-made tree lasts longer and looks great each year.
Unpacking And Preparing
Unpacking and preparing your artificial Christmas tree is the first step to a smooth setup. This stage helps avoid surprises and makes assembly faster. Taking time here ensures your tree looks great and stays safe.
Checking All Parts
Open the box carefully and take out all pieces. Check the branches, trunk sections, and stand. Look for any damage or missing parts before starting. Confirm you have the instruction manual to guide you.
Clearing Your Space
Choose a wide, flat area to set up your tree. Remove furniture or items that block your space. This gives you room to move and prevents accidents. A clean space also keeps your tree safe from damage.
Gathering Necessary Tools
Most artificial trees need few tools. Usually, a screwdriver or pliers might help. Have a pair of gloves to protect your hands. Keep all tools close to save time during assembly.
Assembling The Base
Assembling the base of your artificial Christmas tree is the first step to a stable and beautiful display. The base supports the entire tree. A firm setup prevents the tree from tipping over. Taking time here saves effort later.
Focus on two main tasks: setting up the stand and securing the tree trunk. Both need careful attention for safety and balance.
Setting Up The Stand
Start by unpacking the tree stand. Make sure all parts are present. Most stands have three or four legs. Lay the legs flat on the floor. Attach each leg firmly to the center piece.
Use the screws or bolts included. Tighten them by hand or with a simple tool. The stand should feel solid without wobbling. Place the stand where you want the tree. Clear the area of obstacles.
Securing The Tree Trunk
Find the bottom section of the tree trunk. Insert it straight into the center of the stand. Push down gently but firmly. Check if the trunk fits snugly.
Use the stand’s screws or clamps to lock the trunk. Tighten each screw evenly. This holds the trunk upright and prevents tilting. Double-check the stability by gently shaking the trunk. Adjust screws if needed.

Credit: www.youtube.com
Connecting The Sections
Connecting the sections of an artificial Christmas tree is simple. Proper connection ensures the tree stands firm and looks full. Each part fits into the next, creating a sturdy shape. Follow these steps carefully for a neat assembly.
Attaching Bottom Branches
Start with the bottom section of the tree. Place it on the stand or base securely. Spread out the bottom branches evenly around the trunk. This gives the tree a wide, full look. Make sure branches are fluffed and not bent.
Adding Middle And Top Sections
Lift the middle section and align it with the bottom. Slide the pieces together firmly but gently. Repeat the same for the top section. The tree should grow taller with each piece added. Check that all sections fit without gaps.
Locking Mechanisms
Many trees have locking clips or pins. Use them to secure each section in place. Locking parts keep the tree stable and safe. Double-check locks before decorating. This prevents wobbling or falling branches later.
Fluffing The Branches
Fluffing the branches is an important step to make your artificial Christmas tree look full and natural. It brings life to the tree by spreading out tight branches and filling empty spaces. This step gives the tree a beautiful shape and makes it ready for decorations.
Spreading Out The Branches
Start by gently pulling the branches away from the trunk. Separate each branch so the tree looks wider. Move from the bottom to the top. Take your time to avoid breaking the branches. Spread the needles evenly to create a natural look.
Shaping The Tree
Shape the branches to form a balanced tree. Bend the branch tips slightly upward or downward. Avoid making the shape too perfect; natural trees have small gaps. Check the tree from all sides. Adjust the branches until the shape looks full and even.
Filling Gaps For Fullness
Look for empty spaces or thin spots. Gently push branches closer to fill those gaps. Add extra branch tips if your tree includes them. Fluffing smaller branches helps hide the pole inside. Make sure the tree looks thick and lush all around.
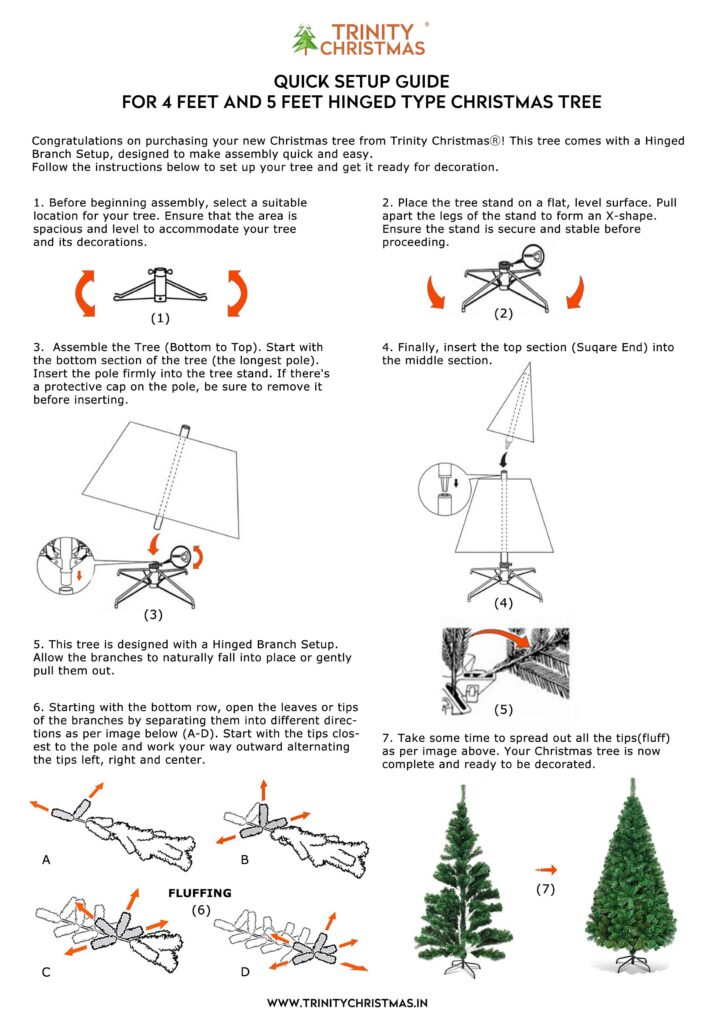
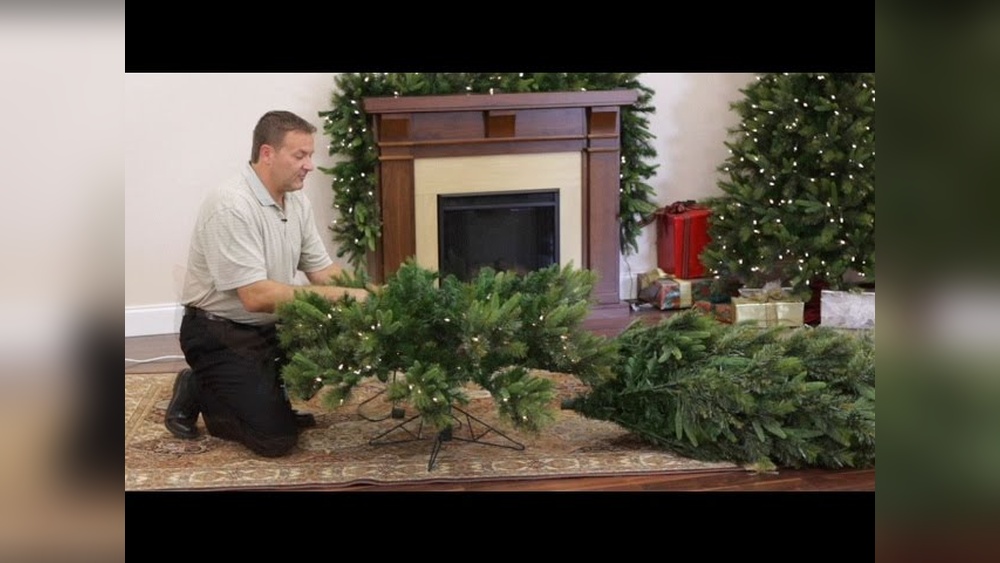
Credit: www.trinitychristmas.in
Adding Lights (if Pre-lit)
Adding lights to a pre-lit artificial Christmas tree makes setup quick and easy. These trees come with lights already attached to the branches. Still, some simple steps help ensure the lights work perfectly. Check all light connections before plugging in. Replace any bulbs that are burnt out. Test the lights to make sure every bulb shines bright. These small steps save time and keep your tree glowing beautifully.
Checking Light Connections
Start by looking at all the light connections on your tree. Make sure each plug fits tightly into its socket. Loose connections can cause some lights not to work. Gently push each connection to secure it. Look for any damaged wires or broken sockets. Fix or replace damaged parts before moving on. Good connections help the whole string of lights shine.
Replacing Bulbs
Find any bulbs that are dark or flickering. These bulbs need replacing to keep the lights bright. Use the bulb replacement kit that comes with your tree. Carefully remove the old bulb by pulling it straight out. Insert the new bulb firmly into the socket. Avoid touching the bulb glass with your fingers. Replace bulbs one by one until all lights work.
Testing The Lights
Plug in the tree lights and watch closely. Check if every bulb glows evenly. Watch for any flickering or dark spots. If any bulbs still do not light, try replacing them again. Sometimes bulbs need a little adjustment in the socket. Make sure the whole tree shines brightly before decorating. Testing now prevents problems later during your holiday celebration.
Decorating Tips
Decorating an artificial Christmas tree makes it feel alive and festive. Simple tips help create a balanced and beautiful look. Use these ideas to make your tree shine and bring holiday joy.
Placing Ornaments Evenly
Start by spreading ornaments evenly around the tree. Avoid clustering all ornaments on one side. Mix big and small ornaments to add depth. Hang some ornaments closer to the trunk for a full look. Step back often to check balance.
Using Garland And Tinsel
Drape garland in gentle loops around the tree. Keep garland spaced out, not tight. Use tinsel sparingly for a touch of sparkle. Tinsel looks great on branch tips and edges. These add texture and catch light nicely.
Adding A Tree Topper
Choose a tree topper that fits your tree size. Place it securely on the top branch. Popular toppers include stars, angels, and bows. A well-placed topper completes the tree’s look. It draws eyes upward and adds charm.
Storage And Maintenance
Taking care of your artificial Christmas tree after the holidays keeps it looking fresh year after year. Proper storage and maintenance help protect the tree from damage. This section guides you through easy steps to handle your tree with care. Follow these tips to save time next season and keep your tree beautiful.
Disassembling The Tree
Start by removing all decorations carefully. Take off lights, ornaments, and garlands first. Separate the tree into sections if it has multiple parts. Handle each piece gently to avoid bending branches. Keep small parts like screws or connectors in a safe place. This makes reassembly easier next time.
Cleaning Before Storage
Dust and dirt settle on the tree during use. Use a soft brush or cloth to wipe branches lightly. Avoid using water, as it can damage the tree. Vacuum the tree with a brush attachment for deep cleaning. Clean the stand and any other parts too. Clean trees last longer and look better next year.
Proper Storage Techniques
Store the tree in its original box or a sturdy container. Use a tree storage bag for extra protection. Keep the tree in a dry, cool place away from heat. Avoid stacking heavy objects on top of the tree. Label the storage container to find it quickly. Proper storage saves space and prevents damage.

Credit: www.webechristmas.com
Frequently Asked Questions
How Do I Assemble An Artificial Christmas Tree?
Start by unpacking all parts carefully. Connect the trunk sections, then attach branches one by one. Fluff branches to fill gaps evenly. Finally, secure the tree on its stand to ensure stability.
What Tools Are Needed To Put Up Artificial Trees?
Most artificial trees require no tools. Some may need a screwdriver for the stand. Always check the instructions provided with your tree for specific requirements.
How Can I Make My Artificial Tree Look Fuller?
Fluff each branch thoroughly to fill empty spaces. Spread needles evenly and bend branch tips outward. Adding extra branches or garlands can also enhance fullness.
How Do I Safely Secure An Artificial Christmas Tree?
Place the tree stand on a flat surface. Tighten screws or bolts firmly but avoid over-tightening. Ensure the tree is stable before decorating to prevent tipping.
Conclusion
Putting together an artificial Christmas tree is simple and fun. Start by unpacking all parts carefully. Attach the sections from bottom to top. Fluff the branches to make the tree look full. Take your time; no need to rush. A well-set tree brings holiday joy and warmth.
Enjoy decorating your tree with lights and ornaments. Celebrate the season with a beautiful, ready tree.