Are you ready to bring the magic of the holidays into your home with an artificial Christmas tree? Putting it together might seem tricky, but it doesn’t have to be.
With the right steps, you can have a beautiful, full tree ready to decorate in no time. This guide will walk you through the process, making it simple and even enjoyable. Keep reading, and you’ll discover how easy it is to create that perfect festive centerpiece your family will love.
Your stress-free holiday decorating starts here!
Choosing The Right Tree
Choosing the right artificial Christmas tree sets the stage for a joyful holiday season. It affects the look of your room and how easy it is to set up. Picking a tree that fits your space and style makes decorating fun and stress-free.
Think about the tree’s size, shape, and quality before buying. This helps you find a tree that feels just right in your home. Here are some key points to consider.
Types Of Artificial Trees
Artificial trees come in many styles. Classic green trees mimic real pine or fir trees. Some have frosted tips to look like snow-covered branches. There are also slim trees designed for small spaces. Choose a style that matches your holiday vision.
Size And Shape Considerations
Measure your space carefully before choosing a tree. Think about ceiling height and room width. A tall tree needs enough room to stand safely. Wide trees fill large spaces but may crowd small rooms. Pick a shape that fits your area well.
Material And Quality
Look for trees made from durable materials like PVC or PE. PVC trees are affordable and have soft needles. PE trees have thicker, more realistic branches. High-quality trees last many years and keep their shape. Check for sturdy stands to hold the tree steady.
Preparing Your Space
Preparing your space is the first step in setting up your artificial Christmas tree. It helps make the process smooth and safe. A well-prepared area gives you enough room to work and avoids damage to your home or decorations.
Selecting The Location
Choose a spot that is flat and stable. It should have enough space for the tree and decorations. Avoid places near heaters or open windows. This keeps the tree safe and fresh-looking. Consider where the tree will be seen the most in your home.
Clearing The Area
Remove furniture or items that block your work space. Clear the floor to prevent tripping or accidents. This gives you room to move and open the tree box easily. A clean area helps keep the tree clean too.
Gathering Tools And Accessories
Collect all tools and decorations before starting. You may need scissors, lights, and a tree stand. Having everything ready saves time and effort. Check if the lights work before placing them on the tree.
Unpacking And Organizing
Unpacking and organizing your artificial Christmas tree is the first step to a beautiful holiday display. This stage sets the foundation for an easy and smooth tree assembly. Taking time here helps avoid damage and confusion later.
Start with a clear space. Lay out all parts on a clean floor or table. This helps you see everything and plan your work.
Checking Tree Components
Open the box carefully. Take out each piece one by one. Check for all parts listed in the instruction manual. Look for the tree stand, trunk sections, and branches. Make sure nothing is broken or missing. This saves time later and avoids surprises during assembly.
Sorting Branches And Sections
Group branches by size and type. Small branches go in one pile. Larger branches go in another. Sort trunk sections by their order of assembly. Label or arrange them from bottom to top. This makes it easy to find parts when you build the tree. Keep screws and small pieces in a container to avoid loss.
Credit: www.youtube.com
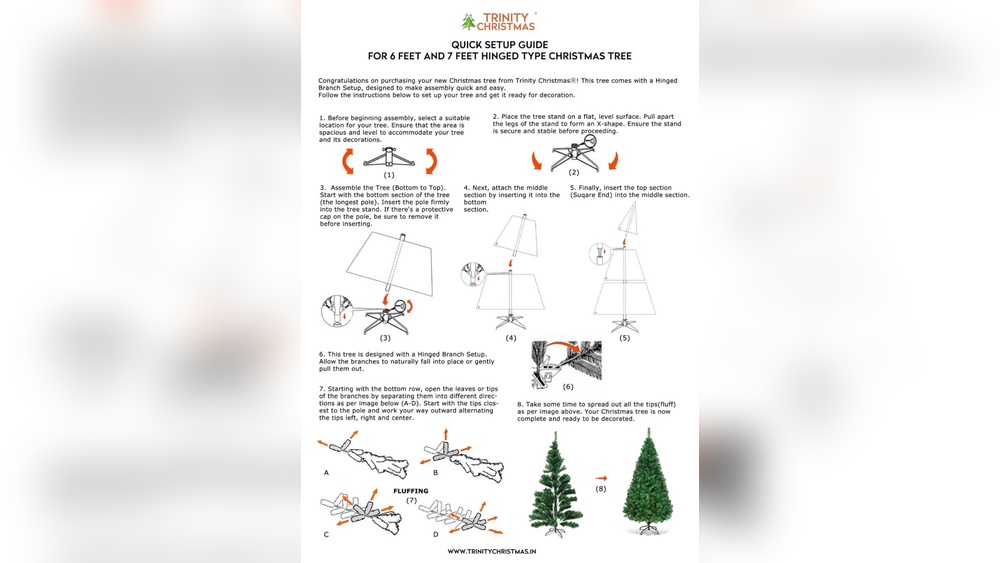
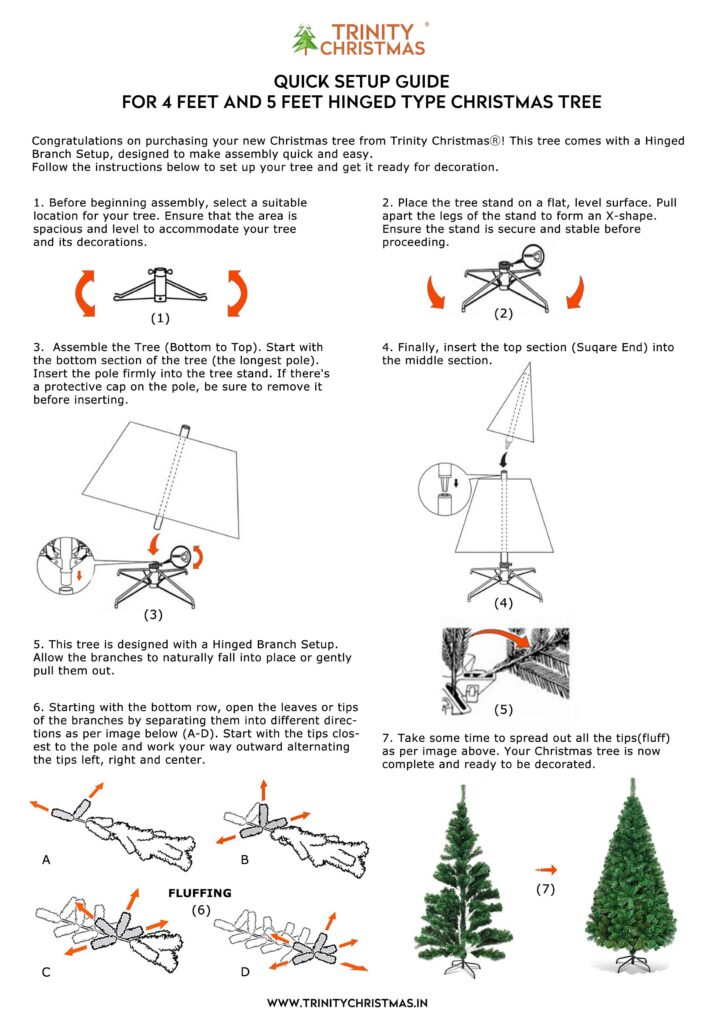
Assembling The Tree Base
Assembling the base of your artificial Christmas tree is the first step in creating a festive centerpiece. A stable base keeps your tree upright and safe. Taking your time to set it up correctly avoids any wobbles or falls later.
Setting Up The Stand
Start by unpacking the tree stand from the box. Place it on a flat surface where you want your tree. Spread the legs of the stand evenly for better balance. Make sure the stand feels steady before moving on.
Some stands have screws or clamps to tighten. Turn these slowly to open the space for the tree trunk. Keep the stand open wide enough to fit the trunk easily.
Securing The Tree Trunk
Take the bottom section of the tree trunk and place it inside the stand. Adjust it so the trunk stands straight. Use the screws or clamps on the stand to hold the trunk tightly. Do not leave the trunk loose.
Check the tree from different angles to ensure it is vertical. Tighten all screws firmly to keep the tree stable. A secure trunk prevents the tree from tipping over during decoration.
Attaching The Tree Sections
Attaching the sections of your artificial Christmas tree is an important step. It shapes how your tree will look and stand. Each section must fit well for a neat and full appearance.
This process does not take long if you follow simple steps. Careful handling makes assembly easier and faster.
Connecting The Trunk Pieces
Start by laying out all the trunk pieces. Usually, these pieces slot or twist together. Align the connectors carefully before joining.
Push or twist the pieces until you hear a click or feel them lock. The pieces should hold firmly without gaps. Keep the trunk upright as you connect each piece.
Ensuring Stability
After assembling the trunk, check its firmness. A stable trunk is key to a safe tree. Place the tree base on a flat surface.
Secure the trunk into the base. Tighten any screws or clamps provided. Give the tree a gentle shake to test balance.
Adjust the sections if the tree wobbles. Stability prevents accidents and keeps decorations in place.
Credit: www.trinitychristmas.in
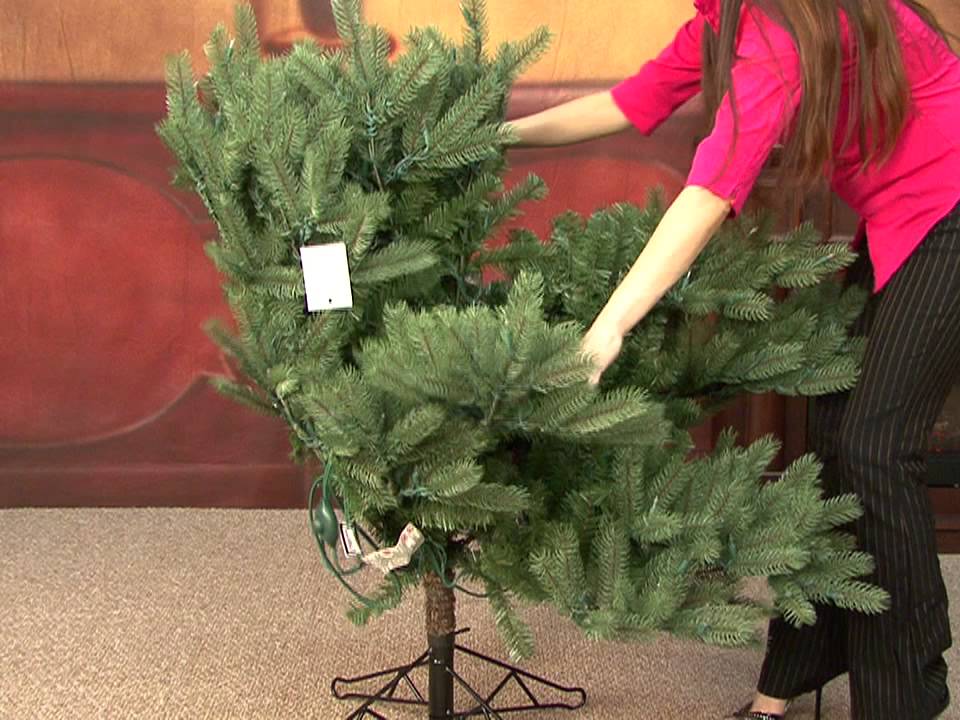
Fluffing The Branches
Fluffing the branches is the key step for a full-looking artificial Christmas tree. It brings life and depth to the tree. Proper fluffing helps the tree look natural and inviting. Spend time on this task for the best results.
Spreading Out Branches
Start by unfolding each branch carefully. Gently pull each tip away from the center. Separate needles to avoid clumps. Work from bottom to top for even coverage. This creates space and makes the tree look wider. Take your time to avoid damage.
Shaping The Tree
After spreading, shape the branches for a natural look. Bend branches slightly upward or downward as needed. Fill gaps by adjusting branch angles. Look at the tree from different sides. Make sure it looks balanced and full. This step gives the tree its classic shape.
Adding Lights
Adding lights to your artificial Christmas tree brings it to life. Lights create warmth and a festive feeling. This step makes your tree stand out and feel magical. Planning the lights well ensures a beautiful and bright tree.
Choosing The Right Lights
Pick lights that fit your tree size. LED lights save energy and last longer. Choose warm white for a classic look. Colored lights add fun and joy. Check the light strand length before buying. Make sure the lights are safe for indoor use.
Wrapping Lights Evenly
Start from the bottom or the top. Wrap lights gently around branches. Space lights evenly for a balanced glow. Push some lights inside branches for depth. Avoid bunching lights in one spot. Turn on lights often to check the effect.

Credit: bestchoiceproducts.com
Decorating The Tree
Decorating an artificial Christmas tree brings the holiday spirit to life. It transforms a simple tree into a festive centerpiece. The right decorations make your tree warm and inviting. Start with a plan to balance colors and textures. This approach makes the decorating process fun and easy.
Hanging Ornaments
Begin by placing your ornaments on the tree branches. Space them out evenly for a full look. Use a mix of sizes and shapes to add interest. Hang larger ornaments near the bottom for balance. Small ornaments work well near the top or inner branches. Step back often to check your progress. This helps keep the look neat and balanced.
Adding Tree Toppers And Skirts
Choose a tree topper that matches your style. Stars, angels, or bows are popular choices. Secure the topper firmly to the highest branch. Next, place a tree skirt around the base. It hides the stand and adds a cozy touch. Pick a skirt that fits your room’s theme. Smooth it out to keep the area tidy and complete.
Maintaining Your Tree
Maintaining your artificial Christmas tree is key to keeping it beautiful year after year. Proper care helps the tree last longer and look fresh each holiday season. Small steps make a big difference in preserving your tree’s shape and color.
Storage Tips After Holidays
Take time to store your tree correctly after the holidays. Remove all decorations gently. Disassemble the tree carefully to avoid breaking branches. Place all parts in the original box or a sturdy storage bag. Store the tree in a cool, dry place. Avoid damp basements or hot attics. Keep the tree away from heavy items that could crush it. Proper storage protects the tree from dust and damage.
Cleaning And Care
Clean your tree before storing it each year. Use a soft brush or cloth to remove dust. Avoid water or harsh cleaners. Check for broken or bent branches and fix them gently. Fluff the branches to restore the tree’s shape. Clean trees look fresh and keep their needles longer. Caring for your tree ensures it stays ready for the next holiday.
Frequently Asked Questions
How Do I Assemble An Artificial Christmas Tree?
Start by unpacking all parts carefully. Connect the tree sections from bottom to top. Secure branches and fluff them for fullness.
What Tools Are Needed To Set Up The Tree?
No special tools are required. Just use your hands to connect sections and shape branches evenly.
How Can I Make My Artificial Tree Look Natural?
Fluff branches thoroughly and shape them outward. Add varied ornaments and warm white lights for a realistic look.
How Do I Maintain My Artificial Christmas Tree?
Keep it clean by dusting regularly. Store in a cool, dry place wrapped to retain shape.
Conclusion
Putting together an artificial Christmas tree is simple with clear steps. Start by spreading out the base for stability. Next, connect the main sections carefully, fitting each piece securely. Fluff the branches to make the tree look full and natural.
Finally, add your favorite decorations to bring the tree to life. Taking your time helps create a beautiful holiday centerpiece. Enjoy the process and the festive atmosphere it brings. This guide makes tree assembly easy for everyone.