Setting up your artificial Christmas tree can feel like a big task, but it doesn’t have to be. Imagine having a perfect tree that stays fresh all season, with no needles to clean up.
Sounds great, right? In this guide, you’ll learn simple steps to put up your tree quickly and easily. You’ll discover tips to make your tree look full and beautiful, impressing everyone who sees it. Keep reading, and you’ll be ready to enjoy a stunning holiday centerpiece without the usual hassle.
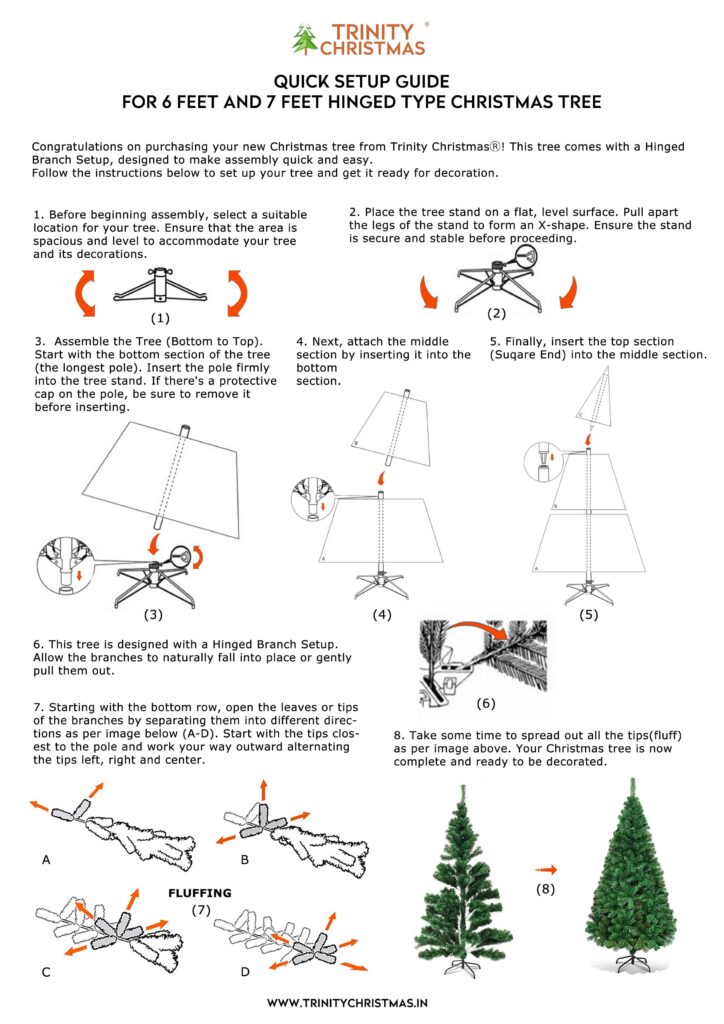
Credit: www.trinitychristmas.in
Choosing The Right Tree
Choosing the right artificial Christmas tree is the first step to a festive holiday. The perfect tree sets the mood and fits your space. Many options are available, so consider key factors before buying. Think about size, style, material, and budget. Each detail affects the look and feel of your holiday decor.
Tree Sizes And Styles
Trees come in many sizes. Small trees suit desks and corners. Tall trees fit large rooms or open spaces. Pick a height that matches your ceiling and room size.
Styles vary from classic green to frosted or white trees. Some have full branches, others are slim or sparse. Choose a style that matches your holiday theme and space.
Material And Quality
Most trees use PVC or PE materials. PVC trees have softer needles and a traditional look. PE trees look more like real pine with thicker, textured branches.
Check branch strength and assembly ease. Good quality trees hold ornaments well and last for years. A sturdy tree saves time and frustration.
Budget Considerations
Artificial trees range from affordable to high-end prices. Set a budget before shopping. More expensive trees often have better quality and details.
Consider long-term use. Spending a bit more can mean a tree that lasts many holidays. Balance cost with appearance and durability for the best value.

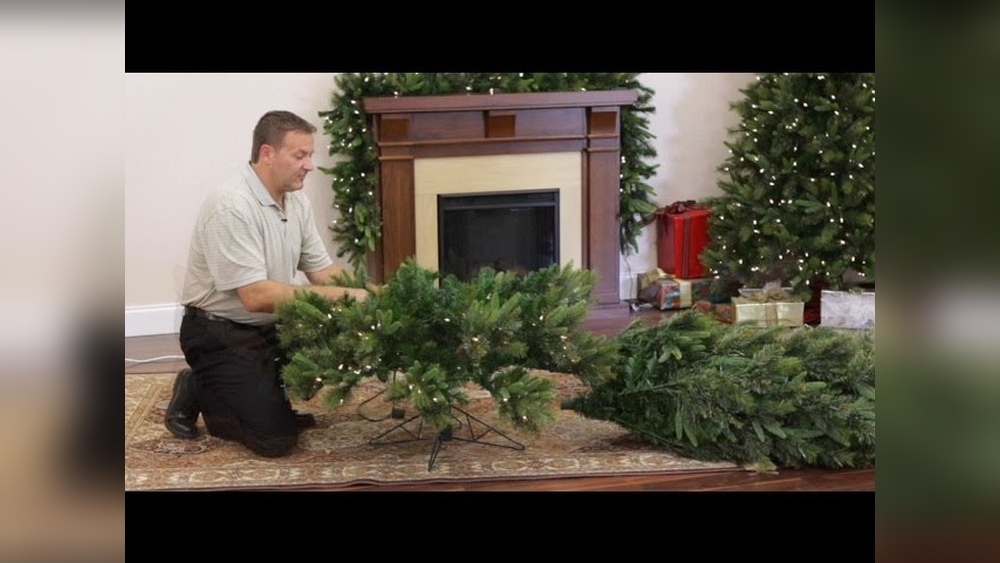
Credit: www.youtube.com
Preparing Your Space
Preparing your space is the first step to putting up an artificial Christmas tree. It helps make the whole process smooth and safe. A well-prepared area gives your tree the perfect spot to shine.
Selecting The Location
Choose a place with enough room for your tree. Avoid spots near heaters or vents. Keep it away from busy walkways. Pick a flat surface to keep the tree steady. Natural light nearby can make the tree look better.
Clearing The Area
Remove any furniture or items that block the space. Clear the floor to avoid tripping hazards. Make sure pets and children have enough room to move. A clean area lets you work freely and safely. It also helps the tree stand out nicely.
Setting Up A Tree Skirt
A tree skirt hides the base and adds style. Spread it evenly around the tree stand. Choose a skirt that matches your room decor. It catches fallen needles and protects your floor. A neat skirt completes the look of your tree.
Unpacking And Inspecting
Unpacking and inspecting your artificial Christmas tree is the first step to a bright holiday season. This process ensures the tree is ready to shine in your home without any issues. Careful attention now saves time and frustration later.
Handling The Tree Sections
Start by placing the box on a flat surface. Open it carefully to avoid damage. Remove each tree section with gentle hands. Support the branches as you lift to keep them intact. Lay the parts out in order to see all pieces clearly.
Checking For Damages
Look closely at each section. Check for broken branches or missing needles. Spot any bent or crushed parts. Inspect the trunk and connectors for cracks or defects. Early detection helps fix problems before assembly.
Organizing Parts For Assembly
Sort the sections from base to top. Keep small parts like screws and hooks in a bowl. Arrange the pieces near your tree stand. This setup makes assembly smoother and faster. Stay organized to avoid losing any parts.
Assembling The Tree
Assembling an artificial Christmas tree is easy and fun. It creates the perfect base for your festive decorations. Follow a few simple steps to set up your tree correctly. This helps your tree look full and stay safe all season long.
Setting Up The Stand
Start by placing the stand on a flat surface. Make sure it is stable and level. Most stands have screws or clamps to hold the tree upright. Tighten these parts securely to avoid wobbling. A firm stand keeps the tree steady and safe.
Connecting The Sections
Next, connect the tree sections from bottom to top. Match the numbered or labeled parts for easy assembly. Insert each section firmly into the one below it. Twist or lock the pieces if the design requires it. Check that all sections fit tightly together.
Securing And Stabilizing
After assembling, adjust the branches for even shape. Spread them out to cover any gaps. Use additional supports if your tree feels loose. A stable tree stays upright during busy holiday moments. This step ensures your tree looks great and stays safe.
Fluffing The Branches
Fluffing the branches of your artificial Christmas tree is the key step after assembly. It gives the tree a natural, full look. Without fluffing, the tree looks flat and lifeless. Spend time spreading out each branch carefully. This process brings depth and beauty to your holiday centerpiece.
Spreading Branches Evenly
Start by pulling each branch away from the tree’s center. Stretch them out gently but firmly. Make sure branches do not overlap too much. Even spreading helps light pass through the tree. It also prevents the tree from looking crowded or sparse.
Creating Fullness
Next, separate the needles on each branch. Use your fingers to spread the tips outward. This adds volume and a lush feel. Pay attention to the edges of the tree. Fluff those parts well to avoid thin spots. Full branches make the tree look alive and inviting.
Fixing Gaps And Shaping
Look closely for gaps between branches. Push smaller branches into empty spaces. Adjust angles to close wide gaps. Shape the tree to a balanced form. Keep the tree symmetrical for a neat appearance. Filling gaps makes the tree look complete and beautiful.
Adding Lights
Adding lights to your artificial Christmas tree brings warmth and sparkle. Lights create a magical glow that highlights the tree’s beauty. This step can be simple and fun with a little care and planning.
Choosing Light Types
Pick lights that fit your tree size and style. LED lights save energy and last longer. White lights give a classic look. Colored lights add a festive feel. Consider warm or cool tones for different moods. Check the length to cover your tree well.
Wrapping Lights Around Branches
Start at the tree base and work upwards. Wrap lights around main branches, not just the tips. Tuck wires into branches for a neat look. Space lights evenly for balanced brightness. Use gentle twists to hold lights in place. Avoid tight wrapping to prevent damage.
Testing And Adjusting Lights
Plug in lights before final placement. Look for dark spots or uneven areas. Adjust lights by moving strands or adding more. Replace any broken bulbs quickly. Ensure plugs and cords are safe and hidden. Test again after adjustments for perfect glow.
Decorating The Tree
Decorating an artificial Christmas tree brings warmth and joy to your home. This step lets you show your style and creativity. Choose ornaments and decorations that tell your holiday story. Bright lights, shiny balls, and special keepsakes make the tree unique. Follow simple tips to make your tree look beautiful and festive.
Selecting Ornaments
Pick ornaments that match your room and theme. Use a mix of colors and shapes for interest. Choose light and heavy ornaments carefully. Light ones go near the top and outer branches. Heavy ornaments stay on strong branches near the trunk. Include some new decorations with old favorites. This keeps the tree fresh and full of memories.
Placing Ornaments Strategically
Start placing ornaments from the center of the tree. Spread them evenly around the branches. Put bigger ornaments lower on the tree. Smaller ones look nice near the top. Fill empty spaces with medium-sized decorations. Step back often to check balance and color. Avoid clustering too many ornaments in one spot.
Adding Toppers And Garlands
Choose a topper that fits the tree size and style. Stars, angels, or bows work well. Secure it firmly on the highest point. Drape garlands gently around the tree. Use beads, ribbon, or popcorn strings for garlands. Space garlands evenly from top to bottom. Let them hang loosely for a soft look.

Credit: bestchoiceproducts.com
Maintaining Your Tree
Maintaining your artificial Christmas tree keeps it looking fresh year after year. Simple care helps protect its shape and color. Small steps make a big difference in preserving the tree’s beauty. Follow these tips to enjoy your tree for many holiday seasons.
Cleaning Tips
Dust your tree regularly with a soft cloth or feather duster. Use a vacuum with a brush attachment for deeper cleaning. Avoid harsh chemicals; plain water works well for wiping branches. Clean gently to prevent bending or damaging the needles. Let the tree dry completely before decorating.
Storing After The Season
Remove all decorations carefully before storage. Disassemble the tree into sections and wrap each part in a cloth or plastic bag. Store the tree in a cool, dry place away from direct sunlight. Use the original box or a special tree storage bag for protection. Keep heavy items off the tree to avoid crushing branches.
Ensuring Longevity
Place the tree away from heat sources like heaters or fireplaces. Avoid exposing the tree to moisture or damp areas. Check branches for any damage each year and fix them promptly. Handle the tree with care when setting up or taking down. Proper care helps your tree stay beautiful for many holidays.
Frequently Asked Questions
How Do I Assemble An Artificial Christmas Tree?
Start by unpacking all parts carefully. Connect the trunk sections and secure them tightly. Attach branches one by one, fluffing them for fullness. Ensure the tree stands straight on its base.
What Tools Are Needed To Set Up The Tree?
No special tools are required. Most trees come with a sturdy stand. You only need your hands to attach branches and shape the tree.
How Can I Make My Artificial Tree Look Natural?
Fluff each branch individually for volume. Bend branch tips to mimic real tree needles. Use warm white lights and natural decorations for a realistic look.
When Should I Set Up My Artificial Christmas Tree?
Set up your tree in early December or late November. This timing allows you to enjoy the festive atmosphere longer. It also gives you ample time for decorating.
Conclusion
Setting up an artificial Christmas tree can be simple and fun. Take your time to arrange the branches evenly. Use the right tools to secure the tree in place. Add lights and decorations to make it festive. Clean up any mess to keep your space neat.
Enjoy the warm and cozy feeling it brings. Celebrate the holiday season with your beautifully set tree. Creating a cheerful home starts with small, easy steps.