Are you tired of your old light pendant and ready for a fresh look? Changing a light pendant might seem tricky, but it’s easier than you think.
With just a few simple steps, you can transform the feel of any room and add your personal touch. Imagine the satisfaction of upgrading your space without calling a professional or spending a fortune. Keep reading, and you’ll discover how to safely and quickly change your light pendant—giving your home a new shine in no time.
Tools And Materials Needed
Changing a light pendant needs some basic tools and materials. Having everything ready makes the process faster and safer. This section covers what you need before starting.
Essential Tools
You will need a screwdriver set for screws. A voltage tester is important to check if power is off. Wire strippers help prepare wires for connection. Pliers assist with twisting wires and holding parts. A ladder or step stool helps reach the pendant safely.
Choosing The Right Pendant
Pick a pendant that fits your room style and size. Check the weight to ensure your ceiling can hold it. Consider the light bulb type and brightness you want. Match the pendant’s wiring to your home’s wiring for safety.
Safety Gear
Wear safety glasses to protect your eyes from dust. Use insulated gloves to avoid electric shocks. Turn off the main power switch before starting work. Keep a flashlight nearby in case the area is dark.

Credit: electriciancourses4u.co.uk
Preparing For The Change
Preparing to change a light pendant is an important step. It ensures safety and makes the process smooth. Taking time to prepare helps avoid mistakes and accidents. Follow these simple steps before starting the change.
Switching Off Power
First, turn off the power at the main circuit breaker. This stops electricity from flowing to the fixture. Confirm the power is off by testing the light switch. Use a voltage tester if available. Safety is the top priority during any electrical work.
Clearing The Area
Remove furniture and objects below the pendant light. Clear space to work comfortably and avoid damage. Lay down a cloth or sheet to catch dust or small parts. Make sure you have good lighting and easy access to tools.
Inspecting Existing Fixture
Look closely at the current light pendant and its fittings. Check for any loose wires or damaged parts. Note the type of bulbs and how the fixture is attached. Understanding the setup helps with the new installation. Take photos if needed for reference.
Removing The Old Pendant
Removing the old light pendant is the first step in changing your light fixture. It requires care and attention to avoid damage and ensure safety. Follow simple steps to take down the old pendant smoothly.
Unscrewing The Fixture
Start by turning off the power at the breaker. This prevents electric shock. Use a ladder or step stool to reach the pendant. Find the screws or bolts holding the fixture. Use a screwdriver to loosen and remove them. Hold the fixture firmly as you unscrew to stop it from falling.
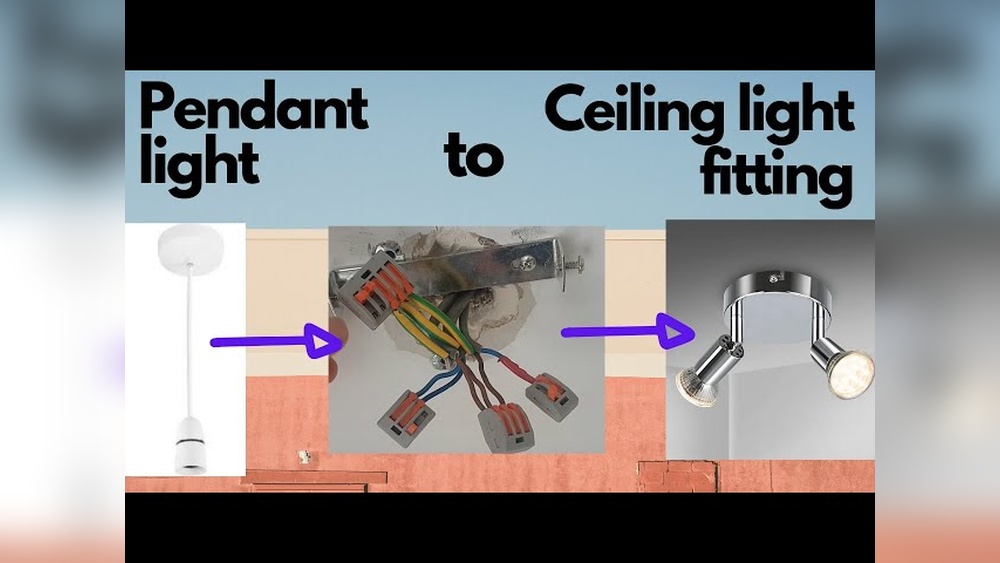
Disconnecting Wires
Once the fixture is loose, gently pull it down to see the wires. Notice the colors: usually black, white, and green or copper. Carefully unscrew the wire nuts connecting the pendant wires to the ceiling wires. Separate each wire one by one. Keep the wires apart to avoid accidental contact.
Handling The Old Pendant Safely
Place the old pendant on a soft surface to avoid scratches. Wrap the wires with electrical tape for extra safety. Check for any broken glass or sharp edges. Dispose of the old fixture properly or save it if reusable. Safety comes first during removal and disposal.

Credit: www.youtube.com
Installing The New Pendant
Installing the new pendant is the key step in changing your light fixture. This process needs careful handling to ensure safety and a perfect fit. Follow each part carefully to get your new pendant up and shining.
Wiring The New Fixture
First, connect the wires from the ceiling to the new pendant. Match the colors: black to black, white to white, and green or copper to ground. Use wire nuts to secure each connection tightly. Double-check that no wire strands are loose. This prevents shorts and ensures the light works well.
Securing The Pendant
Next, fix the pendant to the ceiling bracket. Use screws or hooks that came with the fixture. Make sure the pendant is stable and does not wobble. Tighten all fasteners but avoid over-tightening, which can damage parts. A secure fixture looks neat and stays safe.
Adjusting Height And Position
Finally, set the pendant’s height to fit your room. Most pendants have adjustable cords or rods. Shorten or lengthen to suit your space and style. Check that the pendant hangs straight and centers over your table or area. Proper positioning improves room lighting and style.
Testing And Final Touches
After installing your new light pendant, testing and final touches are essential. This step ensures your fixture works safely and looks great. Follow these simple instructions to complete your project with confidence.
Turning Power Back On
First, restore power at the circuit breaker. Turn the switch to the “on” position carefully. Avoid touching wires or metal parts. Use a flashlight if needed. Make sure the area is dry and safe.
Checking For Proper Function
Flip the light switch to test the pendant. The light should turn on without flickering or buzzing. Listen for unusual sounds. If the light fails, turn off the power and recheck connections. Ensure the bulb is the correct type and firmly in place.
Cleaning And Styling Tips
Wipe the pendant gently with a soft cloth. Remove dust and fingerprints for a fresh look. Avoid harsh cleaners to protect finishes. Adjust the height or angle for the best light spread. Add a matching lampshade or decorative bulbs for style.
Troubleshooting Common Issues
Troubleshooting common issues helps keep your light pendant working well. Small problems may seem tricky but often have simple fixes. Knowing these fixes saves time and effort. This section guides you through easy solutions for frequent problems.
Fixing Flickering Lights
Flickering lights annoy many people. Loose bulbs cause flickers. Make sure the bulb fits tightly in the socket. Check for faulty bulbs by replacing them. Sometimes, the switch or wiring causes flicker. Turn off power before checking electrical parts. If flickering continues, the fixture may need repair.
Dealing With Loose Fixtures
Loose fixtures can sway or hang unevenly. Tighten screws or bolts holding the pendant. Use a screwdriver or wrench for better grip. Check the mounting bracket on the ceiling. If the bracket is loose, fix it before reattaching the pendant. A secure fixture prevents accidents and looks better.
When To Call A Professional
Some problems need expert help. If wiring looks damaged, stop and call an electrician. Electrical issues can cause shocks or fires. Complex repairs or replacements should be handled by pros. Always choose safety over risk. Professionals ensure your light pendant works safely and correctly.

Credit: prettyhandygirl.com
Frequently Asked Questions
How Do I Safely Turn Off Power Before Changing A Pendant?
Always switch off power at the circuit breaker before starting. Use a voltage tester to confirm no electricity flows to the fixture. This prevents electrical shock and ensures safe handling during the light pendant replacement process.
What Tools Are Needed To Change A Light Pendant?
You typically need a screwdriver, wire strippers, voltage tester, and pliers. Having these tools ready ensures a smooth and efficient pendant replacement without interruptions or safety risks.
Can I Replace A Light Pendant Without An Electrician?
Yes, if you follow safety steps and understand wiring basics. Always turn off power and use a voltage tester. If unsure, consult a professional to avoid hazards or damage.
How Do I Connect Wires When Installing A New Pendant?
Match wire colors: black to black (live), white to white (neutral), and green or bare to ground. Secure connections with wire nuts and electrical tape for safety and proper function.
Conclusion
Changing a light pendant can brighten any room easily. Always turn off the power before starting work. Use the right tools and follow safety steps carefully. Take your time to avoid mistakes or accidents. A new pendant can update your home’s look quickly.
Enjoy the fresh, clean light once the job is done. Simple changes can make a big difference in your space. Now, you are ready to change a pendant light confidently.