Wiring a table lamp socket might sound tricky, but with the right steps, you can do it yourself quickly and safely. Imagine turning your old lamp into a stylish new light source without spending a lot of money.
Whether you want to fix a broken socket or build a lamp from scratch, this guide will show you exactly what to do. Keep reading, and by the end, you’ll have the confidence to wire your table lamp socket like a pro.
Your home lighting is about to get a simple, powerful upgrade!
Tools And Materials Needed
Before wiring a table lamp socket, gather all necessary tools and materials. Having everything ready saves time and avoids frustration. Proper tools and materials ensure a safe and secure connection.
Essential Tools
- Screwdriver: A flathead and a Phillips head for different screws.
- Wire Strippers: To remove insulation without damaging wires.
- Needle-Nose Pliers: Helpful for bending and holding wires.
- Voltage Tester: Checks if the power is off before working.
- Utility Knife: For cutting wires or trimming insulation.
Required Materials
- Table Lamp Socket: The part where the bulb screws in.
- Electrical Cord: A two-wire cord suitable for lamps.
- Wire Connectors or Wire Nuts: For safe wire joining.
- Electrical Tape: To secure wire connections.
- Light Bulb: Choose one that fits your socket type.
Safety Precautions
Working with electrical parts can be risky. Safety is the top priority when wiring a table lamp socket. Taking the right steps protects you from shocks and injuries. Follow these safety rules before starting your project.
Power Off And Testing
Always turn off the power before handling any electrical device. Unplug the lamp from the wall socket. Use a voltage tester to make sure no electricity flows. This prevents accidental shocks while you work.
Handling Electrical Components
Use insulated tools to handle wires and parts. Avoid touching bare wires with your hands. Keep your work area dry and clean. Wear rubber-soled shoes for extra protection. Check wires for damage and replace if needed.
Preparing The Lamp Cord
Preparing the lamp cord is an important step before wiring a table lamp socket. It ensures safety and proper function of the lamp. This process includes stripping the wires and identifying their polarity. Taking time with these tasks makes the wiring easier and more reliable.
Stripping The Wires
Start by cutting the lamp cord to the needed length. Use wire strippers to remove about half an inch of the outer plastic cover. Be careful not to cut the inner wires.
Next, strip about a quarter inch of insulation from the two inner wires. This exposes the copper wire inside. Do this gently to avoid breaking the wire strands.
Identifying Wire Polarity
Check the two wires for different markings. One wire usually has a ribbed or striped insulation. This is the neutral wire.
The smooth or unmarked wire is the hot wire. Correctly identifying these wires is key for safe lamp operation. Connect the hot wire to the brass terminal and the neutral to the silver terminal in the socket.

Credit: www.amazon.com
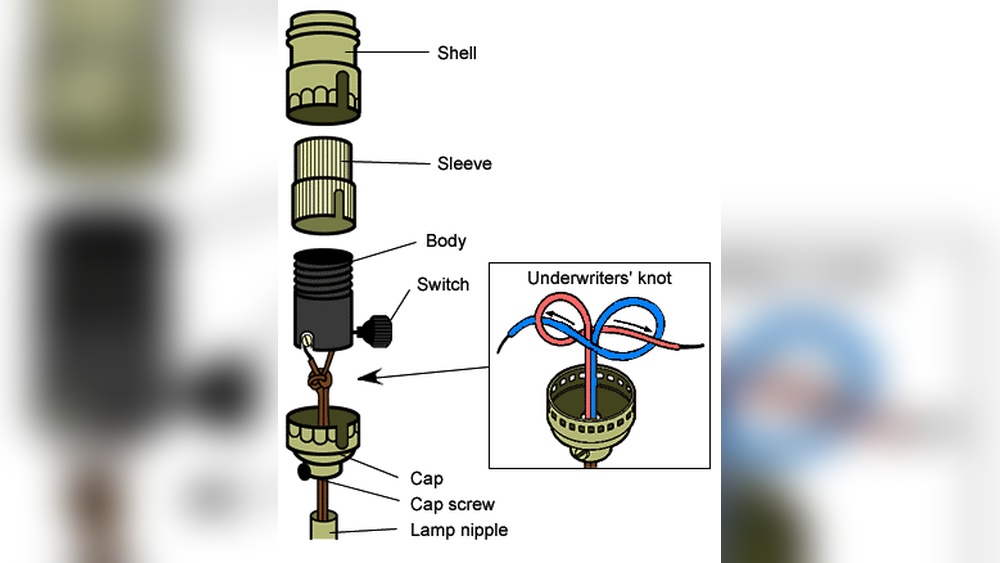
Connecting The Socket Wires
Connecting the socket wires is a key step in wiring a table lamp. This step ensures the lamp receives power safely and works correctly. You handle two wires: the live wire and the neutral wire. Each wire must attach to the right place on the socket. Follow the steps carefully to avoid mistakes.
Attaching The Live Wire
The live wire carries electricity to the lamp. It is usually colored brown or black. First, strip about half an inch of insulation from the wire end. Twist the exposed copper strands to keep them tight. Locate the live terminal on the socket. It often has a brass screw or is marked “L”. Wrap the wire around the screw in a clockwise direction. Tighten the screw firmly to hold the wire in place. Make sure no copper shows outside the terminal. A good connection avoids sparks and flickering.
Attaching The Neutral Wire
The neutral wire completes the circuit by carrying electricity back. It usually has blue or white insulation. Strip about half an inch of insulation from the wire end. Twist the copper strands tightly. Find the neutral terminal on the socket. This is often a silver screw or marked “N”. Wrap the wire around the screw clockwise. Tighten the screw so the wire is secure. Check that no copper is exposed outside the terminal. A solid connection keeps the lamp working safely.
Securing The Socket
Securing the socket is an important step in wiring a table lamp. It keeps the socket stable and safe. A loose socket can cause electrical problems or make the lamp unsafe to use.
Take your time to fasten the socket properly and protect the wires. This ensures your lamp works well and lasts longer.
Fastening The Socket To The Lamp
First, place the socket into the lamp base or holder. Align it so the holes match the lamp’s frame. Use the screws or nuts that came with the socket to fasten it tightly. Do not over-tighten; this can crack the socket. Make sure the socket does not move or wiggle.
Ensuring Wire Safety
Check the wires before you secure the socket. Make sure they are not frayed or damaged. Use wire connectors or electrical tape to cover any exposed wire. Keep wires away from sharp edges or heat sources. This prevents shorts or shocks. Secure the wires so they do not pull on the socket or lamp parts.
Testing The Lamp
Testing the lamp is a key step after wiring the socket. It ensures the wiring is correct and the lamp works safely. Take your time to check every detail. This prevents problems and keeps you safe.
Reconnecting Power
First, plug the lamp into a power outlet. Make sure your hands are dry. Check the lamp switch is off before plugging it in. This avoids sparks or shocks. Once connected, turn the switch on slowly.
Verifying Functionality
Look for the light bulb to glow steadily. If it does, your wiring is correct. If the bulb flickers or does not light, turn off power immediately. Check all wire connections again. Tighten any loose wires and test again. Confirm the lamp switch works smoothly. A fully functional lamp means your wiring job is done right.
Troubleshooting Common Issues
Troubleshooting common issues can save time and effort while wiring a table lamp socket. Simple problems often cause the lamp to not work correctly. Identifying these problems quickly helps fix the lamp without extra costs or delays. Below are frequent issues and how to solve them.
No Light Or Flickering
No light or flickering means the lamp is not getting power properly. Check if the bulb is screwed in tightly. A loose bulb can cause flickering or no light at all. Ensure the bulb is not burned out by testing it in another lamp. Verify the lamp is plugged into a working outlet. Sometimes the problem is the power source, not the lamp. If the bulb and outlet are fine, inspect the socket for damage or dirt. Dirt inside the socket can block the connection. Clean it carefully with a dry cloth. Replace the socket if it looks worn out or broken.
Loose Connections
Loose connections inside the lamp cause flickering and power loss. Turn off and unplug the lamp before checking. Look at the wires connected to the socket. Wires should be tightly wrapped around the screws. If wires are loose, tighten the screws carefully. Avoid overtightening to prevent wire damage. Use wire strippers to remove old insulation before reconnecting wires. Make sure no bare wire touches other parts inside the lamp. Loose or exposed wires can cause shorts or shocks. Secure all connections firmly to ensure steady power flow.

Credit: www.youtube.com

Credit: www.sunmory.com
Frequently Asked Questions
How Do I Wire A Table Lamp Socket Safely?
To wire a table lamp socket safely, first unplug the lamp. Strip the wires carefully and connect them to the correct terminals. Use wire nuts and electrical tape to secure connections. Always follow the manufacturer’s instructions and double-check all connections before plugging in the lamp.
What Tools Are Needed To Wire A Table Lamp Socket?
You need wire strippers, a screwdriver, electrical tape, and wire nuts. A voltage tester can also help ensure safety. These tools make wiring easier and help secure connections properly for a safe and functional lamp socket.
Can I Replace A Damaged Table Lamp Socket Myself?
Yes, you can replace a damaged socket yourself. Unplug the lamp, remove the old socket, and connect the new one using the same wiring method. Ensure all connections are tight and insulated. If unsure, consult a professional electrician.
What Wire Colors Connect To A Table Lamp Socket?
Typically, black or brown wires connect to the brass terminal (live), and white or blue wires connect to the silver terminal (neutral). Green or bare wires are for grounding. Always confirm wire colors before wiring to avoid hazards.
Conclusion
Wiring a table lamp socket is simple with clear steps. Always turn off power before starting any work. Use the right tools and follow safety tips carefully. Connect wires firmly to avoid loose contacts. Test the lamp after wiring to ensure it works well.
Small efforts can save time and prevent accidents. Enjoy your newly wired lamp lighting up your space. Stay safe and confident with every DIY project you try.