Wiring a table lamp with two switches might sound tricky, but it’s easier than you think. Imagine controlling your lamp from two different spots in your room—how convenient would that be?
Whether you want to add extra comfort or just enjoy more control, this simple wiring trick can make a big difference. You’ll learn step-by-step how to do it safely and effectively. Ready to take your lighting to the next level?
Let’s get started!

Credit: www.electricaltechnology.org
Tools And Materials Needed
Wiring a table lamp with two switches needs specific tools and materials. Having the right items ensures safety and smooth work.
Gather everything before starting. It saves time and avoids interruptions.
Essential Tools For Wiring
- Screwdriver (flathead and Phillips) for screws
- Wire stripper to remove insulation
- Voltage tester to check power
- Needle-nose pliers for bending wires
- Electrical tape to cover wire joints
- Wire cutters to trim wires
Materials Required
- Table lamp base with socket
- Two single-pole switches
- Electrical wire (14 or 16 gauge)
- Wire nuts for connecting wires
- Power cord with plug
- Light bulb compatible with lamp socket
Safety Gear
- Insulated gloves to protect hands
- Safety glasses to guard eyes
- Work in a dry, well-lit area

Credit: www.youtube.com
Safety Precautions
Always turn off the power before starting any wiring work to avoid electric shock. Use insulated tools and check connections carefully for safety. Double-check that switches and wires are properly secured to prevent hazards.
Turn Off Power Before Starting
Always switch off the power at the circuit breaker. This stops electricity flow. It keeps you safe from shocks. Double-check by using a voltage tester. Never assume the power is off.
Use Proper Tools And Equipment
Use insulated tools designed for electrical work. Avoid metal tools without insulation. Wear rubber-soled shoes to reduce risk. Keep your work area dry and clean. Proper tools make wiring safer and easier.
Check Wiring And Components
Inspect wires for damage or wear. Replace frayed or broken wires. Use the right wire gauge for the lamp. Make sure switches and sockets are rated for your lamp. Faulty parts can cause fires or shocks.
Work In A Well-lit Area
Good lighting helps you see connections clearly. Avoid working in dark or shadowy places. Clear space reduces mistakes and accidents. A well-lit area improves safety and accuracy.
Follow Electrical Codes And Guidelines
Use wiring methods approved by local codes. This ensures safety and legality. Read instructions carefully before starting. Correct wiring prevents hazards and improves lamp function.
Keep Children And Pets Away
Keep your workspace free from distractions. Children and pets can cause accidents. Secure wires and tools out of reach. A focused environment helps avoid mistakes.
Basic Wiring Concepts
Basic wiring is the first step in connecting a table lamp with two switches. Understanding how electricity flows helps avoid mistakes and keeps you safe. This section explains the simple ideas behind wiring a two-switch lamp. It breaks down complex terms into easy parts.
Understanding Two-switch Setup
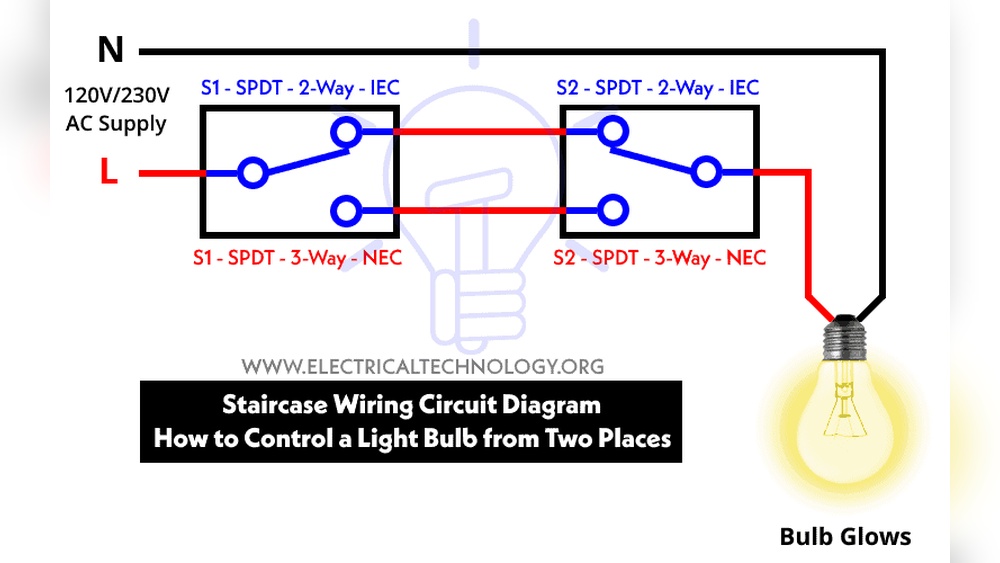
A two-switch setup lets you control one lamp from two places. Imagine turning a lamp on or off from opposite sides of a room. This is common in hallways or bedrooms. The wiring uses special switches called “three-way” switches. These switches work together to open or close the lamp’s circuit. Electricity flows through the switches, lighting the lamp when the circuit is complete.
Identifying Wire Types
Knowing wire types is important for safe wiring. Usually, you will see three wires: live (hot), neutral, and ground. The live wire carries electricity to the lamp. The neutral wire returns electricity to the source. The ground wire is for safety, preventing shocks. These wires have different colors. Black or red is live, white is neutral, and green or bare copper is ground. Correctly identifying these wires avoids confusion and hazards.
Preparing The Lamp And Switches
Preparing the lamp and switches is the first step in wiring a table lamp with two switches. This process ensures safety and proper function. Taking time here prevents mistakes later. It also makes the wiring process smoother and faster.
Removing Existing Components
Start by unplugging the lamp from the power source. Remove the lampshade and light bulb carefully. Unscrew the lamp socket to access the wiring inside. Take out the old switches if they are already installed. Keep all screws and small parts in a safe place. This step clears the way for new wiring and switches.
Inspecting Wiring Points
Look closely at the wires inside the lamp and switches. Check for any signs of damage or wear, such as frayed wires or loose connections. Make sure the wires are clean and free of rust. Use a voltage tester to confirm no power is running through the wires. Fix or replace any damaged parts before continuing. Proper inspection helps avoid electrical hazards and ensures a good connection.
Step-by-step Wiring Process
Wiring a table lamp with two switches allows you to control the light from two different spots. This setup is common in rooms with multiple entrances. Follow these steps carefully to wire your lamp safely and correctly. Each step builds on the last, so take your time and double-check your work.
Connecting Power Source
Start by turning off the power at the circuit breaker. Use a voltage tester to confirm no electricity flows. Connect the black (hot) wire from the power source to the common terminal of the first switch. Attach the white (neutral) wire directly to the lamp socket’s neutral terminal. Connect the ground wire to the switch’s ground screw. Safety first.
Wiring The First Switch
From the first switch, run two traveler wires to the second switch. Attach these wires to the traveler terminals on the first switch. Make sure connections are tight and secure. Label the wires if needed to avoid confusion. The first switch acts as a control point for the lamp.
Wiring The Second Switch
At the second switch, connect the traveler wires to the traveler terminals. Attach the black wire from the lamp socket to the common terminal on this switch. Connect the ground wire to the ground screw. Double-check all connections. The second switch completes the circuit for two-way control.
Connecting To The Lamp Socket
Connect the black wire from the second switch to the lamp socket’s hot terminal. Attach the neutral wire to the socket’s neutral terminal. Secure the ground wire to the socket’s metal frame if available. Ensure all wires are tight and insulated. Test the switches by turning the power back on and toggling both switches.
Testing The Wired Lamp
Testing the wired lamp is an important step after finishing the wiring. This step ensures the lamp and switches work correctly. It helps catch any wiring mistakes early. You can avoid damage or safety risks by testing properly.
Check each switch to see if it controls the lamp as expected. Test all wiring connections. This makes sure the lamp lights up and turns off smoothly. Follow safety rules during testing to prevent accidents.
Checking Switch Functionality
Start by turning on the power supply to the lamp. Flip the first switch and watch the lamp. It should turn on or off depending on the switch position. Next, try the second switch. It should also control the lamp independently.
Both switches must work from their locations. If the lamp stays on or off regardless of switch position, the wiring may be wrong. Test each switch several times to confirm smooth operation. This check confirms the wiring is correct.
Troubleshooting Common Issues
If the lamp does not light up, check the bulb first. Ensure it is screwed in tightly and working. Next, look for loose wires or poor connections. Tighten any loose wire nuts or screws.
If one switch does not work, verify the traveler wires connecting switches. These wires allow both switches to control the lamp. Incorrect traveler wiring causes switch failure. Use a tester to check for power at each switch terminal.
Look for damaged wires or incorrect wire colors. Replace damaged parts immediately. Testing again after corrections confirms success. Repeat the process until the lamp works perfectly from both switches.
Finishing Touches
After wiring your table lamp with two switches, it is time for the finishing touches. These steps ensure safety and a neat look. Proper finishing keeps your lamp working well and looking good for years.
Securing Wires And Switches
Check each wire to make sure it is tightly connected. Loose wires can cause sparks or stop the lamp from working. Use electrical tape or wire nuts to cover exposed wire ends. Secure the switches in their places firmly. Use screws or clamps to hold the switches steady. Avoid any movement that could loosen the wires later.
Reassembling The Lamp
Put the lamp parts back in the right order carefully. Make sure no wires are pinched or caught during assembly. Tighten all screws and fasteners, but do not overtighten. Attach the lamp shade and bulb once everything is secure. Test the switches to confirm the lamp works correctly. Your lamp is now ready to use safely and stylishly.

Credit: www.youtube.com
Frequently Asked Questions
How Do I Wire A Table Lamp With Two Switches?
To wire a table lamp with two switches, use a three-way switch setup. Connect the lamp’s live wire to the common terminal. Link the two switches using traveler wires. Ensure the neutral wire bypasses switches and connects directly to the lamp.
What Tools Do I Need For Wiring Two Switches?
You need wire strippers, screwdrivers, electrical tape, voltage tester, and wire nuts. These tools help strip wires, secure connections, and ensure safe wiring. Always turn off the power before starting any electrical work.
Can I Use Standard Switches For Two-switch Wiring?
No, standard single-pole switches won’t work. You need two three-way switches designed for controlling one light from two locations. Three-way switches have three terminals to allow traveler wire connections.
Is It Safe To Wire A Lamp With Two Switches Myself?
Yes, if you follow safety guidelines and local codes. Turn off the power at the breaker before wiring. Double-check all connections and use proper tools. When unsure, consult a licensed electrician.
Conclusion
Wiring a table lamp with two switches is easier than it seems. Follow each step carefully and stay safe. Double-check your connections before turning on the power. This setup lets you control the lamp from two places. It adds convenience to your room’s lighting.
Take your time and use the right tools. Soon, you will enjoy the flexibility of two-switch control. Keep practicing to build confidence with electrical projects. Simple tasks like this improve your home and skills. Ready to brighten your space with smart wiring?