Are you looking to add a unique touch to your space without spending a fortune? Making your own plug-in pendant light is easier than you think, and it lets you create a stylish, custom lighting solution that fits your style perfectly.
Imagine transforming a plain corner into a cozy, well-lit spot with just a few simple steps. In this guide, you’ll discover how to build your own pendant light quickly and safely, even if you’re new to DIY projects. Keep reading, and you’ll be amazed at how a small project can make a big impact on your home’s atmosphere.
Materials Needed
Gathering the right materials is the first step to making a plug-in pendant light. Each part plays an important role in the final look and safety of your light. Choose items carefully to ensure your project works well and looks great.
Choosing The Right Pendant Shade
Pick a shade that fits your space and style. Shades come in many shapes, sizes, and materials. Glass shades offer a clear, bright light. Fabric or metal shades create a softer, warmer glow. Make sure the shade has a hole or opening for the cord and bulb.
Selecting The Plug-in Cord
Choose a cord with a plug at one end and a socket for the bulb. Look for cords with a switch to turn the light on and off easily. The cord length should fit your room’s layout. Check the cord’s voltage and wattage ratings for safety.
Additional Tools And Supplies
Prepare simple tools like wire cutters, a screwdriver, and pliers. You may need electrical tape and wire connectors for safe wiring. A small drill can help if you need to make new holes. Gloves and safety glasses protect your hands and eyes.
Safety Precautions
Safety is very important when making a plug-in pendant light. Working with electricity can be dangerous. Taking the right steps keeps you safe and protects your home. Follow these safety tips closely to avoid accidents.
Handling Electrical Components
Always turn off the power before touching wires or plugs. Use tools with insulated handles to prevent shocks. Check wires for damage or wear before starting. Never force parts together; they should fit easily. Keep dry hands and avoid wet areas while working. Double-check connections to ensure they are tight and secure.
Working In A Safe Environment
Choose a clean, dry workspace with good lighting. Clear the area of clutter to avoid trips or falls. Keep children and pets away during the project. Use a sturdy surface to work on your materials. Have a fire extinguisher nearby just in case. Take breaks to avoid fatigue, which can cause mistakes.
Preparing The Pendant Shade
Preparing the pendant shade is an important step in making a plug-in pendant light. The shade needs to be clean and ready to hold the electrical parts safely. Taking time to prepare it well ensures the light will look great and work properly.
Cleaning And Inspecting The Shade
Start by cleaning the shade with a soft cloth. Remove dust and dirt gently. Check the shade for cracks or damage. Small cracks can weaken the shade and cause problems later. If you find any damage, consider using a different shade. A clean, strong shade is safer and looks better.
Drilling Holes For The Cord
Next, find the right spot for the cord hole. Usually, the top center of the shade works best. Mark the spot with a pencil. Use a drill with a small bit to make the hole. Drill slowly to avoid breaking the shade. The hole should be just big enough for the cord to fit through. This step helps the cord hang neatly and keeps the light secure.
Wiring The Plug-in Cord
Wiring the plug-in cord is a key step in making a pendant light. It connects the power source to the bulb, allowing the light to work safely. This process needs care and attention to avoid any electrical problems. Follow each step carefully to ensure your pendant light functions well and looks great.
Stripping And Connecting Wires
Start by stripping about half an inch of insulation from the cord wires. Use a wire stripper or sharp scissors. Be gentle to avoid cutting the wires inside. Once stripped, twist the wire strands to keep them neat.
Next, connect the wires to the light socket terminals. Match the colors: usually black or brown wire to the live terminal, white or blue to the neutral. Tighten the screws firmly to hold the wires in place. Check the connection by tugging lightly on the wires.
Securing The Cord To The Shade
After wiring, secure the cord to the pendant shade. Use a cord grip or a small clamp to hold the cord tightly. This stops the wires from pulling loose when you move the light.
Attach the cord grip to the shade’s hole or bracket. Make sure the cord has no tension. Leave enough slack so the light hangs properly. Proper securing keeps your pendant light safe and durable.
Assembling The Pendant Light
Assembling the pendant light is an important step in your project. It brings all parts together. This section guides you through the simple steps to complete your light fixture. Follow each instruction carefully to ensure safety and functionality.
Attaching The Socket
Start by preparing the socket for the light bulb. Hold the socket firmly. Connect the socket wires to the plug wires. Match the colors: black to black and white to white. Use wire nuts to secure the connections. Make sure no bare wire is exposed. Slide the socket into the pendant holder. Tighten any screws to keep it in place. The socket must be stable and secure.
Installing The Bulb
Choose a bulb that fits your socket type. Check the wattage limit on the socket. Screw the bulb gently into the socket. Turn it clockwise until it fits snugly. Avoid over-tightening to prevent damage. Test the bulb by plugging the light into an outlet. The bulb should light up without flickering. If it does not, check your wiring connections again.
Mounting And Placement
Mounting and placing your plug in pendant light correctly makes a big difference. It affects the room’s look and the light’s function. Good placement helps the light shine where you need it. Proper mounting keeps it safe and steady. Follow these steps for the best results.
Choosing The Location
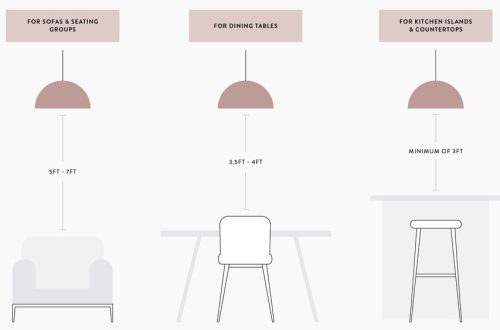
Pick a spot with easy access to a power outlet. Avoid places where the cord might get in the way. Think about the room’s purpose. A pendant light above a dining table adds focus. In a reading corner, it should provide enough brightness. Consider the height of the ceiling too. The light should hang low enough to be useful but high enough to avoid bumps.
Hanging The Pendant Light Safely
Use a strong hook or bracket to hold the light. Check that the ceiling can support the weight. Use a stud finder for a secure hold. Keep the cord away from sharp edges. Make sure the plug can reach the outlet without stretching. Test the light once it’s hung to see if it swings or feels loose. Adjust the height by pulling the cord through the hook carefully.
Troubleshooting Tips
Troubleshooting your plug-in pendant light can save time and effort. Small problems often cause big issues. Identifying these problems early helps keep your light working well. The following tips focus on common issues and easy fixes.
Fixing Flickering Lights
Flickering lights can be annoying and unsafe. Check the bulb first. Make sure it is screwed in tightly. Loose bulbs cause flickering. Use the correct wattage bulb as recommended. Wrong wattage bulbs may not work properly.
Next, inspect the socket for dirt or damage. Dust or corrosion can stop good contact. Clean the socket gently with a dry cloth. Avoid moisture near electrical parts.
If flickering continues, test the plug in another outlet. A faulty outlet can cause flickering too. If the plug fits loosely, the connection may be weak. Try a different socket to see if the problem stops.
Cord And Socket Issues
Damaged cords or sockets are common problems. Look for cuts, frays, or exposed wires. Do not use the light if cords are damaged. Replace the cord or get professional help.
Check the socket for cracks or burn marks. These signs indicate overheating or short circuits. Replace the socket immediately to avoid hazards.
Make sure the plug fits securely into the socket. Loose plugs cause poor connections and power loss. Push the plug firmly but gently to ensure a good fit.
Test the switch on the cord. If it does not work smoothly, it may need repair or replacement. A faulty switch interrupts power flow and causes issues.
Frequently Asked Questions
What Materials Are Needed To Make A Plug-in Pendant Light?
You need a pendant light kit, plug-in cord, light bulb, mounting bracket, screws, and tools like wire strippers. Choose materials that match your style and ensure electrical safety for a smooth assembly.
How Do You Safely Wire A Plug-in Pendant Light?
Turn off power before wiring. Connect live, neutral, and ground wires correctly. Use wire nuts to secure connections and insulate exposed wires. Follow electrical codes and test the light before final installation.
Can I Customize The Length Of The Pendant Cord?
Yes, you can adjust the cord length to fit your space. Measure carefully and cut the cord before wiring. Securely strip wires and reassemble to maintain safety and functionality.
What Types Of Bulbs Work Best For Pendant Lights?
LED bulbs are energy-efficient and long-lasting, ideal for pendant lights. Choose bulbs with appropriate wattage and color temperature to suit your ambiance. Avoid bulbs that generate excessive heat for safety.
Conclusion
Making a plug-in pendant light is simple and fun. You only need a few tools and parts. Follow each step carefully to stay safe. This project adds charm to any room quickly. Try different styles to match your space. Enjoy the warm light and cozy feel it brings.
Now, you can create your own light fixture at home. Give it a try and brighten your space today!