Are you ready to transform your space with stunning pendant lighting but not sure where to start? Hanging pendant lights can seem tricky, but with the right steps, you can easily brighten up your room and add a touch of style.
Imagine the warm glow and eye-catching design that a perfectly placed pendant light can bring to your home. Keep reading, and you’ll discover simple, clear instructions that will guide you through the process. By the end, you’ll feel confident and excited to take on this lighting upgrade yourself.
Let’s get started!
Choosing The Right Pendant Light
Choosing the right pendant light sets the tone for your room. It affects the room’s look and lighting quality. Picking the right one makes your space feel cozy and stylish. Consider the type, size, and style carefully to match your needs and décor.
Types Of Pendant Lights
Pendant lights come in many shapes and designs. Single pendants focus light on one spot. Multi-light pendants spread light over a larger area. Globe pendants offer soft, even light. Cage pendants add an industrial feel. Choose a type that suits your room’s purpose and style.
Size And Scale Considerations
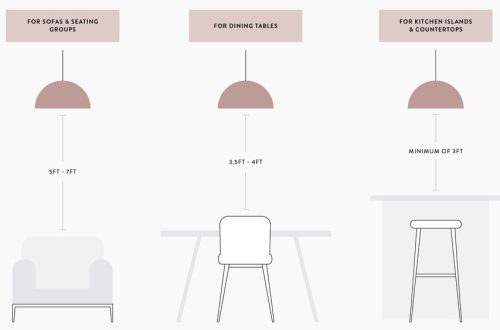
Size matters for pendant lights. Too big, and it overwhelms the room. Too small, and it looks lost. Measure your space before buying. The pendant should fit the room’s height and width. Keep at least 30 inches above tables or counters for good clearance.
Style And Finish Options
Styles range from modern to vintage and rustic. Choose a finish that matches your furniture and décor. Matte black, brushed nickel, and brass are popular finishes. The style and finish create the room’s mood. Pick one that blends well with your room’s theme.
Preparing For Installation
Preparing for installation is the first important step to hang pendant lighting safely and correctly. Taking time to gather tools and check your setup will save problems later. This stage ensures the project goes smoothly and the lighting looks great.
Tools And Materials Needed
Collect all tools before starting. You will need a screwdriver, wire stripper, voltage tester, drill, and ladder. Also, have electrical tape, wire connectors, and the pendant light kit ready. A tape measure helps to position the light properly.
Safety Precautions
Turn off power at the breaker box before working with wires. Use a voltage tester to confirm no electricity flows in the wires. Wear safety glasses and gloves to protect your eyes and hands. Avoid working alone in case of emergencies.
Checking Electrical Compatibility
Check the existing electrical box supports the pendant weight. Verify the wiring matches the pendant’s requirements. Confirm the circuit can handle the new light’s power load. Use the pendant’s instructions to match wire colors correctly.
Measuring And Marking Placement
Measuring and marking the placement of pendant lighting is a key step. This ensures your lights hang at the right height and look balanced. Careful measurement avoids mistakes and saves time during installation. Take your time to get it right before drilling or mounting.
Determining The Hanging Height
Choose a height that fits the room and purpose. For kitchen islands, hang pendants 30 to 36 inches above the surface. In dining rooms, leave 28 to 34 inches between the table and light. Adjust height if ceilings are very high or low. Keep pendants out of direct eye line for comfort.
Spacing Multiple Pendants
Space pendants evenly for a neat look. Keep 24 to 30 inches between each fixture. Use the length of your surface as a guide. Too close makes the area look crowded. Too far apart loses the effect of multiple lights. Measure and mark each spot carefully.
Marking Anchor Points
Find the exact spots to drill or hang anchors. Use a pencil to mark the ceiling. Double-check measurements before marking. Use a ladder and a tape measure for accuracy. Mark each point clearly to avoid confusion. These anchor points hold the pendant securely.
Installing The Mounting Bracket
Installing the mounting bracket is a key step in hanging pendant lighting. It holds the fixture firmly on the ceiling. A properly installed bracket ensures safety and stability. Take time to do this step carefully. It sets the foundation for the whole lighting setup.
Attaching The Bracket To The Ceiling
Start by turning off the power at the breaker. Use a stud finder to locate a ceiling joist or beam. The bracket must attach to a strong support. Hold the bracket in place and mark the screw holes. Drill pilot holes to avoid splitting the wood. Screw the bracket tightly into the ceiling using the right screws. The bracket should sit flush without any gaps.
Ensuring Secure Support
Check the bracket’s stability by gently shaking it. It should not move or wiggle at all. If it feels loose, tighten the screws or try different anchors. Use metal anchors for drywall without joists. Always follow the pendant light’s weight guidelines. A secure bracket prevents accidents and keeps the pendant light hanging straight.
Wiring The Pendant Light
Wiring the pendant light is a key step in the installation process. It connects the light fixture to your home’s power supply. Proper wiring ensures the light works safely and efficiently.
Take your time with the wiring. Check that the power is off before starting. Use the right tools and follow safety guidelines carefully.
Connecting Electrical Wires
Match the wires from the pendant light to the wires in the ceiling box. Usually, black wires connect to black, white to white, and green or copper to the ground wire. Use wire nuts to twist the wires together tightly. Make sure no bare wire is exposed outside the wire nuts. Secure the connections by gently tugging on each wire.
Testing The Connection
Turn the power back on at the breaker. Use the wall switch to test the light. The pendant light should turn on without flickering or buzzing. If it doesn’t work, turn off the power again and check your connections. Ensure all wires are securely connected and correctly matched. Testing confirms your wiring is safe and functional.
Hanging And Adjusting The Pendant
Hanging and adjusting a pendant light is an important step. It ensures the fixture looks good and works well. Proper hanging prevents damage and keeps the light safe. Follow clear steps to attach and adjust your pendant light with ease.
Attaching The Pendant To The Bracket
Start by aligning the pendant’s mounting bracket with the ceiling box. Use screws to secure the bracket tightly. Make sure the bracket does not move or wobble. This holds the pendant firmly in place. Check that the wires are ready for connection before attaching.
Adjusting Cord Or Chain Length
Measure the desired height from the ceiling to the pendant. Shorten or lengthen the cord or chain carefully. Use pliers to open and close chain links if needed. For cords, wrap the extra length neatly inside the ceiling box. Keep the pendant at a height that fits the room’s purpose.
Securing The Fixture
Once the length is set, tighten all screws and fasteners. Ensure the pendant hangs straight and does not tilt. Use a level to check alignment if needed. Attach any decorative covers to hide wires and hardware. Confirm that the fixture feels stable before turning on the power.
Final Touches
After hanging your pendant lighting, focus on the final touches. These steps help your light look great and work well. Small details make a big difference in your room’s style and brightness.
Installing Bulbs
Choose bulbs that match the fixture’s style and size. Check the maximum wattage allowed. Screw the bulbs in gently but firmly. Avoid over-tightening to prevent damage. Test the light switch to ensure bulbs work properly.
Cleaning And Styling Tips
Clean the pendant shade with a soft cloth before use. Dust regularly to keep it bright and clear. Use mild soap and water for stubborn dirt. Arrange furniture and decor to highlight the light. Position the pendant to create a cozy atmosphere.
Troubleshooting Common Issues
Hanging pendant lights can brighten up any room. Sometimes, small problems happen during or after installation. These issues can be fixed with simple steps. Understanding common problems helps keep your lights working well and looking great.
Fixing Flickering Lights
Flickering lights can be annoying and distracting. First, check the bulb. A loose bulb often causes flickering. Turn off the power and tighten the bulb firmly. If flickering continues, try a new bulb. Use bulbs that match the fixture’s recommended wattage.
Loose wiring can also cause flickering. Turn off the power before inspecting wires inside the fixture. Tighten any loose connections carefully. If unsure, ask an electrician to check the wiring for safety.
Adjusting Uneven Pendants
Uneven pendants spoil the look of your lighting. Start by turning off the power. Check the length of each pendant’s cord or chain. Most pendants have adjustable cords. Pull or release the cord to set the right height.
Use a level tool to ensure pendants hang evenly. Adjust each pendant until they line up straight. If chains are tangled or twisted, smooth them out before hanging. Proper adjustment improves both style and function.
Dealing With Loose Fixtures
Loose fixtures feel unsafe and may fall. Turn off the power before fixing them. Check the mounting bracket attached to the ceiling. Tighten all screws holding the bracket in place.
Secure the fixture to the bracket firmly. If screws are stripped, replace them with new ones. Use wall anchors if needed for extra support. A tight fixture stays safe and stable over time.
Frequently Asked Questions
How High Should Pendant Lights Hang Above A Table?
Pendant lights should hang 28 to 34 inches above a table. This height provides optimal lighting and comfort. It avoids glare while illuminating the surface effectively. Adjust based on ceiling height and room size for best results.
What Tools Are Needed To Hang Pendant Lighting?
You need a drill, screwdriver, wire stripper, voltage tester, and a ladder. These tools ensure safe and efficient installation. Having the right tools speeds up the process and prevents damage.
Can Pendant Lighting Be Installed On Sloped Ceilings?
Yes, pendant lights can be installed on sloped ceilings. Use an adjustable or swivel canopy to keep the fixture level. This allows for proper alignment and enhances room aesthetics.
How To Choose The Right Pendant Light Size?
Choose pendant lights proportional to the space and furniture size. For kitchen islands, use multiple smaller pendants or one large fixture. Proper sizing balances the room and improves lighting effectiveness.
Conclusion
Hanging pendant lighting adds style and light to any room. Choose the right height and secure the fixture well. Always turn off power before starting the work. Follow steps carefully for a safe and neat install. A well-hung pendant light can change the room’s feel.
Enjoy the new look and brightness it brings. This simple project can update your space quickly. Don’t rush—take time to do it right. Your effort will pay off with beautiful lighting.