Are you looking to add a unique touch to your space without spending a fortune? Making your own hanging pendant light is easier than you think, and it gives you complete control over the style and brightness in your room.
Imagine the satisfaction of lighting up your home with a piece you crafted yourself—something that truly reflects your taste. In this guide, you’ll discover simple steps to create a beautiful pendant light that fits perfectly in your space. Ready to transform your room and impress everyone who walks in?
Let’s get started!
Materials Needed
Gathering the right materials is the first step to make a hanging pendant light. Each part plays a key role in the final look and function. Choosing good items ensures safety and style. Below are the main materials you will need.
Choosing The Right Bulb
Select a bulb that fits your fixture. LED bulbs save energy and last longer. Choose the right brightness for the room. Warm light creates a cozy feel. Check the bulb’s base size before buying.
Selecting The Pendant Shade
The shade controls light direction and style. Pick a shade that matches your room’s decor. Glass shades offer a modern look. Fabric shades give a soft, warm glow. Make sure the shade fits your bulb size.
Essential Tools
Use basic tools to build your light. You need wire cutters and strippers. A screwdriver helps fix parts securely. A drill may be necessary for mounting. Safety gloves protect your hands during work.
Preparing The Workspace
Preparing your workspace is the first step to making a hanging pendant light. A clean, organized area helps you work faster and safer. It also makes the process more enjoyable.
Clear enough space to move around freely. Good lighting is important to see all parts clearly. A flat surface works best to lay out your materials and tools.
Safety Precautions
Wear safety goggles to protect your eyes from dust and debris. Use gloves to avoid cuts and scrapes. Make sure the power is turned off before starting any electrical work.
Keep a fire extinguisher nearby in case of emergencies. Avoid loose clothes or jewelry that can get caught. Work in a well-ventilated area to prevent inhaling fumes.
Setting Up Your Tools
Gather all tools needed before starting your project. Arrange them within easy reach on your workspace. Common tools include a screwdriver, wire stripper, and pliers.
Check each tool for damage or wear to ensure safety. Use a sturdy ladder if you need to reach high places. Having everything ready saves time and prevents frustration.
Assembling The Pendant Light
Assembling a hanging pendant light is an easy step that brings your project to life. It involves connecting parts carefully for safety and style. Follow these simple steps to assemble your pendant light correctly. You will enjoy a beautiful light fixture in your space.
Wiring The Socket
Start by preparing the socket for wiring. Strip about half an inch of insulation from the ends of the wires. Connect the wires to the socket terminals. Tighten the screws firmly to hold the wires in place. Make sure no wires are loose or exposed. This step is key for safe electrical work.
Attaching The Shade
Next, place the light shade over the socket. Align the shade with the socket’s holder or ring. Secure the shade by tightening the holder or screws. The shade should feel stable and not wobble. This keeps the light looking neat and protects the bulb.
Securing The Cord
Finally, manage the cord to avoid tangling or pulling. Use a cord grip or clamp if available. Attach it near the socket to hold the cord firmly. This stops stress on the wiring and socket. Neat cord management ensures your pendant light lasts longer.
Installing The Light Fixture
Installing the hanging pendant light is an important step. It brings your design to life. Careful setup ensures safety and style. Follow these steps to install your light fixture correctly.
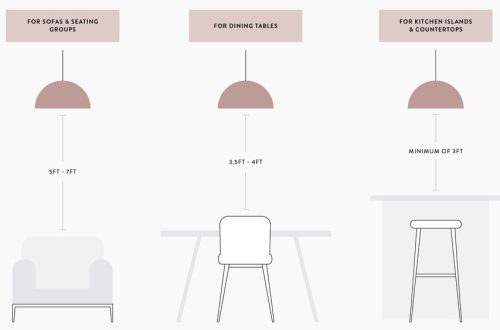
Finding The Perfect Spot
Choose a place with enough space around. The pendant should hang where it is useful. Avoid spots too close to walls or furniture. Check the height to prevent bumps. A central spot in the room often works best.
Mounting The Pendant
Turn off the power before starting. Use a sturdy hook or bracket on the ceiling. Attach the mounting plate securely. Hang the pendant so it stays level. Tighten all screws to avoid wobbling.
Connecting To Power
Match the wires carefully by color. Connect black to black, white to white, and green to ground. Use wire nuts to secure connections. Wrap with electrical tape for safety. Turn the power back on and test the light.
Customizing Your Pendant Light
Customizing your pendant light lets you create a unique look for your space. It is a simple way to match your style and home decor. You can change small details to make a big impact. This section explains easy steps to personalize your hanging pendant light.
Adding Decorative Elements
Decorative elements make your pendant light stand out. Use beads, fabric, or paint to add color and texture. Wrap the cord with colorful thread or ribbon for a fresh look. Attach small charms or pendants to the light fixture itself. These touches help the light fit your room’s theme and mood.
Adjusting Cord Length
Correct cord length ensures your light hangs just right. Measure the height of your ceiling and the space below. Shorten or lengthen the cord to suit your needs. Use simple tools like wire cutters and pliers for adjustments. A well-set cord improves both function and style of your pendant light.
Troubleshooting Tips
Making a hanging pendant light is a fun project. Sometimes, small problems happen. These troubles can stop your light from working well. This section helps you find and fix common problems quickly. Fixing these issues keeps your light safe and bright.
Common Wiring Issues
Loose wires cause many lighting problems. Check all wire connections. Make sure wires are tight and secure. Use wire nuts to join wires safely. Look for damaged or frayed wires. Replace any wires that look bad. Wrong wire colors can confuse you. Black or red wires carry power. White wires are neutral. Green or bare wires are ground. Match wires correctly to avoid shorts or shocks.
Fixing Flickering Lights
Flickering lights annoy and waste energy. They often come from loose bulbs or switches. Tighten the bulb in the socket. Replace the bulb if flickering stays. Check the light switch for wear. A faulty switch can cause flickers. Loose wiring inside the fixture is another cause. Turn off power before checking wires. Secure all wire connections inside the light. Flickering may also mean a poor power supply. If unsure, ask an electrician to check your home wiring.
Frequently Asked Questions
What Tools Are Needed To Make A Hanging Pendant Light?
You need a drill, wire strippers, screwdriver, electrical tape, and a voltage tester. These tools ensure safe and accurate installation.
How Do I Choose The Right Bulb For Pendant Lights?
Select bulbs based on brightness, color temperature, and fixture compatibility. LED bulbs are energy-efficient and long-lasting.
Can I Install A Hanging Pendant Light Myself?
Yes, if you follow safety guidelines and have basic electrical knowledge. Turn off power before installation to avoid shocks.
What Materials Are Best For Diy Pendant Lights?
Common materials include metal, glass, wood, and fabric. Choose based on style, durability, and ease of handling.
Conclusion
Making a hanging pendant light is simple and fun. You just need a few tools and materials. Following clear steps helps you create a unique light for your space. It adds style and warmth to any room. Plus, it gives you a sense of pride and creativity.
Try different designs to fit your taste and home. Enjoy the glow of your handmade pendant light every day. This project brings both light and joy into your life.