Are you ready to transform your outdoor space with cozy, glowing string lights? Attaching string lights to a post might seem tricky at first, but with the right steps, you can create a warm and inviting atmosphere in no time.
Whether you want to brighten up your patio, garden, or deck, this simple guide will help you do it safely and securely. Keep reading, and you’ll learn how to hang your lights like a pro—making your space shine beautifully every evening.
Choosing The Right String Lights
Choosing the right string lights is key to brightening your outdoor space. The right lights make your posts look great and last long. Consider the type, size, and strength of the lights. Each factor helps you pick the best lights for your needs.
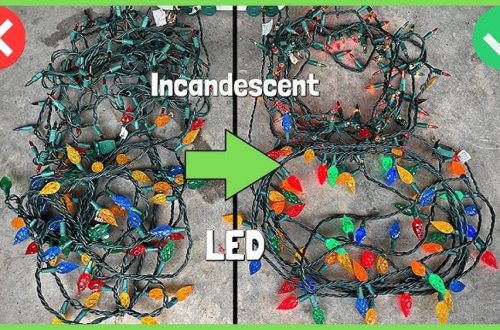
Types Of String Lights
String lights come in many styles. Some have big bulbs that shine brightly. Others use tiny LED lights that save energy. Choose lights that fit your style and purpose. Classic bulbs give a warm glow. LED lights are cool and last longer.
Length And Brightness
Measure the area around your posts before buying. Pick a string light long enough to cover the space. Brightness matters for mood and safety. Soft lights create a cozy feel. Bright lights help you see clearly at night.
Weather Resistance
Outdoor string lights must handle weather changes. Look for lights labeled waterproof or weatherproof. These lights resist rain, wind, and sun. Durable lights save money by lasting several seasons. Protect your investment with weather-resistant options.
Preparing The Post
Preparing the post is the first step to attach string lights securely. A well-prepared post keeps the lights stable and safe. It also helps the lights look neat and last longer.
Start by choosing the right post material. Clean the surface well. Then measure and mark the spots for the lights. These steps make the installation easier and more reliable.
Selecting The Post Material
Choose a post made of strong material like wood or metal. Wood is easy to work with and holds hooks well. Metal posts are sturdy but may need special tools. Avoid soft or weak posts. They might not hold the lights properly.
Cleaning The Surface
Remove dirt, dust, and old paint from the post. Use a brush or cloth for cleaning. A clean surface helps hooks or clips stick better. It also prevents damage to the lights and post. Make sure the post is dry before attaching anything.
Measuring And Marking
Measure the post height and length to plan light placement. Mark spots with a pencil or tape where hooks will go. Keep marks evenly spaced for a balanced look. Accurate marks help avoid mistakes during attachment.
Tools And Materials Needed
Attaching string lights to a post requires some basic tools and materials. Having the right items makes the job easier and safer. This section lists what you need before starting your project. Prepare these tools and materials to ensure a smooth setup.
Essential Tools
You need a ladder to reach high posts safely. A tape measure helps to space the lights evenly. Use a drill or screwdriver to secure fasteners. Scissors or wire cutters are useful for trimming the string lights.
Fasteners And Clips
Choose clips designed for outdoor string lights. These clips hold the lights without damaging wires. Cable ties also work well to keep lights tight. Avoid nails or staples that can harm the wiring.
Safety Gear
Wear gloves to protect your hands from cuts and scrapes. Safety glasses shield your eyes from debris. Use non-slip shoes for stable footing on ladders. Always keep safety in mind during installation.
Step-by-step Attachment Process
Attaching string lights to posts can brighten any outdoor space. Follow this clear, step-by-step guide to make the process easy. Each step will help you place the lights securely and neatly.
Starting Point Setup
Begin by choosing the first post to attach your lights. Make sure the post is clean and dry. This helps the lights stick better. Unroll the string lights gently to avoid tangles. Plug in the lights briefly to check if they work. Mark the spot on the post where you want the lights to start.
Securing The Lights
Use clips, hooks, or zip ties to attach the lights to the post. Start at the marked spot and fasten the lights firmly. Space the fasteners evenly to keep the lights straight. Avoid pulling the wire too tight; it can break. Check that the bulbs face outward for better light spread.
Managing Excess Wire
Leave some slack at the end to avoid strain on the wire. Coil any extra wire neatly and secure it with a twist tie. Keep excess wire off the ground to prevent damage. Tuck the coil behind the post or out of sight. This keeps your setup tidy and safe.
Creative Lighting Arrangements
Creative lighting arrangements bring charm and warmth to any outdoor space. They turn simple posts into glowing features. With string lights, you can create unique looks. Experiment with different styles to match your mood or event. The right technique makes your setup sturdy and beautiful.
Wrapping Techniques
Wrapping string lights around posts is a popular method. Start at the base and move upward in a spiral. Keep the lights tight but not too tight. Overlap slightly for a fuller effect. This method highlights the post shape and adds texture. Use clips or ties to keep lights in place.
Patterns And Shapes
Create patterns by arranging lights in simple shapes. Try zigzags, diamonds, or vertical lines. Shapes add interest and guide the eye. Use more lights for complex designs like stars or hearts. Plan your pattern before hanging lights for best results. Patterns work well for parties or festive events.
Layering Lights
Layering means using different strings of lights on one post. Start with a base layer wrapped around the post. Add a second layer with larger bulbs or different colors. This creates depth and brightness. Layering offers a rich, glowing look. Mix textures and light sizes for a cozy feel.
Safety Tips And Maintenance
Attaching string lights to posts creates a warm and inviting atmosphere. Safety and proper care keep your lights shining bright and your space safe. Follow these tips to avoid problems and enjoy your lights longer.
Avoiding Electrical Hazards
Always unplug the lights before handling them. Check for damaged wires or broken bulbs. Replace any faulty parts before use. Use outdoor-rated extension cords and plugs. Keep cords away from water or damp areas. Never overload electrical outlets to prevent fires.
Weatherproofing Connections
Cover plugs and connectors with waterproof tape. Use weatherproof covers designed for outdoor outlets. Elevate connections off the ground to avoid puddles. Seal gaps with silicone to block moisture. Proper sealing stops short circuits and damage from rain.
Regular Inspection
Check lights weekly for loose bulbs or frayed wires. Tighten clips or ties holding the lights to posts. Clean dirt and debris from bulbs and cords. Replace bulbs immediately if they burn out. Early checks prevent bigger problems and keep lights safe.
Troubleshooting Common Issues
Attaching string lights to posts can sometimes bring small problems. These issues can stop your lights from shining bright. Knowing how to fix common problems saves time and keeps your space glowing.
Lights Not Turning On
Check if the power source works. Make sure the plug fits tightly. Test the outlet by plugging in another device. Replace the fuse in the plug if needed. Look for any visible damage on the wire.
Loose Connections
Loose connections cause flickering or no light. Tighten all connections between strings and posts. Secure the plugs firmly in the sockets. Use electrical tape to hold wires in place. Check that clips or hooks hold the lights tightly.
Replacing Damaged Bulbs
Damaged bulbs stop the whole string from working. Find the broken bulb by looking for dark spots. Unplug the lights before replacing any bulb. Use the same type and size bulb for replacement. Push the new bulb gently but firmly into the socket.
Frequently Asked Questions
How Do I Attach String Lights To Wooden Posts?
Use outdoor-rated staples or hooks to secure string lights to wooden posts. Avoid damaging wires by stapling carefully. Space fasteners evenly to prevent sagging and ensure a neat appearance. Check for stability and adjust tension as needed for safety and aesthetics.
What Tools Are Needed To Hang String Lights On Posts?
You’ll need a ladder, outdoor staples or hooks, a staple gun or hammer, and measuring tape. Ensure the lights and tools are suitable for outdoor use. Safety gear like gloves and eye protection can help prevent injuries during installation.
Can I Use Zip Ties To Attach String Lights?
Yes, zip ties are a great option to attach string lights to posts. They are weather-resistant, easy to use, and won’t damage the wiring. Make sure to trim excess tie ends for a clean look and avoid overtightening to prevent wire damage.
How Do I Prevent String Lights From Sagging On Posts?
To prevent sagging, secure lights tightly using hooks or staples spaced every few feet. Use tensioners or wire tighteners if available. Regularly check and adjust the tension to keep lights taut and evenly spaced, ensuring a polished and safe setup.
Conclusion
Attaching string lights to a post is simple and fun. Choose the right tools and follow safety steps. Secure the lights tightly to avoid sagging or damage. Check the connections for power and stability. Enjoy the warm, cozy glow your lights create.
Brighten your space with ease and style. Now, your outdoor area looks inviting and festive. Try different light patterns to match your mood. Lighting up your posts adds charm and comfort. Keep your setup neat and safe for long use.