Looking to add a cozy, magical touch to your space? Hanging string lights on your ceiling is one of the easiest and most effective ways to transform any room.
But if you’re wondering how to do it without damaging your walls or making a mess, you’re in the right place. In this guide, you’ll discover simple steps and smart tips to hang your string lights safely and beautifully. By the end, you’ll have the skills to create the perfect glow for your home, party, or outdoor area.
Ready to brighten up your space? Let’s get started!
Choosing The Right String Lights
Choosing the right string lights is key to creating the perfect ceiling display. The right lights set the mood and last long. Consider the type, length, style, and safety before buying. These factors help avoid problems and make the setup easier.
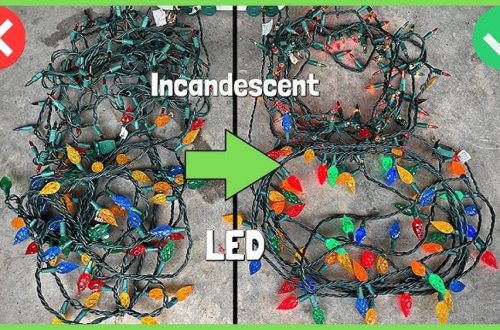
Types Of String Lights
There are many types of string lights. LED lights save energy and stay cool. Incandescent bulbs give a warm glow but use more power. Solar string lights charge in sunlight and work without plugs. Battery-operated lights offer flexibility in placement. Choose based on where you want to hang them and power options available.
Selecting Length And Style
Measure the ceiling area before choosing length. Too short means not enough coverage. Too long means extra wires and clutter. Styles vary from globe bulbs to fairy lights. Globe bulbs give a classic look. Fairy lights create a delicate, twinkling effect. Pick a style that fits the room’s look and your taste.
Safety Considerations
Check if the lights are rated for indoor use. Outdoor lights may be too harsh for indoor ceilings. Look for lights with good insulation and quality wiring. Avoid lights with frayed cords or broken bulbs. Use lights with a low heat output to reduce fire risk. Always follow the manufacturer’s instructions for safe installation.
Preparing Your Ceiling
Preparing your ceiling is the first important step to hang string lights safely and attractively. This step ensures your lights will stay in place and look great. Take time to clear the area and plan your layout carefully. A clean and organized space makes the task easier and faster.
Cleaning And Clearing Space
Start by removing dust and dirt from your ceiling. Use a soft cloth or duster to clean the surface. Clear any furniture or objects that might block your work area. A clean ceiling helps the hooks or clips stick better. It also prevents damage to your lights or ceiling.
Identifying Attachment Points
Find strong spots on your ceiling to attach the lights. Look for beams, joists, or sturdy fixtures. These points hold the weight of the string lights safely. Avoid weak or crumbly areas that might break. Use a stud finder if needed to locate hidden beams.
Measuring And Planning Layout
Measure the length of your ceiling where the lights will hang. Mark points to place hooks or clips evenly. Plan your light pattern before you start hanging. This helps avoid tangles and uneven spacing. Draw a simple sketch to guide your installation.
Tools And Materials Needed
Hanging string lights on your ceiling needs some basic tools and materials. Having the right items makes the job easier and safer. Prepare everything before you start. This helps avoid delays and keeps the process smooth.
Essential Tools
- Measuring tape to check the length and height
- Step ladder for reaching the ceiling comfortably
- Drill or screwdriver for mounting hardware
- Wire cutters to trim the string lights if needed
- Level to ensure straight and even placement
Mounting Accessories
- Ceiling hooks designed for hanging lights
- Adhesive hooks for damage-free surfaces
- Plastic anchors to support hooks on drywall
- Zip ties or twist ties to secure cables
- Extension cords if the power outlet is far
Additional Supplies
- Painter’s tape for temporary placement and adjustments
- Protective gloves to avoid cuts and scrapes
- Clear fishing line for an invisible hanging effect
- Marker or pencil to mark drill points
- Cleaning cloth to wipe the ceiling before installation
Installing Hooks And Clips
Installing hooks and clips is a key step to hang string lights on the ceiling. These small tools hold the lights in place. They keep the lights neat and prevent damage to walls or ceilings. Choosing the right hardware and placing it well makes the setup strong and safe.
Choosing Mounting Hardware
Select hooks or clips made for string lights. Plastic clips work well on smooth ceilings. Metal hooks offer stronger support for heavier lights. Look for hardware with adhesive backing for easy use. Screw-in hooks give more hold but need tools to install. Match the hardware to your ceiling type and light weight.
Placement Tips
Plan the path of your string lights before installing. Space hooks or clips about every 12 to 18 inches apart. Keep the lights away from heat sources or sharp edges. Use a level or tape measure for even spacing. Place hooks near power outlets for easy plugging. Avoid crowded areas to prevent tangling.
Securing Hooks Safely
Clean the ceiling surface before attaching adhesive hooks. Press hooks firmly and hold for 30 seconds. Let adhesive set for one hour before hanging lights. For screw hooks, use a drill or screwdriver carefully. Avoid drilling near wires or pipes in the ceiling. Check hooks regularly to ensure they stay secure.
Hanging The String Lights
Hanging string lights on the ceiling creates a warm and cozy atmosphere. The process is simple and fun. With the right steps, your lights will look great and stay secure.
Attaching Lights To Hooks
Start by placing hooks on the ceiling where you want the lights. Use adhesive hooks for smooth surfaces or screw-in hooks for wood. Clip or loop the string lights onto the hooks carefully. Make sure the lights are secure but not too tight. This prevents damage to the wire.
Creating Desired Patterns
Plan the shape before hanging the lights. Straight lines, zigzags, or waves work well. Space the hooks evenly to keep the pattern neat. Adjust the lights to follow the design clearly. Patterns add style and charm to any room.
Adjusting Tension And Position
Check the tension of the string lights. Avoid sagging by tightening the wire gently. Too much tension can pull the hooks loose. Move the lights slightly to fix uneven spots. Proper tension keeps your lights safe and attractive.
Power Source And Wiring
Setting up string lights on your ceiling needs careful thought about power and wiring. Safe and neat wiring makes your lights shine well. It also stops accidents and keeps your room tidy. This section explains how to handle power sources and wires for string lights.
Locating Outlets
Find the nearest power outlet to your ceiling area. Check if the outlet can handle the lights’ power. Use outlets that are not overloaded with other devices. Plan your light layout around these outlets. It saves you from long wires and hazards.
Using Extension Cords Safely
Choose extension cords made for indoor use. Pick cords with enough length to reach your lights. Avoid running cords across walkways or under rugs. Keep cords away from heat sources or water. Plug cords directly into outlets, not into other extension cords.
Concealing Wires
Hide wires along ceiling edges or behind moldings. Use clips or adhesive hooks to secure wires neatly. Paint wires the same color as your ceiling for less visibility. Tuck excess wire into corners or behind furniture. This keeps your setup clean and safe.
Maintenance And Safety Tips
Keeping string lights safe and well-maintained is important. Proper care helps lights last longer and prevents accidents. Follow simple steps to keep your ceiling lights bright and secure.
Regular Inspection
Check the lights often for damage or wear. Look for frayed wires, broken sockets, or loose connections. Catch problems early to avoid bigger issues. Inspect before and after each use, especially if lights stay up for months.
Replacing Bulbs
Replace burnt-out bulbs quickly to keep the string working well. Use bulbs that match the original type and voltage. Turn off the power before changing bulbs. Handle bulbs gently to avoid breaking them.
Avoiding Fire Hazards
Use lights approved for indoor use on ceilings. Keep bulbs away from flammable materials like curtains or paper. Avoid overloading electrical outlets with too many strings. Unplug lights when not in use to reduce fire risk.
Creative Decorating Ideas
Creative decorating ideas make string lights more than just lighting. They bring warmth and style to any room. With simple tricks, you can turn a plain ceiling into a magical space. Here are some fun ways to use string lights in your home.
Layering Lights
Layering string lights creates depth and charm. Hang multiple strands at different heights on the ceiling. This gives a cozy and twinkling effect. Use various light styles like fairy lights with bigger bulbs. Layering adds texture and a soft glow all around.
Combining With Other Decor
Combine string lights with other decorations for a unique look. Wrap lights around wooden beams or curtain rods. Pair them with plants or hanging art for extra interest. Draping lights over fabric or paper lanterns adds color and softness. This mix turns simple lights into eye-catching decor.
Seasonal Themes
Change string lights to match the season or holiday. Use warm white lights for autumn and winter. Add small ornaments like pinecones or leaves for fall. Bright colors work well for spring and summer. For holidays, include themed decorations like stars or snowflakes. Seasonal themes keep your space fresh and festive.
Frequently Asked Questions
How Do I Hang String Lights On A Ceiling Safely?
Use adhesive hooks or ceiling clips designed for string lights. Avoid nails or staples to prevent damage. Ensure the lights are rated for indoor use and check the ceiling material before installation. Secure wires properly to prevent them from falling or causing hazards.
What Tools Are Needed To Hang String Lights On Ceiling?
You typically need adhesive hooks, a ladder, measuring tape, and string lights. Optional tools include a pencil for marking spots and zip ties for extra security. These tools help you install lights neatly and safely without damaging the ceiling.
Can I Hang String Lights On A Textured Ceiling?
Yes, but use strong adhesive hooks or ceiling clips suitable for textured surfaces. Avoid heavy lights to prevent detachment. Test the adhesive on a small area first to ensure it sticks properly. This maintains the ceiling’s integrity and holds the lights firmly.
How Far Apart Should Ceiling Hooks Be For String Lights?
Hooks should be spaced about 3 to 4 feet apart for even light distribution. This spacing supports the weight of the lights and prevents sagging. Adjust spacing based on the light string length and ceiling size for the best look.
Conclusion
Hanging string lights on your ceiling brings warmth and charm to any space. Follow simple steps for a safe and neat setup. Choose the right tools and plan your design carefully. Test the lights before finalizing their place. Enjoy the cozy glow and festive feel they create.
With patience and care, your room will shine beautifully every night. Brighten your home with ease and style.