Are you ready to give your room a fresh, stylish look? Installing a light pendant ceiling fixture is one of the easiest and most effective ways to brighten up your space.
But if you’ve never done it before, the process might seem tricky. Don’t worry—this guide will walk you through every step, making it simple and safe. By the end, you’ll have a stunning new light that adds charm and warmth to your home.
Keep reading, and let’s get started on transforming your ceiling together!
Tools And Materials Needed
Installing a light pendant ceiling fixture requires specific tools and materials. Having everything ready makes the process smooth and safe. This section lists what you need to start your project.
Essential Tools
Gather basic tools like a screwdriver, drill, and wire strippers. A voltage tester is important to check electrical power. Pliers and a ladder also help during installation. These tools ensure the job is done correctly and safely.
Choosing The Right Light Pendant
Select a light pendant that fits your room size and style. Check the weight to confirm your ceiling can support it. Look for energy-efficient bulbs to save electricity. The right pendant adds charm and brightens your space well.
Safety Gear
Wear gloves to protect your hands from sharp parts. Safety glasses keep dust and debris out of your eyes. Use a stable ladder to avoid falls. Safety gear prevents injuries and keeps the work area safe.
Preparing The Installation Area
Preparing the installation area is a key step before hanging a light pendant ceiling. This stage helps ensure safety and smooth installation. Careful preparation avoids accidents and damage. Follow the steps below to get your space ready.
Turning Off Power
Start by switching off the power to the room. Use the circuit breaker to cut electricity to the light fixture. Double check by flipping the light switch. No power means no risk of electric shock during work.
Removing Old Fixtures
Take down any existing light fixture carefully. Unscrew the fixture base from the ceiling. Gently pull it down to expose the wiring. Keep screws and parts safe for later use or disposal.
Inspecting Wiring
Look closely at the exposed wires. Check for damage or wear like cracks and frays. Confirm wires are clean and not loose. Good wiring ensures the new light pendant works safely and well.
Installing The Mounting Bracket
Installing the mounting bracket is the first step to hang your light pendant safely. It holds the fixture firmly to the ceiling. This part needs careful attention to ensure stability and safety. Follow clear steps to find the right spot and fix the bracket securely.
Locating Ceiling Joists
Ceiling joists are wooden beams that support the ceiling. The mounting bracket must attach to a joist. Use a stud finder to locate them easily. Move the tool slowly across the ceiling. Mark the edges of the joist with a pencil. The center point is where the bracket goes. If no joist is found, use a ceiling anchor designed for heavy loads.
Securing The Bracket
Hold the mounting bracket against the marked spot. Align it with the joist center. Use a drill to make pilot holes for screws. This prevents wood from splitting. Screw the bracket firmly into the ceiling joist. Check that it does not wobble or move. Tight screws ensure the light pendant will hang safely. Double-check the bracket’s position before proceeding to the next step.
Wiring The Light Pendant
Wiring the light pendant is a key step in its installation. It connects the light to your home’s power. Proper wiring ensures the pendant works safely and well.
Understanding basic wiring helps avoid electrical problems. This guide covers how to connect wires, use wire nuts, and test connections.
Connecting Wires Safely
Turn off the power at the breaker before starting. Use a voltage tester to confirm no power flows. Match wires by color: black to black, white to white, and green or copper to ground.
Strip about half an inch of insulation from each wire end. Twist the matching wires together clockwise. Keep wires tight and neat to avoid shorts.
Using Wire Nuts
Choose the right size wire nuts for your wires. Place the wire nut over the twisted wires. Twist the nut clockwise until it feels tight and secure.
Give a gentle tug on each wire to check the connection. No wires should slip out. Wrap electrical tape around the wire nut for extra safety.
Testing Connections
Restore power at the breaker. Turn on the light switch to check the pendant. The light should turn on without flickering or buzzing.
If the light does not work, turn off power and check connections. Repeat the process until the fixture works properly and safely.
Attaching The Light Pendant
Attaching the light pendant is a key step in your installation process. It makes sure the fixture is safe and looks great. This step needs careful attention to avoid damage or accidents. Follow simple instructions and take your time.
Securing The Fixture
Start by holding the light pendant close to the ceiling mount. Align the fixture’s base with the mounting bracket. Use screws to fasten the base tightly. Check that the screws are firm but not too tight. This prevents cracking or damage.
Double-check that the fixture does not wobble. A secure fixture keeps the pendant steady and safe. Avoid hanging the pendant by its cord or chain alone.
Adjusting Height And Position
Adjust the pendant’s height before final tightening. Most pendants have adjustable rods or chains. Shorten or lengthen to fit your room’s style. The bottom of the pendant should not block sight lines.
Ensure the pendant hangs straight down. Tilted fixtures look uneven and can cause strain on wires. Make small adjustments and secure all parts firmly. This keeps your pendant looking balanced and neat.
Final Checks And Power On
After installing your light pendant ceiling, the final steps are crucial. These steps ensure safety and proper function. Check every connection carefully before turning the power back on. This prevents accidents and damage to your new fixture.
Double-checking Connections
Look closely at all wire connections. Make sure wires are tightly twisted and secured with wire nuts. Check that no bare wire is exposed outside the connectors. Confirm the ground wire is attached to the metal box or fixture. Loose connections can cause flickering or short circuits.
Restoring Power
Turn the circuit breaker back on slowly. Use the switch to control the light. If the breaker trips immediately, turn it off and recheck your wiring. Never force the power on if you see sparks or smell burning.
Testing The Light
Flip the wall switch and watch the light. It should turn on without flickering. Try adjusting the pendant height if needed. Test all bulbs to confirm they work. A steady, bright light means a successful installation.
Troubleshooting Common Issues
Troubleshooting common problems helps keep your light pendant ceiling working well. Knowing how to fix small issues saves time and money. It also makes your space safer and more comfortable.
Flickering Light
Flickering usually happens from a loose bulb or bad connection. Turn off the power before checking the bulb. Tighten the bulb gently to see if it stops flickering. If it continues, check the wiring inside the fixture. Sometimes, a faulty switch or dimmer causes flickering. Replace these parts if needed to fix the problem.
Loose Fixtures
A loose fixture can swing and cause damage. First, turn off the power for safety. Check the mounting bracket and screws holding the pendant. Tighten all screws with a screwdriver. If the fixture still moves, inspect the ceiling box. It may need extra support or replacement. Secure fixtures prevent accidents and keep your lighting steady.
Power Problems
Power issues stop the light from turning on. Confirm the switch is in the ON position. Check your circuit breaker or fuse box for tripped switches. If the breaker is fine, test the outlet or wiring with a voltage tester. Faulty wiring needs a licensed electrician to fix it. Avoid working on live wires to prevent shocks.
Tips For Stylish Lighting
Stylish lighting can change the whole look of a room. It makes spaces feel warm and inviting. Choosing and placing light pendants with care helps achieve the perfect style. Simple tips can guide you to create beautiful lighting effects.
Think about the type of bulbs, where to hang the lights, and how to mix them with other fixtures. These choices affect both function and design.
Choosing Bulb Types
Pick bulbs that match your room’s mood. Soft white bulbs give a warm glow. Bright white bulbs offer clear, clean light. Consider LED bulbs for energy savings and long life. Bulbs with different shapes add style too. Edison bulbs bring a vintage feel. Choose bulbs that fit your fixture and style needs.
Placement Ideas
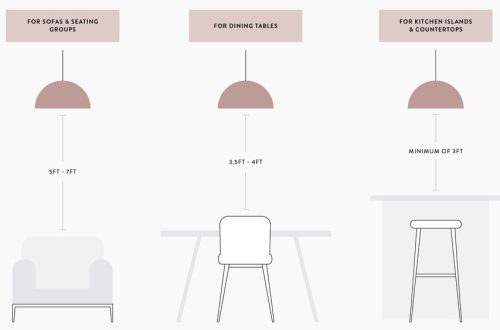
Hang pendants at the right height for comfort and style. Over dining tables, keep lights about 30 to 36 inches above. In kitchens, place them above islands or counters. Use multiple pendants for balanced lighting. Avoid hanging too low to prevent glare. Think about the room size and ceiling height. Proper placement highlights your space’s best features.
Combining With Other Fixtures
Mix pendants with ceiling lights or wall sconces. This adds layers and depth to your lighting. Use dimmers to adjust brightness for different moods. Combine styles carefully to keep a cohesive look. Pendant lights can be the main focus or part of a group. Balance is key to avoid clutter or darkness.
Frequently Asked Questions
How Do I Choose The Right Pendant Light For My Ceiling?
Select a pendant light based on room size, ceiling height, and style. Consider light intensity and fixture weight for safety and ambiance.
What Tools Are Needed To Install A Light Pendant Ceiling?
You need a drill, screwdriver, wire stripper, voltage tester, ladder, and mounting hardware. Safety gloves and goggles are also recommended.
How Do I Safely Connect The Pendant Light Wiring?
Turn off the power at the circuit breaker. Match the wires by color, twist, and secure with wire nuts. Test connections before finalizing.
Can I Install A Pendant Light On A Drywall Ceiling?
Yes, but use proper anchors or a ceiling joist for support. Drywall alone cannot hold the fixture’s weight safely.
Conclusion
Installing a light pendant on your ceiling can brighten any room easily. Follow each step with care and patience. Turn off the power before starting to stay safe. Use the right tools to make the job smooth. Take your time to connect wires correctly.
Check the fixture is secure before finishing. Enjoy your new light and the cozy glow it brings. This simple project adds style and light to your home. Give it a try and see the difference yourself.