Are you ready to give your room a fresh, stylish look? Installing a pendant light in your ceiling is one of the easiest ways to brighten up your space and add a touch of personality.
But maybe you’re wondering how to do it safely and correctly without hiring a pro. Don’t worry—you’re about to discover simple, step-by-step instructions that anyone can follow. By the end of this guide, you’ll have the confidence to install your pendant light quickly and enjoy the warm glow it brings to your home.
Let’s get started!
Tools And Materials Needed
Installing a pendant light requires specific tools and materials. Having everything ready makes the job easier and safer. This section lists what you need to complete the project properly.
Essential Tools
- Screwdriver (flathead and Phillips)
- Wire stripper
- Voltage tester
- Drill with drill bits
- Measuring tape
- Ladder or step stool
- Pliers
- Electrical tape
Required Materials
- Pendant light fixture
- Light bulbs (check the fixture’s wattage)
- Wire connectors (wire nuts)
- Mounting bracket (usually included with the fixture)
- Electrical box (if not already installed)
Preparing The Ceiling
Preparing the ceiling is the first step to install a pendant light safely. This part ensures the area is ready for the new fixture. Follow the steps carefully to avoid problems later.
Focus on turning off the power, removing any old light fixture, and checking the electrical box. Each step helps create a safe and solid base for your new pendant light.
Turn Off Power
Start by switching off the power from the main circuit breaker. This stops electricity from flowing to the fixture area. Use a voltage tester to confirm no power is present. Never skip this step. Safety first.
Remove Old Fixture
Next, carefully take down the old light fixture. Unscrew the fixture base from the ceiling. Detach the wires by loosening the wire nuts. Keep the wires separate and visible for the next step.
Check Electrical Box
Look at the electrical box to ensure it is secure and strong. The box must hold the weight of the new pendant light. Replace the box if it is loose or damaged. A sturdy box prevents accidents and keeps the fixture stable.
Wiring The Pendant Light
Wiring the pendant light is a key step in installing it safely. Proper wiring ensures the light works well and avoids electrical problems. Take your time and follow each step carefully. Safety is very important when working with electricity.
Identify Wires
First, find the wires coming from your ceiling. Usually, there are three types: live, neutral, and ground. The live wire is often black or red. The neutral wire is white or blue. The ground wire is green or bare copper. Check your light’s instructions for wire colors too.
Turn off power at the breaker before touching wires. Use a voltage tester to be sure wires have no power. Knowing each wire’s purpose helps avoid mistakes.
Connect Wires Safely
Match each wire from the pendant light to the ceiling wire. Connect live to live, neutral to neutral, and ground to ground. Twist wires together tightly. Use wire connectors or wire nuts to cover the joined wires. This keeps wires secure and prevents shorts.
Do not force wires or leave any exposed copper. Keep connections tight but gentle to avoid breaking wires. Use electrical tape around connectors for extra safety.
Secure Wire Connections
After connecting wires, tuck them neatly into the ceiling box. Avoid pinching or bending wires sharply. Attach the pendant light’s mounting bracket firmly. Make sure all wires stay inside the box with no stress on connections.
Double-check each connection before turning power back on. A loose wire can cause flickering or sparks. Secure wiring ensures your pendant light will work safely and last long.
Mounting The Pendant Light
Mounting the pendant light is a key step in your installation process. It ensures the light stays secure and looks great. Follow these simple steps carefully. The right mounting keeps your pendant safe and stylish.
Attach Mounting Bracket
Start by attaching the mounting bracket to the ceiling box. Use screws that come with your light fixture. Make sure the bracket is tight and stable. This bracket holds the weight of your pendant light. Check the bracket is level before tightening screws fully.
Hang The Pendant
Next, connect the pendant light to the mounting bracket. Carefully lift the fixture and hook it onto the bracket. Connect the electrical wires as per the instructions. Use wire nuts to secure the connections. Tuck the wires neatly into the ceiling box to avoid clutter.
Adjust Height
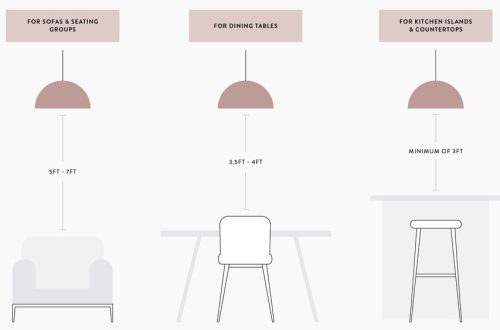
Adjust the pendant light height to suit your space. Most fixtures have adjustable cords or rods. Shorten or lengthen the cord to get the perfect drop. Make sure the pendant hangs straight and does not sway. Tighten any screws or locks to hold the height firmly.
Final Checks And Testing
After installing your pendant light, it is important to do final checks and testing. This step ensures your light works safely and correctly. Take your time to confirm everything is in place before fully using the fixture.
Restore Power
Turn the main power switch back on at the circuit breaker. This restores electricity to the pendant light. Make sure no tools or hands are near the wires during this step. Safety first.
Test The Light
Flip the wall switch to turn on the pendant light. Check if the light bulb glows brightly and steadily. Look for any flickering or strange noises. These may indicate a problem with the connection or bulb.
Troubleshooting Tips
If the light does not turn on, recheck the wiring connections. Make sure all wires are tight and matched correctly. Confirm the bulb is screwed in properly and working. If flickering continues, try replacing the bulb or switch. Never touch wires with power on.
Frequently Asked Questions
How Do I Prepare The Ceiling For Pendant Light Installation?
First, turn off the power at the circuit breaker. Remove the existing fixture and check the ceiling box for support. Ensure the electrical box is securely attached and can hold the pendant’s weight. Mark the installation spot and gather necessary tools before starting.
What Tools Are Needed To Install A Pendant Light?
You will need a screwdriver, wire strippers, voltage tester, drill, and ladder. A wire nut and electrical tape are also essential. Having all tools ready ensures a smooth and safe installation process.
How Do I Connect Wires For A Pendant Light?
Match the wires by color: black to black (hot), white to white (neutral), and green or copper to ground. Twist wire ends together with wire nuts. Secure connections with electrical tape to prevent loose wiring or short circuits.
How Can I Adjust The Height Of A Pendant Light?
Most pendant lights have adjustable cords or rods. Loosen the locking mechanism, set the desired length, then tighten securely. Measure the height to ensure proper illumination and aesthetic balance with room size.
Conclusion
Installing a pendant light on your ceiling is easier than it seems. Follow the steps carefully and take your time. Always turn off the power before starting any work. Use the right tools to keep the job safe and smooth.
A well-installed light can brighten your room and add style. Enjoy the new look and feel of your space. With patience, anyone can do this simple project. Keep these tips in mind for a safe, successful installation.