Are you tired of your plain recessed lights and ready to give your space a fresh, stylish look? Replacing recessed lights with pendant fixtures can completely transform the feel of any room, adding character and warmth.
But you might be wondering, is it difficult? Will it take too much time or cost a lot? Don’t worry—you’re about to discover a simple, step-by-step way to make this switch yourself. Keep reading, and you’ll learn exactly how to replace your recessed light with a pendant, making your home look amazing without stress or confusion.
Tools And Materials Needed
Replacing a recessed light with a pendant light requires specific tools and materials. Having the right items ready makes the job easier and safer. This section lists everything needed for a smooth replacement process.
Essential Tools
Gather basic electrical tools before starting. You need a screwdriver set for removing fixtures. Wire strippers help prepare electrical wires. A voltage tester ensures no power runs through wires. Needle-nose pliers assist in bending and holding wires. A ladder or step stool provides access to the ceiling. Measuring tape helps position the pendant correctly.
Choosing The Right Pendant Light
Select a pendant light that fits your room size. Consider the light’s style and color. Check the maximum wattage allowed for your electrical box. Ensure the pendant’s weight matches the ceiling support. Adjustable cords or rods offer flexible hanging height. Choose energy-efficient bulbs for long-lasting light.
Safety Gear
Wear safety glasses to protect your eyes from dust or debris. Use insulated gloves to avoid electrical shocks. Turn off the circuit breaker before touching any wires. Have a flashlight nearby for dark spaces. Keep a fire extinguisher handy just in case. Use a sturdy ladder to prevent falls.
Preparing The Workspace
Preparing the workspace is the first step to replace a recessed light with a pendant. A clean and safe area helps you work faster and avoid mistakes. Taking time to set up your space ensures a smooth installation process.
Gather all tools and materials needed before starting. Clear the area under the light fixture. Good lighting in the workspace makes it easier to see wires and parts. Protect the floor with a drop cloth to catch debris and screws.
Turning Off Power
Safety starts with turning off the power to the light fixture. Find the correct circuit breaker in your electrical panel. Switch it off to cut electricity to the recessed light. Use a voltage tester to confirm no current flows to the wires. Never skip this step to avoid electric shock.
Removing Existing Recessed Light
Remove the trim and bulb from the recessed light first. Check for clips or screws holding the fixture in place. Carefully pull out the light housing from the ceiling. Disconnect the wires by unscrewing wire nuts. Keep the wires separated to prevent contact.
Inspecting Electrical Box
Look at the electrical box where the recessed light was installed. Ensure it is sturdy and securely attached to the ceiling joist. The box must support the weight of the new pendant light. Replace or reinforce the box if it is loose or damaged. Confirm the wiring is in good condition and meets local codes.
Installing The Pendant Light
Installing the pendant light is the next step after removing the recessed light. This part needs care and attention. Follow each step carefully to make sure the new light is safe and looks good.
Mounting The New Fixture
Start by attaching the mounting bracket to the electrical box. Use screws to secure it tightly. The bracket holds the pendant light in place. Make sure it is level and stable. This will prevent the fixture from hanging crooked.
Wiring Connections
Turn off the power at the breaker before touching wires. Connect the black wires from the fixture and ceiling. Twist them together and secure with a wire nut. Repeat for the white wires. Attach the ground wire to the green screw or grounding wire. Double-check all connections are tight and secure.
Securing The Pendant
Lift the pendant light and attach it to the mounting bracket. Use the screws or nuts provided with the fixture. Make sure the pendant hangs straight and steady. Adjust the chain or rod length if needed. Finally, install the light bulb and switch the power back on.
Adjusting Pendant Height
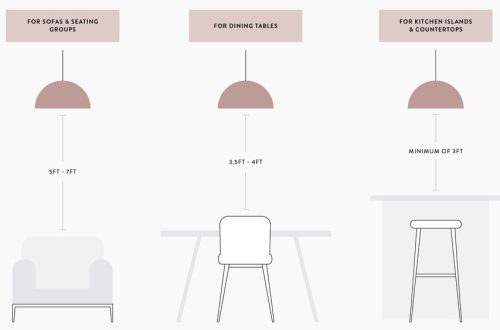
Adjusting the pendant height is important to get the right look and light in your room. A pendant light hanging too low can block views or get in the way. Too high, and it may not provide enough light. Proper height helps balance style and function.
Follow simple steps to measure and adjust the drop length. This way, your new pendant will fit your space perfectly. The right height also improves safety and comfort.
Measuring Drop Length
Start by measuring the distance from the ceiling to the surface below. This surface might be a table, countertop, or floor. For dining areas, keep the pendant 28 to 34 inches above the table.
In open spaces, hang the pendant 7 feet or more from the floor. Use a tape measure for accuracy. Mark the spot on the cord or chain to set the right length.
Adjusting Cord Or Chain
Most pendants come with adjustable cords or chains. To shorten, pull the cord through the canopy and secure it inside. For chains, open a link with pliers and remove extra links.
Make small changes and check the height often. Once set, tighten all screws and covers. Ensure the pendant hangs straight and stable for safety.
Testing And Final Touches
After installing your new pendant light, it’s time to focus on testing and final touches. This step ensures the light works safely and looks great in your space. Careful checks help avoid problems and make sure everything fits perfectly.
Restoring Power
First, turn the circuit breaker back on to restore power. Check the switch controlling the pendant light. Flip it on to see if the light activates. If it does not, turn off the breaker again and check your wiring connections. Safety is the priority.
Checking Light Functionality
Look closely at the pendant light once it’s on. Make sure the bulb shines evenly and there is no flickering. Test the switch a few times to confirm it works smoothly. Listen for any buzzing or unusual sounds. These signs can indicate wiring issues.
Cleaning And Styling
Remove any dust or fingerprints from the light fixture. Use a soft cloth to gently clean the pendant. Adjust the height or angle to suit your room’s style. Position the light to brighten the desired area well. These small touches complete the look.
Troubleshooting Tips
Replacing recessed lights with pendant fixtures can brighten your space beautifully. Yet, some common problems might appear during or after installation. Knowing how to troubleshoot these issues saves time and avoids extra costs. The tips below cover frequent wiring troubles, flickering lights, and installation errors.
Common Wiring Issues
Check the power is off before touching wires. Loose connections cause lights to fail. Use a screwdriver to tighten wire nuts securely. Match wire colors: black to black, white to white, and green or bare copper to ground. Damaged wires may need replacement. Test the circuit with a voltage tester for safety. Ensure the switch controls the correct fixture. Incorrect wiring can cause shorts or shocks.
Fixing Flickering Lights
Flickering often means a bad connection or bulb. Turn off power and tighten all wire connections. Swap the bulb with a new one to rule out defects. Dimmer switches sometimes do not work well with certain bulbs. Use LED bulbs compatible with dimmers if needed. Loose sockets also cause flickering. Make sure the bulb fits snugly in the socket. Check the fixture’s wiring for damage.
Addressing Installation Problems
Improper mounting leads to unstable pendants. Use the right mounting bracket for your fixture. Secure the pendant firmly to avoid swinging. Confirm the ceiling box supports the fixture’s weight. Some boxes need reinforcement for heavy pendants. Adjust the hanging length carefully for balance. Follow the manufacturer’s instructions step-by-step. Test the pendant light before finishing the job.
Frequently Asked Questions
How Do I Remove A Recessed Light Fixture Safely?
Turn off the power at the circuit breaker first. Then, gently pull down the recessed trim and disconnect the wiring. Use a voltage tester to ensure no electricity is flowing before fully removing the fixture.
Can I Use Existing Wiring For A Pendant Light?
Yes, you can reuse the recessed light wiring if it’s in good condition. Ensure the wiring supports the new pendant’s wattage. Always check local electrical codes and consult a professional if unsure.
What Tools Are Needed To Replace Recessed Light With Pendant?
You’ll need a voltage tester, wire strippers, screwdrivers, electrical tape, and a ladder. Also, have the pendant light kit and mounting hardware ready for installation.
How Do I Mount A Pendant Light Where Recessed Light Was?
Install a ceiling electrical box rated for pendant lights. Secure it to a joist or support brace. Attach the pendant fixture to the box, following the manufacturer’s instructions carefully.
Conclusion
Replacing recessed lights with pendant lights brings style and function together. It changes the room’s look and feel instantly. The process is straightforward if you follow the right steps. Safety matters most—always turn off the power first. Choose a pendant that fits your space well.
Take your time with wiring and mounting. Enjoy the new light and the fresh atmosphere it creates. Small changes can make a big difference in your home. This upgrade adds charm and better lighting where you need it.