Are you ready to give your space a fresh, stylish look? Installing new pendant lights can completely transform the mood and feel of any room.
But if you’re worried it might be complicated or time-consuming, don’t be. This guide will walk you through every step, making the process simple and stress-free. By the end, you’ll have beautiful new lighting that shines just the way you want.
Keep reading to discover how easy it is to brighten up your home with pendant lights!
Choosing The Right Pendant Lights
Choosing the right pendant lights is key for a great room look. These lights set the mood and style. Picking the perfect ones can change a space completely. Think about size, brightness, and how they fit your decor.
Considering Room Size And Style
Room size guides your pendant light choice. Large rooms need bigger or multiple lights. Small rooms look best with smaller, simple fixtures. Match the light style to your room’s style. Modern rooms suit sleek, simple pendants. Rustic spaces work well with warm, textured lights.
Selecting Bulb Types And Brightness
Choose bulbs by type and brightness. LED bulbs save energy and last long. Soft white bulbs create a warm glow. Bright white bulbs offer clear, sharp light. Check the bulb’s brightness in lumens. Higher lumens mean brighter light for tasks or reading.
Matching Fixtures With Decor
Fixtures must blend with your room’s decor. Look at color, shape, and material. Metal fixtures fit industrial or modern rooms. Glass or fabric shades work in cozy spaces. Pick a finish that matches other furniture or hardware. Consistency helps the room feel balanced and complete.
Gathering Necessary Tools And Materials
Before installing new pendant lights, gather all tools and materials. Preparation saves time and avoids mistakes. Check everything carefully to ensure a smooth process.
Having the right tools makes the job easier and safer. Missing items can cause delays or damage. Organize your workspace and keep tools within reach.
List Of Essential Tools
- Screwdriver set (flathead and Phillips)
- Wire stripper and cutter
- Voltage tester
- Drill with bits
- Measuring tape
- Step ladder
- Pliers
- Electrical tape
- Wire nuts
Safety Equipment To Use
- Insulated gloves to protect from electric shock
- Safety glasses to shield your eyes
- Dust mask if drilling creates dust
- Non-slip shoes for steady footing
Preparing The Installation Area
Preparing the installation area is the first step to install new pendant lights. It ensures safety and a smooth process. Taking time to prepare can save effort later. Follow simple steps to get ready for the new fixture.
Turning Off Power Safely
Start by turning off the power at the circuit breaker. This stops electricity to the fixture’s area. Use a voltage tester to confirm no power flows. Never skip this step. It protects you from electric shock.
Removing Old Fixtures
Remove the old light fixture carefully. Unscrew the fixture from the ceiling or wall. Gently lower it to expose the wiring. Keep screws and parts safe for reuse. Handle glass or bulbs with care to avoid damage.
Checking Electrical Wiring
Inspect the wiring for any damage or wear. Look for frayed wires or loose connections. Make sure wires match the new fixture’s requirements. Replace damaged wires before installing the new light. Proper wiring ensures the pendant light works safely.
Mounting The Pendant Light
Mounting the pendant light is a key step in your installation. This process ensures your new light hangs securely and looks great. Follow these simple steps for a safe and neat setup.
Assembling The Fixture
Start by unpacking all parts carefully. Identify each piece using the manual. Attach the light shade or globe to the fixture base. Tighten any screws or fasteners by hand. Avoid overtightening to prevent damage. Make sure the fixture looks balanced and stable.
Securing The Mounting Bracket
Locate the electrical box on your ceiling. Align the mounting bracket with the box. Use the screws provided to secure the bracket. Tighten the screws firmly for a strong hold. Check that the bracket does not move or wobble. This step supports the entire pendant light.
Connecting Wiring Correctly
Turn off power at the breaker to stay safe. Match wires by color: black to black, white to white, green or copper to ground. Twist wire ends together and secure with wire nuts. Wrap electrical tape around wire nuts for extra safety. Push wires gently into the electrical box. Confirm all connections are tight before moving on.
Adjusting Height And Position
Adjusting the height and position of your new pendant lights is key to getting the perfect look and function. The right drop length sets the mood and helps light the room well. Placement affects how light spreads and highlights areas.
Careful adjustment makes your space both stylish and practical. Let’s explore simple steps to measure and align your pendant lights for best results.
Measuring Drop Length
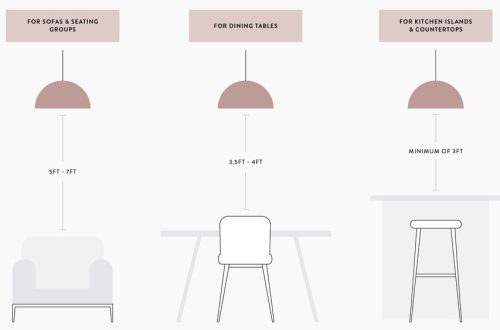
Start by measuring the distance from the ceiling to the spot where you want the light to hang. Consider the height of people and furniture below. For dining tables, keep the light about 30-36 inches above the surface. For open areas, 7 feet from the floor works well.
Use a tape measure and mark the cord or chain at the right length. Cut or adjust the wire carefully to avoid mistakes. A consistent drop length creates balance and comfort.
Aligning For Optimal Lighting
Position your pendant lights to avoid shadows and glare. Center the light over tables, counters, or seating areas. Multiple pendants should line up evenly for a neat look.
Check the angle of the light bulbs. Adjust the fixture to spread light where it is most needed. Proper alignment helps the room feel bright and inviting.
Testing And Finishing Touches
After installing your new pendant lights, testing and finishing touches are vital steps. They ensure safety and enhance the room’s look. These final checks confirm the lights work properly. Then, decorative details bring style and personality.
Restoring Power And Testing Lights
Turn the circuit breaker back on carefully. Switch on the pendant lights using the wall switch. Watch the bulbs light up evenly. Check for any flickering or dim spots. Test all installed lights in the room. Ensure each pendant light glows steadily. If a light does not work, turn off power again. Double-check wiring and bulb placement. Fix any loose connections before turning power back on.
Adding Decorative Elements
Choose accessories that match your room’s style. Add dimmer switches for light control and mood setting. Consider decorative bulbs with unique shapes or colors. Use ceiling medallions to frame the pendant lights. Add coordinating shades or covers if needed. Clean the glass or metal parts gently. Wipe away fingerprints and dust for a polished look. Small details make a big difference in appearance.
Troubleshooting Common Issues
Installing new pendant lights can brighten any room instantly. Sometimes, small issues may arise after installation. Troubleshooting these problems helps keep your lights working perfectly. This section covers common problems and simple fixes for pendant lights.
Fixing Flickering Lights
Flickering lights often mean a loose bulb or poor connection. First, turn off the power and check the bulb. Tighten it gently to ensure a good fit. If flickering continues, check the switch and wiring for damage. Replace any faulty parts to stop flickering.
Addressing Loose Fixtures
Loose fixtures can swing or hang unevenly. Check the mounting bracket and screws. Tighten all screws firmly to secure the fixture. If the fixture still moves, use extra anchors or support brackets. Proper fixing prevents damage and keeps lights stable.
Dealing With Wiring Problems
Wiring issues can cause lights to fail or short circuit. Always switch off power before inspecting wires. Look for disconnected or damaged wires inside the fixture box. Match wire colors correctly when reconnecting. Use wire nuts and electrical tape for safety. If unsure, call an electrician.
Maintenance Tips For Pendant Lights
Keeping your pendant lights in good shape helps them look great and work well. Regular care stops dust and dirt from building up. It also keeps the light bright and safe to use. Simple steps can make your lights last longer and shine beautifully.
Cleaning And Care
Turn off the light and let it cool down first. Use a soft cloth to wipe the shade and fixture gently. Avoid harsh cleaners that can damage the finish. A mix of mild soap and water works well for most materials. Clean the bulb with a dry cloth to keep it bright. Dust your lights every week to prevent buildup. Check wires and fittings for any signs of wear.
Replacing Bulbs Safely
Always switch off the power before changing bulbs. Wait until the bulb is cool to avoid burns. Use the correct bulb type and wattage for your fixture. Handle bulbs with a cloth or gloves to keep oils off. Screw the new bulb in gently but firmly. Check that the bulb is secure and the light turns on properly. Dispose of old bulbs according to local rules.
Frequently Asked Questions
How Do I Choose The Right Pendant Light Size?
Select a pendant size based on room dimensions. For small spaces, use smaller fixtures. Large rooms allow bigger pendants. Consider ceiling height for proper hanging length. Balance size with furniture scale to ensure harmony and style.
What Tools Are Needed To Install Pendant Lights?
You need a screwdriver, wire stripper, voltage tester, drill, and ladder. Also, use wire nuts and electrical tape. Always turn off power before installation. These tools help ensure a safe and smooth pendant light setup.
Can I Install Pendant Lights Without An Electrician?
Yes, if you have basic electrical knowledge and follow safety rules. Turn off power at the breaker box first. Use a voltage tester to check wires. If unsure, consult a professional to avoid hazards or damage.
How High Should Pendant Lights Hang Above Counters?
Hang pendant lights 28 to 34 inches above the countertop. This height provides optimal lighting and avoids glare. Adjust slightly based on ceiling height and fixture size for best visual appeal.
Conclusion
Installing new pendant lights can brighten any room quickly. Follow safety steps to avoid accidents. Choose the right tools and take your time. Double-check all wiring connections before turning power back on. Enjoy the fresh look and better lighting in your space.
Small changes can make a big difference in your home. Ready to add style and light? This guide helps you do it right.