Looking to add a stylish touch to your room? Installing a pendant light with a chain can instantly transform your space with a warm, inviting glow.
But if you’re unsure how to do it yourself, don’t worry—you’re in the right place. This guide will walk you through every simple step, so you can confidently hang your new light fixture without hassle. By the end, you’ll have the skills to brighten your home and impress your guests.
Ready to get started? Let’s dive in!
Tools And Materials Needed
Installing a pendant light with a chain needs specific tools and materials. Having the right items makes the job safer and easier. Prepare all before starting to avoid delays.
Tools Required
- Screwdriver (flathead and Phillips)
- Wire stripper
- Voltage tester
- Drill with bits
- Measuring tape
- Ladder or step stool
- Pliers
- Level
- Safety glasses
- Work gloves
Materials Needed
- Pendant light with chain
- Mounting bracket (usually included)
- Wire connectors (wire nuts)
- Electrical tape
- Light bulbs
- Anchor screws or wall plugs
- Ceiling hook or support
- Electrical box cover plate (if needed)
Safety Equipment
- Insulated gloves
- Eye protection
- Dust mask (for drilling)
Choose The Right Pendant Light
Choosing the right pendant light is key to a beautiful and functional space. It sets the mood and fits your room’s style. This step helps avoid costly mistakes and ensures the light hangs perfectly.
Think about the room size and ceiling height. A large pendant might overwhelm a small room. A small light can get lost in a big space.
Consider Room Size And Ceiling Height
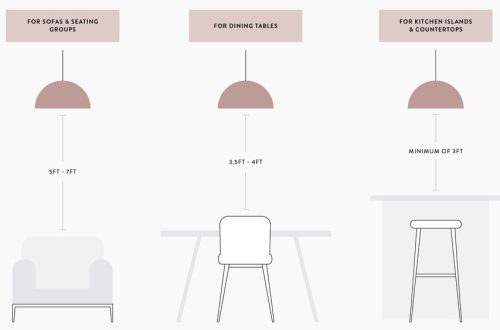
Measure the room before buying a pendant light. The light should not be too big or too small. High ceilings need longer chains or bigger lights. Low ceilings need shorter chains and smaller fixtures.
Match Your Decor Style
Pick a pendant light that fits your room’s look. Modern rooms suit sleek, simple designs. Traditional rooms pair well with classic or vintage styles. The right style ties the room together nicely.
Choose The Right Light Brightness
Check the light bulb wattage. It affects how bright the room will be. Use softer bulbs for cozy spaces. Brighter bulbs work well for kitchens or work areas.
Select The Best Chain Length
The chain length controls how low the light hangs. It should not block views or hit heads. Adjust the chain based on ceiling height and furniture below.
Turn Off Power Safely
Turning off the power before installing a pendant light with a chain is very important. It keeps you safe from electric shocks. Always take this step seriously. It protects you and your home from accidents.
Locate The Circuit Breaker
Find the main electrical panel in your home. It is usually in a basement, garage, or utility room. Open the panel door carefully. Look for the switch that controls the room where you will install the light.
Switch Off The Correct Breaker
Flip the breaker switch to the off position. This stops electricity from flowing to the light fixture. Make sure you turn off the right breaker. Turning off the wrong one won’t protect you.
Use A Voltage Tester
Check the wires with a voltage tester. This tool shows if electricity is still running. Touch the tester to the wires carefully. If the tester shows no power, it is safe to continue.
Double Check For Safety
Try turning on the light switch. If the light does not come on, the power is off. Always check twice before starting work. Safety is the top priority.
Remove Existing Fixture
Removing the existing fixture is the first step to install a pendant light with a chain. It prepares the space for the new light and ensures safety. Take your time to do this carefully.
Turn Off Power
Always turn off the power at the breaker box. This stops electricity from flowing to the light. Use a voltage tester to check the wires and confirm the power is off.
Remove Light Bulbs And Shade
Unscrew any light bulbs from the fixture. Take off the shade or cover gently. This makes the fixture lighter and easier to handle.
Unscrew The Fixture
Find the screws or bolts holding the fixture to the ceiling. Use a screwdriver or wrench to loosen them. Keep the screws safe for later use.
Disconnect The Wires
Look at how the wires connect. Usually, there are black (hot), white (neutral), and green or bare (ground) wires. Unscrew the wire nuts to separate the wires carefully.
Remove The Fixture Base
Take down the fixture base from the ceiling. Set it aside. Check the electrical box to make sure it is secure and ready for the new pendant light.
Assemble The Pendant Light
Assembling the pendant light is an important step in your installation. It prepares the light fixture for hanging and wiring. Taking your time here ensures safety and a proper fit. Follow each step carefully to avoid problems later.
Attach The Chain
Start by connecting the chain to the pendant light. Use the hook or loop on the light to secure one end of the chain. Make sure it is tight and locked. The chain supports the light’s weight, so it must be strong.
Next, attach the other end of the chain to the mounting bracket or ceiling hook. Adjust the chain length to set your desired hanging height. Use pliers if needed to close any open links. Double-check the chain is secure before moving on.
Connect The Wiring
Turn off the power at the circuit breaker before handling wires. Strip about half an inch of insulation from the light’s wires. You will see a black (live), white (neutral), and green or copper (ground) wire.
Connect the black wire from the light to the black house wire. Twist them together and secure with a wire nut. Repeat for the white wires. Finally, connect the green or copper wire to the ground wire or screw.
Carefully tuck the wires into the ceiling box. Make sure no bare wire is exposed outside the wire nuts. Tighten all connections firmly for safety. Restore power only after all wiring is complete and checked.
Mount The Light Fixture
Mounting the light fixture is a key step in installing a pendant light with a chain. This step ensures the light hangs safely and looks great. It involves attaching the mounting bracket and securing the pendant light to it. Follow these instructions carefully for a strong and stable setup.
Install The Mounting Bracket
Start by turning off the power at the circuit breaker. This keeps you safe during installation. Take the mounting bracket and align it with the electrical box on the ceiling. Use the screws provided to attach the bracket firmly. Make sure it sits flat and tight against the ceiling. The bracket supports the entire weight of the pendant light. Double-check that it is secure before moving on.
Secure The Pendant Light
Next, connect the wires from the pendant light to the house wiring. Match the colors: black to black, white to white, and green or copper to ground. Use wire nuts to twist the wires together. Push the connected wires into the electrical box carefully. Then, hang the pendant light by attaching the chain to the mounting bracket. Tighten any screws or nuts to hold the light firmly. Adjust the chain length if needed. The light should hang steady without wobbling.
Adjust Chain Length
Adjusting the chain length is a key step when installing a pendant light. It helps set the perfect height for your space. A chain too long or too short can affect the room’s look and the light’s function.
Take time to measure and adjust the chain before hanging the light. This ensures the light fits well in your room and shines where you need it most.
Measure The Desired Height
First, decide how low the pendant light should hang. Use a tape measure to check the distance from the ceiling to the spot where the light will hang. Remember, the light should not block views or hit heads.
Remove Excess Links
To shorten the chain, use pliers to open and remove extra links. Count carefully to avoid removing too many. Keep the removed links in case you need to add length later.
Attach The Chain To The Ceiling Hook
After adjusting, connect the chain to the ceiling hook securely. Make sure the link is closed tightly to prevent the light from falling. Test the chain’s strength by gently pulling down.
Check The Light’s Position
Hang the pendant light and see if the height feels right. It should provide enough light without interfering with movement. Adjust again if necessary by adding or removing chain links.
Restore Power And Test
After installing your pendant light with chain, restoring power and testing is the final step. This step ensures everything works safely and correctly. It confirms your hard work has paid off. Follow the steps carefully to avoid any issues.
Turn The Circuit Breaker Back On
Locate your home’s electrical panel. Find the breaker switch that was turned off during installation. Flip the switch back to the “on” position. This restores power to the light fixture. Be careful and make sure your hands are dry.
Check The Light Bulb
Look at the bulb in your pendant light. Confirm it is screwed in tightly. Loose bulbs can cause flickering or no light at all. Use the recommended bulb type and wattage for safety.
Test The Light Switch
Turn on the light switch that controls your pendant light. The light should turn on immediately. If it does not, double-check your wiring connections. Make sure the power is on and the bulb works.
Inspect For Flickering Or Sparks
Watch the light for a few minutes. Look for flickering or any sparks. Flickering may mean a loose connection. Sparks are a sign to turn off the power and check again.
Enjoy Your New Pendant Light
Your pendant light with chain is now ready to use. It adds style and light to your room. You can adjust the chain length anytime for the perfect look.
Troubleshooting Common Issues
Installing a pendant light with a chain can sometimes lead to small problems. These issues can stop the light from working or hanging properly. Fixing these problems is easier than it seems. This guide helps you solve common troubles quickly. Keep your tools ready and follow each step carefully.
Checking The Electrical Connection
Loose wires cause the light not to turn on. Turn off the power before touching wires. Make sure all wires are connected tightly. Match the colors correctly: black to black, white to white. Use wire nuts to secure the connections. Test the light after fixing the wires.
Adjusting The Chain Length
The chain may be too long or too short. This affects how the light hangs. Use pliers to open chain links carefully. Remove or add links to get the right length. Keep the light hanging evenly and straight. Measure twice before cutting the chain.
Fixing A Wobbly Pendant Light
A shaky light can be unsafe and annoying. Check if the mounting bracket is tight. Tighten all screws on the bracket and fixture. Make sure the ceiling box is secure. Use a level to ensure the light hangs straight. Tighten loose parts to stop wobbling.
Replacing A Burnt-out Bulb
A light that won’t shine may need a new bulb. Turn off the power before changing the bulb. Remove the old bulb carefully. Check the bulb type and wattage on the fixture. Install a new bulb that matches the recommended size. Test the light after replacement.
Frequently Asked Questions
How Do I Safely Install A Pendant Light With A Chain?
Turn off the power at the circuit breaker before starting. Use a voltage tester to confirm no current. Securely mount the ceiling bracket, then hang the pendant light on the chain. Connect wires properly and test the light before finishing.
What Tools Are Needed For Pendant Light Installation?
You need a screwdriver, wire stripper, voltage tester, pliers, and a ladder. A drill may be required for mounting holes. Having these tools ready ensures a smooth, safe installation process.
How Do I Adjust The Chain Length Of A Pendant Light?
To adjust, remove links from the chain to shorten it. Use pliers to open and close the links carefully. Ensure the pendant hangs at your desired height and remains secure.
Can I Install A Pendant Light Without An Electrical Box?
No, an electrical box is necessary for safe installation. It supports the fixture and protects wiring connections. Always install or use an existing ceiling box before hanging a pendant light.
Conclusion
Installing a pendant light with a chain is simple and practical. Follow the steps carefully for a safe setup. Always turn off the power before starting work. Check that the chain length fits your space well. Secure all connections tightly to avoid problems later.
A well-installed light adds style and brightens your room. Take your time and enjoy the process. You can now create a cozy, inviting atmosphere easily. This project saves money and improves your home. Ready to light up your space?