Are you ready to add style and brightness to your room with a pendant light but unsure how to wire it safely? Wiring a pendant light might seem tricky, but with the right steps, you can do it yourself without stress.
In this guide, you’ll discover simple, clear instructions that make the process easy to follow—even if you’ve never handled electrical work before. By the end, you’ll have the confidence to install your pendant light quickly and securely, transforming your space with a beautiful new glow.
Keep reading to learn exactly how to wire a pendant light the right way.

Credit: diy.stackexchange.com
Tools And Materials Needed
Wiring a pendant light needs the right tools and materials. This ensures safety and a smooth installation. Having these items ready saves time and avoids frustration.
Below is a list of the essential tools and materials you will need for the job.
Basic Electrical Tools
You need some common tools for electrical work. These include a screwdriver, wire stripper, and voltage tester. A pair of needle-nose pliers helps with bending wires. Electrical tape is also important for securing connections.
Safety Gear
Safety comes first. Wear insulated gloves to protect your hands. Safety glasses shield your eyes from dust and debris. A sturdy ladder helps you reach the ceiling safely.
Materials For Pendant Light Installation
Get the pendant light fixture with its mounting bracket. Use wire nuts to join wires securely. You will also need electrical cable, usually 14/2 or 12/2 gauge. A ceiling box is required if one is not already installed.
Additional Items
A circuit tester verifies power is off before starting. A drill with bits helps if you need new holes. Wire connectors and a utility knife are handy for trimming and connecting wires.
Safety Precautions
Safety is the top priority when wiring a pendant light. Working with electricity can be dangerous. Taking the right steps keeps you safe and prevents accidents. Follow these safety rules before starting your project.
Turn Off Power At The Circuit Breaker
Always switch off the power from the circuit breaker. This stops electricity flow to the wires you will work on. Use a voltage tester to double-check that power is off. Never trust the switch alone.
Use Proper Tools And Equipment
Choose tools made for electrical work. Insulated screwdrivers and wire strippers protect you from shocks. Avoid using damaged or worn-out tools. Good tools make the job safer and easier.
Wear Safety Gear
Put on safety gloves and goggles. Gloves protect your hands from cuts and shocks. Goggles shield your eyes from dust and wire bits. Safety gear lowers the risk of injury.
Check For Damaged Wires
Inspect all wires before connecting them. Look for cracks, frays, or exposed copper. Replace any damaged wire to avoid shorts or fires. Safe wiring means a safer home.
Follow Local Electrical Codes
Know the rules for electrical work in your area. Local codes ensure wiring is safe and reliable. Use the correct wire size and connectors. Proper compliance avoids future hazards.
Work In A Dry Environment
Keep the workspace dry and clean. Water and electricity do not mix. Avoid wiring in wet or damp places. A dry area reduces the chance of electric shock.
Turning Off Power
Turning off the power is the first and most important step when wiring a pendant light. It keeps you safe from electric shocks and accidents. Always make sure the electricity is completely off before you start any work on your light fixture.
Many people skip this step and risk serious injury. Taking a moment to switch off the power can save you from harm. It also protects your tools and the wiring from damage.
Locate The Circuit Breaker
Find the main circuit breaker panel in your home. This is usually in the basement, garage, or utility room. Look for the breaker that controls the room where you will install the pendant light.
Switch Off The Correct Breaker
Flip the switch for the correct circuit breaker to the off position. This stops electricity from flowing to the light fixture. Double-check that you turned off the right breaker to avoid any risks.
Test The Power Is Off
Use a voltage tester or a simple light switch test. Turn on the light switch to see if the bulb lights up. No light means the power is off and it is safe to proceed.
Inform Others
Tell everyone in the house that you turned off the power. This prevents someone from turning it back on by mistake. Safety always comes first during electrical work.
Credit: www.jim-lawrence.co.uk
Removing The Old Fixture
Removing the old fixture is the first step in wiring a new pendant light. This part needs care and attention. Safety comes first. Make sure the power is off before touching any wires. This step ensures you avoid electric shocks and accidents.
Take your time to remove the old fixture gently. Damaging wires or the ceiling can cause extra work. Follow these steps for a smooth removal process.
Turn Off The Power
Find the circuit breaker that controls the light. Switch it off to cut power. Double-check by flipping the light switch. The light should not turn on. Use a voltage tester on the wires to be sure.
Remove The Light Bulbs And Shades
Take out any bulbs from the fixture. Remove any glass shades or covers carefully. Set them aside in a safe place. This clears space to access screws and wiring.
Unscrew The Fixture
Look for screws or nuts holding the fixture. Use a screwdriver to loosen them. Support the fixture with one hand while unscrewing. Slowly lower the fixture from the ceiling.
Disconnect The Wiring
Locate the wire connectors or wire nuts. Unscrew them to free the wires. Separate the fixture wires from the house wires. Remember which wires connect together. You may take a photo for reference.
Remove The Mounting Bracket
The old fixture may have a mounting bracket. Unscrew and take it down if needed. This clears the area for the new pendant light installation.
Preparing The Pendant Light
Preparing the pendant light is the first step before installation. This process ensures the light fixture is ready and safe to use. Proper preparation helps avoid mistakes and saves time during wiring. It also allows a cleaner, professional look for the final setup.
Follow simple steps to prepare the pendant light. These steps include assembling the fixture and adjusting the cord length. Both tasks are important to fit your space and style perfectly.
Assembling The Fixture
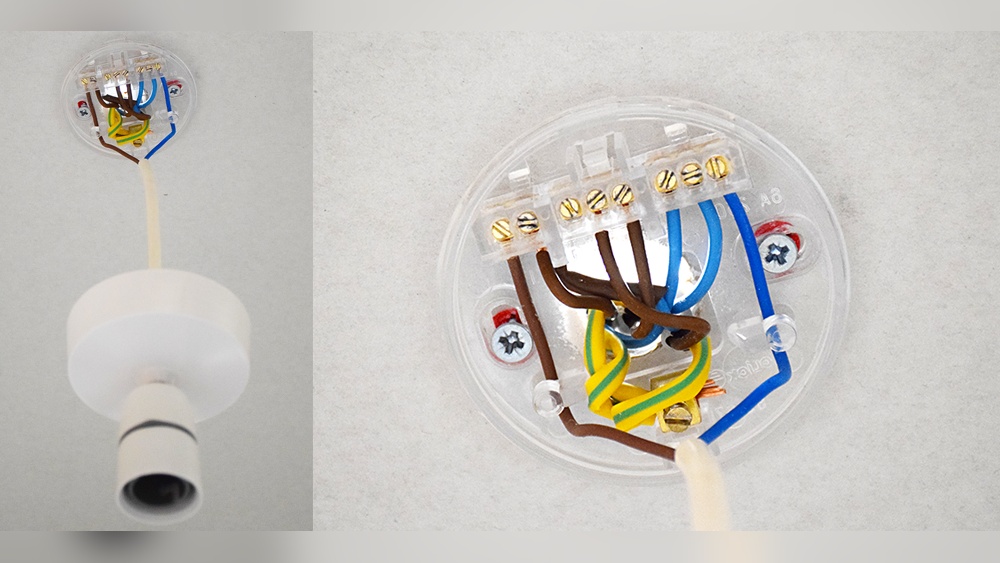
Start by unpacking all parts carefully. Check that every piece is included and undamaged. Attach the canopy to the mounting bracket if required. Secure the socket holder to the fixture body. Make sure screws are tight but avoid overtightening. Attach any decorative parts according to the instructions. This step shapes the fixture and prepares it for wiring.
Adjusting The Cord Length
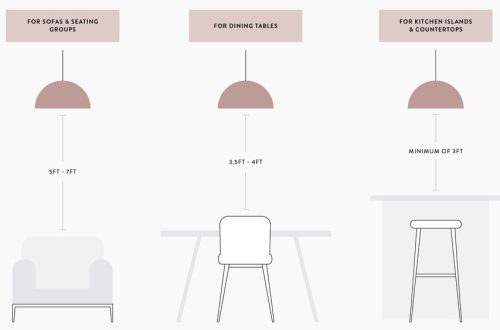
Decide the best hanging height for your room. Measure from the ceiling to where the light will hang. Pull the cord through the canopy to shorten or lengthen it. Cut the excess cord only if necessary. Strip the cord ends to expose the wires for connection. Keep the cord straight and avoid twisting. Proper cord length improves both safety and appearance.
Credit: www.youtube.com
Identifying Wires
Before wiring a pendant light, identifying the wires is key. Each wire has a role in the electrical system. Knowing which is which helps avoid mistakes. It also keeps you safe during installation.
Live Wire
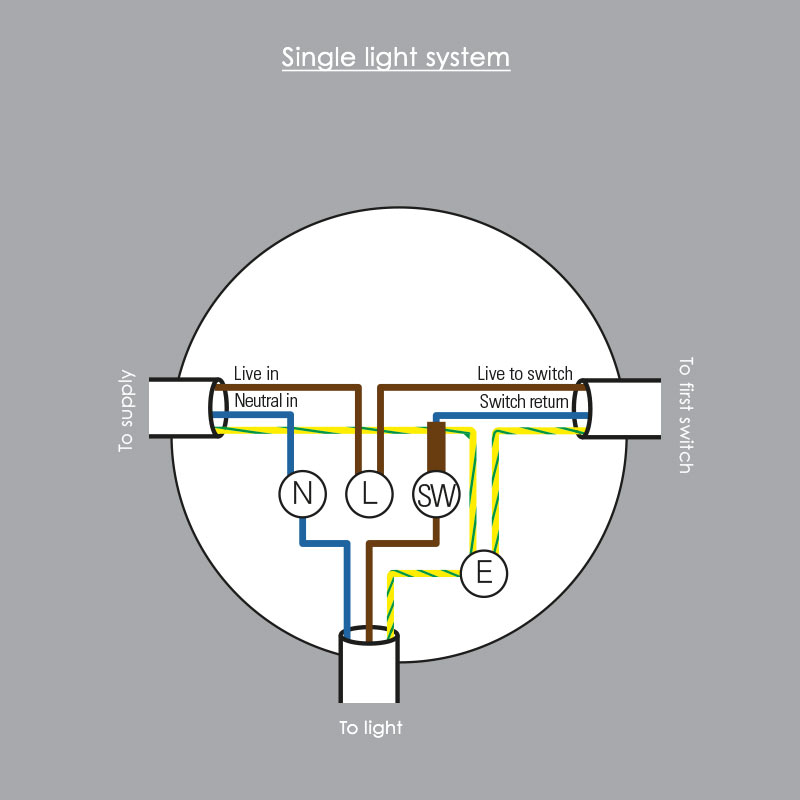
The live wire carries electricity from the power source. It is often colored brown or red. This wire is dangerous if touched. Always handle the live wire with care. It connects to the switch or the light fixture.
Neutral Wire
The neutral wire completes the electrical circuit. It usually has a blue or black color. This wire carries current back to the power source. It helps the light work properly. Connect the neutral wire to the matching terminal in the fixture.
Ground Wire
The ground wire is a safety feature. It is often green or bare copper. This wire prevents electric shocks by directing electricity away. It connects to the metal parts of the light or the electrical box. Always attach the ground wire to ensure safety.
Connecting The Wires
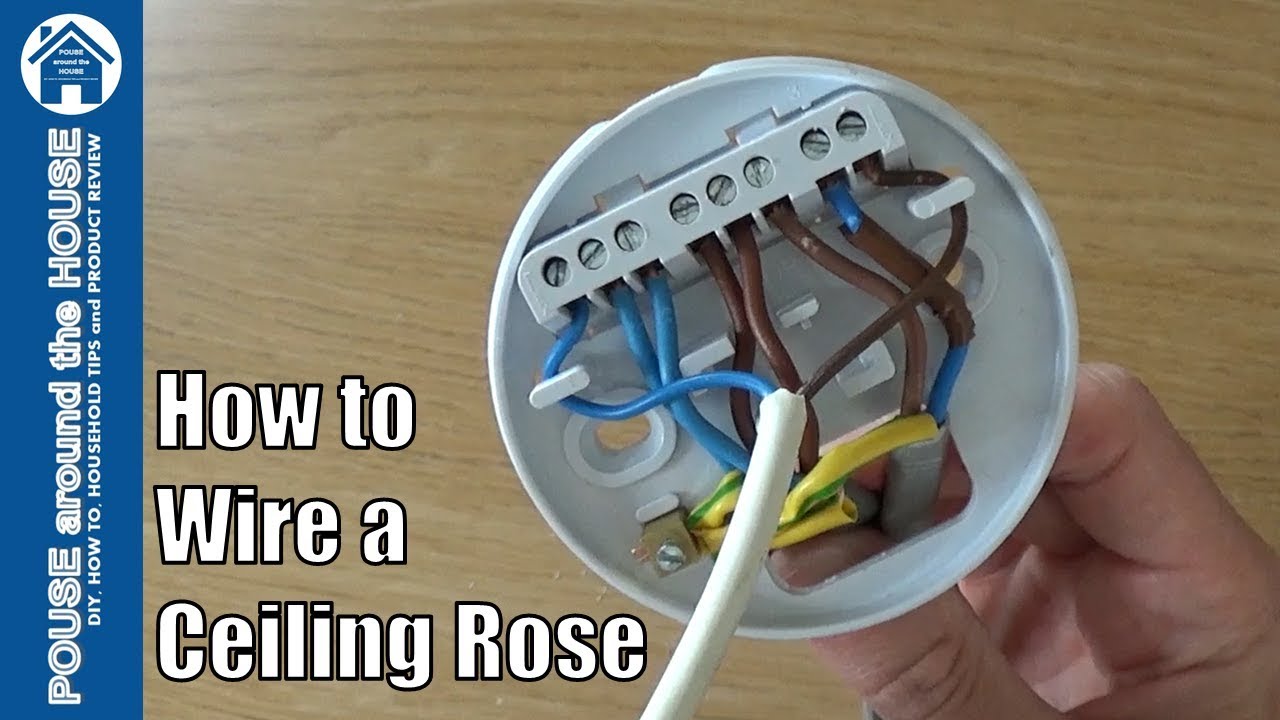
Connecting the wires is a key step in wiring a pendant light. This process ensures the light works safely and correctly. Understanding how to join the wires prevents electrical problems. Follow each step carefully to make a strong and secure connection.
Matching Wire Colors
Identify the wires by their colors. Usually, black or red wires are live wires. White wires are neutral. Green or bare wires are ground. Match the pendant light wires to the house wires by color. This step is crucial for safe operation.
Do not twist wires of different colors together. Only join wires that have the same color code. This keeps the electrical flow correct and avoids short circuits.
Securing Wire Connectors
Use wire connectors to join wires firmly. Twist the wires together before placing a connector on them. Turn the connector clockwise until it is tight.
Make sure no bare wire shows outside the connector. A loose connection can cause sparks or a fire. Tug gently on each wire to check if it stays in place.
Mounting The Pendant Light
Mounting the pendant light is a key step in your installation. It secures the light fixture to the ceiling. A proper mount ensures safety and a neat look. This process requires careful handling and the right tools. Take your time to avoid mistakes.
Turn Off The Power
Start by switching off the power at the circuit breaker. Confirm the power is off by testing the wires. This prevents electric shock during mounting. Safety first, always.
Attach The Mounting Bracket
Locate the electrical box in the ceiling. Fix the mounting bracket to the box using screws. Ensure the bracket is tight and stable. This bracket holds the pendant light firmly.
Connect The Wires
Match the wires from the pendant to the house wires. Usually, black to black, white to white, and green or copper to ground. Twist the wire ends together and secure with wire nuts. Double-check connections for a solid fit.
Secure The Pendant Light
Lift the pendant light and align it with the mounting bracket. Use screws or clips to hold it in place. Make sure the fixture is straight and steady. Tighten all fasteners properly.
Adjust The Pendant Height
Set the pendant cord to your preferred length. Pull the cord through the canopy until it feels right. Lock the cord in place with the fixture’s mechanism. Check the height matches your room’s style.
Testing The Connection
Testing the connection is a key step after wiring your pendant light. It ensures the light works safely and correctly. This step helps avoid electrical problems and keeps your home safe.
Check each wire and connection carefully. Make sure nothing is loose or touching the wrong parts. A good test saves time and effort later.
Turn Off The Power
Always switch off the power before testing. Use the circuit breaker to cut power. This protects you from electric shock.
Use A Voltage Tester
Use a voltage tester to check the wires. This tool shows if electricity flows correctly. It helps find wiring errors fast.
Check The Light Switch
Turn the light switch on and off. The pendant light should respond immediately. If it does not, check your wiring again.
Look For Loose Connections
Loose wires cause flickering or no light. Tighten all wire nuts and screws. Secure connections stop future electrical issues.
Test The Ground Wire
Make sure the ground wire is connected. It prevents electric shock and damage. Use a tester to confirm grounding works.
Inspect The Bulb
Check the bulb is properly screwed in. Use the correct type of bulb for your fixture. A bad bulb can look like a wiring problem.
Troubleshooting Common Issues
Troubleshooting pendant light wiring issues can save time and frustration. Many problems arise from simple mistakes or overlooked details. Understanding common issues helps fix them quickly. This section covers frequent problems and clear solutions.
Check Power Supply
Start by ensuring the power is off. Use a voltage tester to confirm no electricity flows. Sometimes the circuit breaker trips or a fuse blows. Reset the breaker or replace the fuse if needed.
Inspect Wire Connections
Loose or wrong connections often cause lights not to work. Double-check that all wires are twisted tightly together. Match wire colors correctly: black to black, white to white, and green or copper to ground. Use wire nuts to secure connections firmly.
Test The Light Bulb
A burnt-out bulb can cause confusion. Remove the bulb and test it in another socket. Replace it if it does not light up. Use bulbs with the correct wattage for your fixture.
Examine The Switch
Faulty switches can stop the light from turning on. Test the switch by turning it on and off several times. Replace the switch if it feels loose or does not click properly. Use a continuity tester for more accuracy.
Check For Damaged Wires
Worn or damaged wires can cause shorts or no power. Look for frayed or cut wires inside the fixture or box. Replace damaged wires immediately for safety. Call an electrician if unsure how to handle wire damage.
Frequently Asked Questions
How Do I Safely Wire A Pendant Light?
Turn off power at the circuit breaker before starting. Use a voltage tester to confirm no electricity. Connect matching wires: black to black (hot), white to white (neutral), and green or bare copper to ground. Secure connections with wire nuts and mount the fixture properly.
What Tools Are Needed To Wire A Pendant Light?
You need a screwdriver, wire stripper, voltage tester, wire nuts, and electrical tape. These tools help safely strip, connect, and secure wires. Having the right tools ensures a smooth and safe installation process.
Can I Wire A Pendant Light Without Professional Help?
Yes, if you follow safety steps and local codes. Turn off power, use correct tools, and follow wiring instructions. If unsure, consult a professional to avoid hazards or code violations.
How Do I Identify The Wires For A Pendant Light?
Typically, black or red wires are hot, white is neutral, and green or bare copper is ground. Use a voltage tester to verify. Proper identification prevents incorrect wiring and electrical issues.
Conclusion
Wiring a pendant light can be simple and safe. Follow each step carefully and take your time. Always turn off power before starting any electrical work. Use the right tools and check connections twice. A properly wired light adds style and function to your space.
Don’t rush—safety matters most. Enjoy your new lighting once finished. Feel confident with your handiwork and keep this guide for future projects. Small efforts bring great results.