Are you tired of your old fluorescent light fixture and ready to give your space a fresh, stylish update? Replacing it with a pendant light can instantly transform the look and feel of your room.
But if you’re unsure where to start or worried about the steps involved, don’t worry—you’re in the right place. This guide will walk you through the process in simple, clear steps so you can confidently make the switch. By the end, you’ll know exactly how to replace your fluorescent fixture with a beautiful pendant light that fits your style and brightens your home.
Keep reading to discover how easy and rewarding this upgrade can be!
Tools And Materials Needed
Replacing a fluorescent light fixture with a pendant light needs the right tools and materials. Having everything ready makes the job easier and safer. This section lists all the items you will need to complete the task smoothly.
Basic Hand Tools
Start with simple hand tools. A screwdriver set is essential for removing screws and securing the new fixture. A pair of wire strippers helps prepare the wires for connection. Use needle-nose pliers to twist wires together. A voltage tester ensures power is off before working on wires.
Electrical Materials
You will need wire connectors to join wires safely. Electrical tape helps secure connections. Purchase a new pendant light fixture that fits your room style and ceiling type. Check if the fixture includes mounting hardware and instructions.
Safety Equipment
Wear safety goggles to protect your eyes from dust and debris. Use insulated gloves for extra protection against electric shock. A stable ladder or step stool is necessary to reach the ceiling comfortably.
Additional Supplies
Have a flashlight or work light handy for better visibility. Keep a drop cloth or old sheet on the floor to catch debris. A pencil can mark drill points or wire locations.
Safety Precautions
Safety is the most important part of replacing a fluorescent light fixture with a pendant. Working with electricity can be dangerous. Taking the right precautions keeps you safe and prevents damage to your home. Follow these key safety steps before starting your project.
Turn Off The Power
Always switch off the power at the circuit breaker. Do not rely on the light switch alone. Use a voltage tester to make sure the wires have no electricity.
Use Proper Tools
Choose tools designed for electrical work. Insulated screwdrivers and wire strippers reduce the risk of shock. Keep tools organized and within reach.
Wear Safety Gear
Wear safety glasses to protect your eyes from dust and debris. Use gloves for better grip and to avoid cuts. Dress in clothes that cover your arms and legs.
Check For Damaged Wires
Inspect all wires before you start. Look for cracks, frays, or exposed metal. Replace any damaged wires to avoid fire hazards.
Secure The Fixture Properly
Make sure the new pendant is hung firmly. Use the right mounting bracket and screws. A loose fixture can fall and cause injury.
Turning Off Power
Turning off the power is the first step when replacing a fluorescent light fixture with a pendant. It keeps you safe from electric shocks. Always make sure no electricity flows to the fixture before starting any work.
Safety is the top priority. Electricity can cause serious injury or worse. Never skip this step.
Locate The Circuit Breaker
Find your home’s circuit breaker panel. It is usually in the basement, garage, or utility room. Look for the switch that controls the light fixture’s power. The breaker may be labeled for easy identification.
Switch Off The Correct Breaker
Flip the breaker switch to the OFF position. This stops electricity to the light fixture. Double-check by turning on the light switch. The light should not turn on.
Use A Voltage Tester
Use a voltage tester to confirm no power is present. Touch the tester to the wires in the fixture box. The tester should show zero voltage. This ensures it is safe to work.
Inform Others In The House
Let everyone in your home know you are working on the light. This prevents someone from turning the power back on by mistake. Place a note on the breaker panel as a reminder.
Removing The Fluorescent Fixture
Removing the fluorescent light fixture is the first step in installing a pendant light. This process needs care to avoid damage or electrical risks. Follow simple steps to safely take down the old fixture.
Detaching The Cover
Start by turning off the power at the breaker box. The cover protects the bulbs and wiring. Gently remove it by sliding or unscrewing. Set the cover aside carefully to avoid breaking it.
Disconnecting The Wiring
Use a voltage tester to confirm the power is off. Unscrew the wire nuts connecting the fixture to the house wires. Separate the fixture wires from the ceiling wires. Keep the wires apart to prevent contact.
Removing Mounting Hardware
Locate the screws or brackets holding the fixture in place. Use a screwdriver to remove them. Hold the fixture firmly while loosening the screws. Lower the fixture and take it down slowly.
Preparing The Ceiling For Pendant
Preparing the ceiling for a pendant light is a key step in the replacement process. This step ensures the fixture is safe and stable. Proper preparation helps avoid future problems like loose fixtures or electrical issues.
Focus first on checking the electrical box. Then secure the mounting bracket firmly. These actions set a solid foundation for your new pendant light.
Checking Electrical Box
Start by turning off the power at the breaker. Use a voltage tester to confirm no electricity flows. Remove the old fixture carefully and inspect the box.
The electrical box must be strong enough to hold the pendant light. It should be metal or a sturdy plastic. If the box is loose or damaged, replace it. A secure box prevents the fixture from falling.
Check the box size too. Pendants may require a bigger box than fluorescent fixtures. Make sure there is enough space for wiring and connections.
Securing Mounting Bracket
The mounting bracket connects the pendant to the ceiling. Align it with the electrical box holes. Use screws to attach the bracket tightly.
Double-check that the bracket does not move. A loose bracket causes the fixture to wobble or fall. Use a level to keep the bracket straight.
Follow the pendant light instructions for mounting bracket installation. Each model may have specific requirements. Proper bracket installation ensures a safe and attractive fixture.
Wiring The Pendant Light
Wiring the pendant light is a key step in replacing your fluorescent fixture. It ensures your new light works safely and properly. Taking time and care during wiring prevents electrical problems.
Understanding the wires and how they connect helps you avoid mistakes. Use the correct tools and follow safety rules. Turn off power at the breaker before starting to work on wires.
Matching Wire Colors
Identify the wires in your ceiling and pendant light. Usually, black or red wires carry power. White wires are neutral. Green or bare wires are ground. Match each wire color from the pendant to the same color in the ceiling.
Connecting the wrong wires can cause shorts or shocks. Double-check colors and labels on wires. If colors differ, use a voltage tester or consult instructions. Proper color matching is crucial for safety and function.
Using Wire Connectors
Wire connectors join wires securely and safely. Twist the wires together, then screw on a wire connector. Make sure no bare wire shows outside the connector. Use the right size connector for the wires you have.
Good connections prevent wires from loosening and causing sparks. Tug gently on wires to test the connection. Cover connections with electrical tape if needed. Proper connectors keep your pendant light stable and safe.
Mounting The Pendant Fixture
Mounting the pendant fixture is a key step in replacing a fluorescent light fixture. This part ensures your new light hangs safely and looks great. Proper mounting provides stability and style to your space.
Attaching The Fixture Base
Start by turning off the power at the circuit breaker. Use a voltage tester to check the wires. Attach the mounting bracket to the electrical box. Connect the fixture wires to the house wires by matching colors. Secure connections with wire nuts. Push the wires gently into the box. Then, screw the fixture base onto the bracket firmly. Make sure the base is flush and tight against the ceiling.
Adjusting Pendant Height
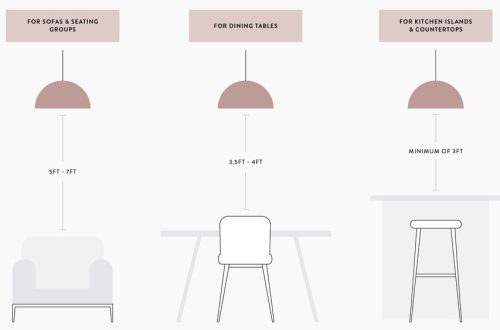
Decide the ideal height for your pendant. Most pendants hang about 30-36 inches above a table. Adjust the cord or chain length before securing it. Shorten or lengthen by loosening the set screw. Pull the wire through to the desired length. Tighten the screw to lock the height. Check the pendant hangs straight and even. This step gives your room a balanced, polished look.
Testing The New Light
Testing the new light is an important step after replacing a fluorescent fixture with a pendant. It ensures the fixture works correctly and safely. Proper testing helps avoid electrical issues and guarantees the new light looks great.
Turn The Power Back On
Start by switching the main power back on. This restores electricity to the light fixture. Make sure the wall switch for the light is off before turning on the main power.
Use The Wall Switch To Test
Flip the wall switch to the “on” position. Check if the pendant light turns on immediately. If it does, the wiring and fixture are connected properly.
Check For Flickering Or Dimness
Observe the light for flickering or dim spots. Flickering may indicate loose wiring or a bad bulb. Dim light could mean the bulb wattage is too low or a connection issue.
Inspect The Fixture For Heat
After the light stays on for a few minutes, touch the fixture carefully. It should be warm but not too hot. Excess heat may signal an electrical problem or wrong bulb type.
Test The Switch Functionality
Turn the wall switch on and off several times. The pendant light should respond each time. If the light fails to switch properly, check the connections again.
Troubleshooting Common Issues
Replacing a fluorescent light fixture with a pendant can brighten up your space beautifully. Sometimes, issues arise during installation that slow down progress. Troubleshooting common problems helps you fix these quickly. This saves time and avoids frustration.
Below are common issues and simple ways to solve them. Keep these tips handy during your project.
Check For Power Supply Problems
Power issues are a top cause of lighting failure. Confirm the circuit breaker is on. Use a voltage tester to check if power reaches the fixture wires. No power means a wiring or breaker problem. Fix these first before continuing.
Ensure Proper Wiring Connections
Loose or wrong wire connections cause flickering or no light. Match wires by color: black to black, white to white, and green or bare copper to ground. Tighten wire nuts securely. Double-check connections before turning power back on.
Verify Compatibility Of Pendant Fixture
Not all pendants work with all wiring setups. Check if the new pendant fits your ceiling box size and wiring type. Confirm the fixture voltage matches your home’s voltage. Using incompatible parts leads to failure or hazards.
Test The Light Bulb
A simple but often missed step. Use a known good bulb in the pendant socket. Sometimes bulbs are faulty or not the right type for the fixture. Replace the bulb if it does not light up.
Secure The Fixture Properly
A loose fixture can cause noise or poor electrical contact. Tighten all mounting screws firmly. Ensure the pendant hangs evenly and does not sway. This also protects the wiring connections inside.
Frequently Asked Questions
How Do I Safely Remove A Fluorescent Light Fixture?
Turn off the power at the breaker before starting. Use a voltage tester to confirm no electricity flows. Unscrew the fixture carefully and disconnect the wiring. Handle bulbs and parts gently to avoid breakage or injury.
What Tools Are Needed To Install A Pendant Light?
You will need a screwdriver, wire stripper, voltage tester, and possibly pliers. A ladder or step stool helps reach the ceiling. Some installations may require a drill or mounting bracket, depending on the fixture type.
Can I Use The Existing Wiring For Pendant Lights?
Yes, existing wiring can often be reused if it’s in good condition. Ensure the wires match the new fixture’s requirements. If unsure, consult a professional electrician to verify compatibility and safety.
How Do I Choose The Right Pendant Light Size?
Consider the room size and ceiling height. A pendant should be proportionate and not overpower the space. Measure the area and select a fixture that complements the room’s style and lighting needs.
Conclusion
Replacing a fluorescent light fixture with a pendant can brighten your space. It adds style and a modern look to any room. Remember to turn off the power before you start the work. Follow each step carefully to stay safe and get good results.
With some patience, you can complete this project yourself. Enjoy the new light and the fresh feel it brings to your home. Simple changes can make a big difference. Give your room a cozy and updated look today.